 Yesterday, we sewed the lining into our jackets. Today we’ll finish it up by sewing the lining to the cuffs. The pattern instructions call for slipstitching, but we can even do that part by machine with a little trick. I’ll show you how to sew the lining into our jacket cuffs completely by machine!
If you skipped ahead and slipstitched your cuffs, you can still use this technique on other lined jackets. So there’s still something to learn potentially. Unless you’re already familiar with this method. (Sometimes I forget which methods are commonly use and which are methods I learned in school and have used ever since.)
Want to catch up on previous Sew-Along posts? Click the links below to read more:
- Minoru Sew-Along #1: Let’s Get Started!
- Minoru Sew-Along #2: Sewing Sleeves and Topstitching Tips
- Minoru Sew-Along #3: Gathering!
- Minoru Sew-Along #4: Sewing the Hood
- Minoru Sew-Along #5: The Secret Hood Zipper
- Minoru Sew-Along #6: Sewing the Hood to the Collar (Quick Post!)
- Minoru Sew-Along #7: We Finally Get to Pull the Gathers!
- Adding Pockets to the Minoru Jacket: Amy’s Awesome Tutorial
- Minoru Sew-Along #8: Front Plackets, Front Zipper
- Minoru Sew-Along #9: All About Cuffs
- Minoru Sew-Along #10: Little Hidden Pockets
- Minoru Sew-Along #11: A Useful Hanging Loop
- Minoru Sew-Along #12: Sewing the Lining
- Minoru Sew-Along #13: Putting It All Together
In the sewing instructions, it asks you to slipstitch the cuffs to the lining. And we could do that, but I have another way! We can finish the cuffs by machine instead. Here’s how!
First, poke the sleeve lining into the jacket sleeve. I’ve pulled my lining out, to show you that it’s been inserted into the jacket sleeve. You’ll want to reach in and pull yours out a little too, to get ready for the next step. Make sure your lining is hanging straight, not twisted inside the jacket.
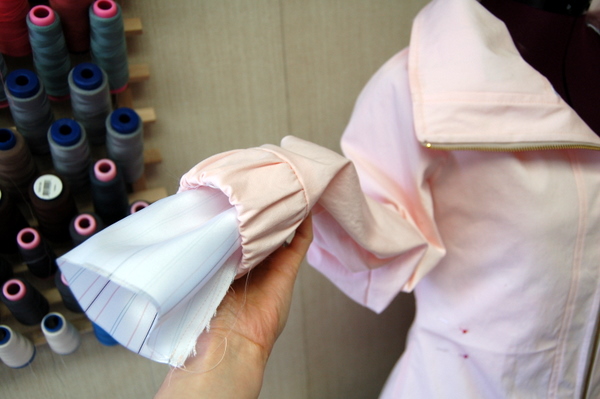
Now, we’ll find our sleeve seam, and turn under the seam allowance. Our seam allowance is 5/8″ or 1.5cm on the hem of the sleeve. No need to press, we’ll just hold it in our hands for now. We’ll be pinning it down shortly!
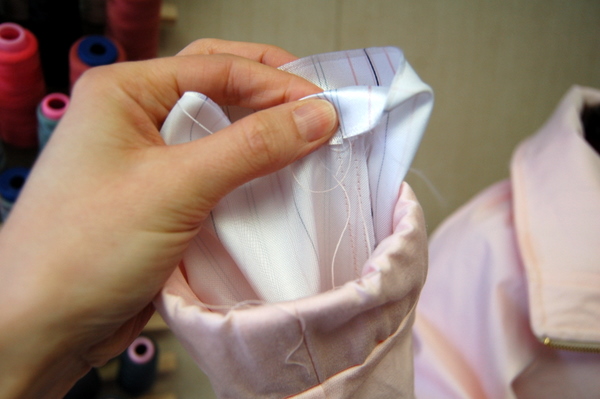
Now, we’ll pin that folded edge of the lining on the jacket cuff, lining up the lining seam with the cuff seam.
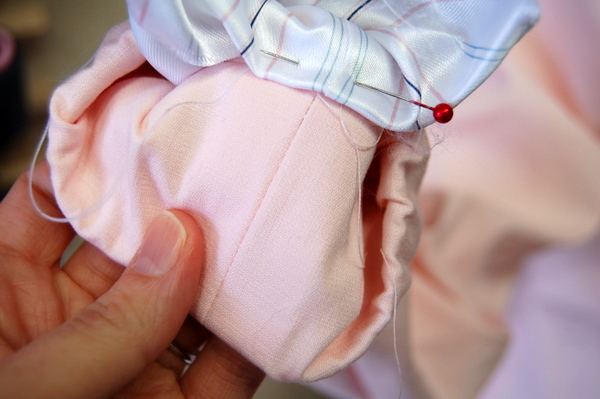
This pinning part is the most important step. It’s what allows us to sew the cuffs in this way! I remember in school, we’d think we could line up our sleeve and sleeve lining without the pinning part, and often end up with a long joined sleeve that was impossible to turn right-side-out. Trust me, it happens! If we’ve done the pinning right, the rest is fairly straightforward.
Reach up through the open hem of the jacket, and pull the pinned cuffs out. This is a really weird-looking photo, but it’s what yours will look like too if you try it!
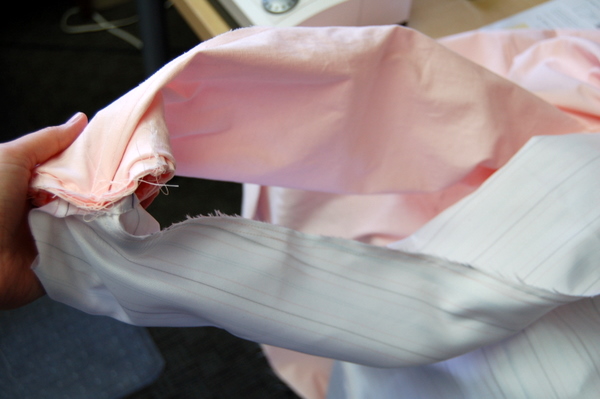
Now, we’ll repin the lining to the cuff, and get ready to sew it in place. We have it pinned like this:
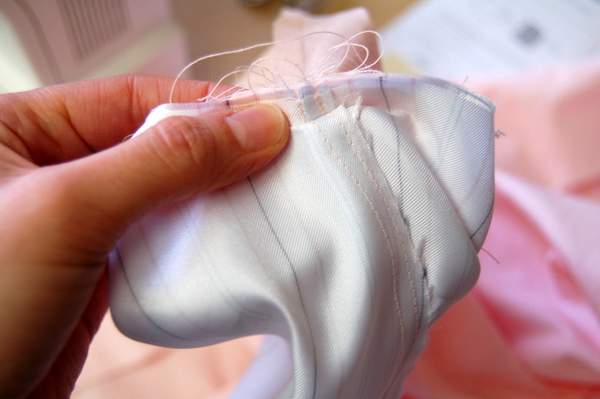
Remove the pin, and re-align the lining edge with the cuff seam allowance without shifting the lining from its original position. You just want to get rid of that fold, while keeping the seams aligned.
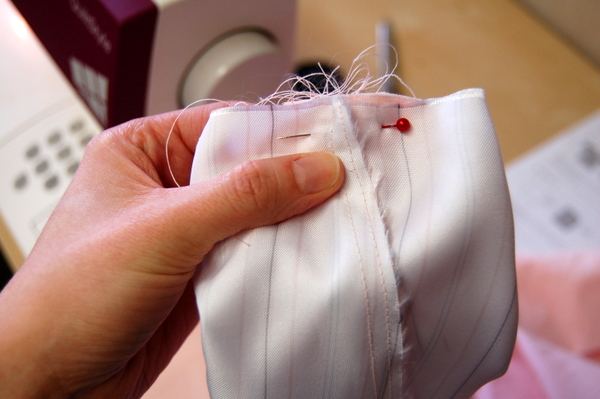
Pin all around the cuff and lining.
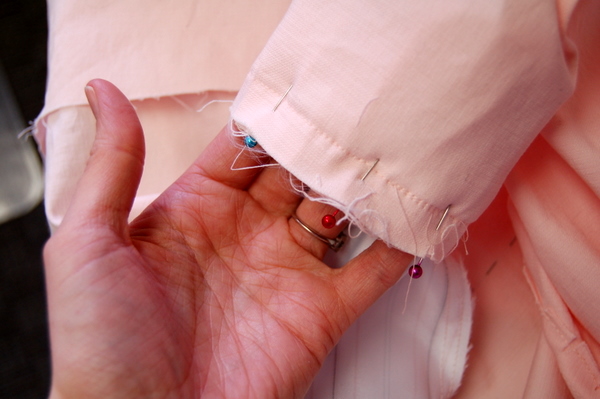
I’ll admit, this next part is the most difficult. Especially if your cuffs are narrow. If you can get through this last step, we’re done!
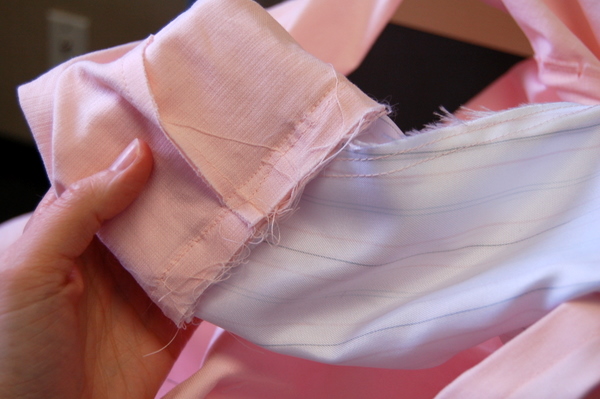
Sew the cuff lining to the cuff seam. (None of the photos I took while actually sewing turned out, or rather, you couldn’t figure out what was happening. So I settled for an after-photo!)
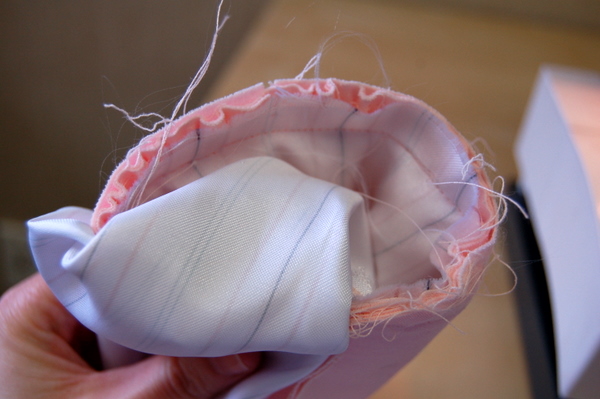
Here’s what it looks like, before turning…
and here it is, after turning right side out!
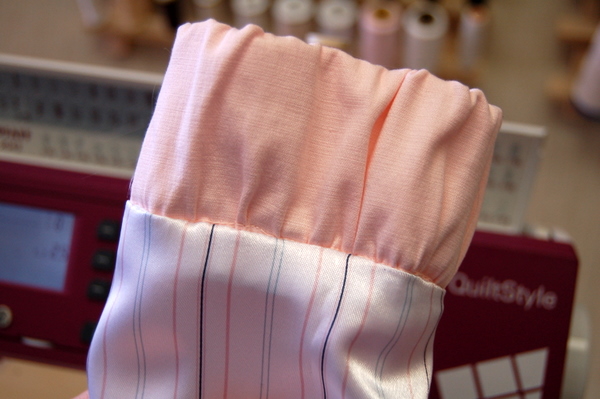
Repeat for the second cuff.
If this method is too hard to follow, or it’s just too tight to stitch around the cuff on your particular sewing machine, you can follow the original directions and slipstitch. I wanted to show you a new method as an alternative to slipstitching, and also introduce a cuff finishing method that might be new to you! Is it faster? Perhaps. Is it more secure and stronger? I think so.
Have you seen this machine-stitched cuff method before? Which method are you going to use on your coat?

I am so glad I waited for this post! I love learning all of these tips and tricks from your sew alongs. My minoru is looking fantastic and I am so proud if it – much thanks is owed to you Tasia.
Ah, you’re welcome! I’m full of tips and tricks :) and I love showing people an easier or at least different way to do something! I’m so glad your Minoru is looking great! I can’t wait to see everyone’s jackets when we’re all done here.
I actually have used this before. I didn’t know about it being an actual method. I just kind of figured it out (it’s like reinventing the bicycle) when I was too lazy to do it by hand on a jacket.
Ah nice! Pretty cool that you figured it out on your own. It’s an actual method used in production sewing, because factories are never going to hand-sew things unless there’s no way around it.
Great post! I think this method was called for in an Ottobre baby pattern I made recently. However, it wasn’t explained very well and I ended up with a mess, rather than a neatly lined cuff. I’m pretty sure this is what they had in mind though.
It’s hard to explain without a ton of photos! It’s much better if you can see it happening step-by-step. Glad this post helped clear up the mystery!
Huh, very cool method! Thanks for posting this! :-)
You’re welcome, glad it was useful! :)
Have used this method for many, many years. It is standard for rtw, and standard practice for shortening sleeves when altering rtw. Not usually included in pattern instructions, don’t know why. Makes bagging a lining completely by machine possible. Although, I greatly dislike the look of the final lining seam closure done by machine: I prefer to use a slip stitch or mattress stitch to close up the lining. It helps to be able to visualize things upside down and backwards, but you’re absolutely right that pre-pinning is a necessity!
It’s probably not included in pattern instructions because it’s hard to explain quickly. They’d need a lot of diagrams to make sure people didn’t get confused! I like being able to choose machine-stitching or hand-stitching depending on the project. And yup, that pinning step is super important!
Wow–I am not participating in the sew-along but I am still reading all the posts closely, both for information to use later on and to help decide whether or not I want to sew the pattern someday. I have got to say that this is the first step I really truly have not been able to get my head around, which makes me want to promote the Minoru way up on my to-sew list–above patterns I already own and have started collecting fabric for! I am such a construction geek (and a current design student) and I once made crazy tubes on a jacket sleeve.
Well, thanks! I’m so glad that people who aren’t sewing along are still getting something from these posts. :)
ps. Crazy tubes, love it!
Will this method create a jump pleat?
No, not on this jacket. If you were to use this same method on a sleeve lining that *was* drafted with a pleat allowance, it would work! I’ve done it before – you press the hem first, hem it lower down so you’re still able to grab the seam allowance for sewing to the lining, follow these steps in today’s post, and then tack the sleeve hem to the sleeve seam allowances. That way, everything looks just like it would if you’d hand-sewed it, but all done by machine!
As usual, your tutorials are fantastic and provide alternatives that advance the skills of beginners and are great reminders for more experienced sewers. I like this method for light weight jackets and coats, finishes very nicely.
Thank you! It’s nice to be able to share some of the techniques I use that aren’t always in pattern instructions. Everything is easier to explain when you have room for tons of photos!
I love figuring out how to get into all the nooks and crannies like this! I can’t wait to try this.
I’m glad you enjoyed the tip! :) I also like finding easier ways to do the same thing, more time to sew the next project!
I actually stumbled upon this method before , and without actually realizing it was a method, have always done this. I’ve always thought I was just lazy and looking for an easy out. I’m glad you think it is a viable method to use. I’m going to try slipstitiching mine this time – just for a change. When I get that far that is, I have my fabric but haven’t even cut out the pattern yet.
Yup, it’s a real method. Often things that are faster and easier can seem lazy, or like shortcuts, but sometimes there truly is an easier and faster way! You’ve got lots of time to decide which method is best for your project.
I like this method because the jacket is going to get lots of wear and machine stitching makes more sense to me. Thanks for this tute. I’ll use it on jacket #2.
Good point – this method is great for more durability, stronger than slipstitching and less little holes for your watch or rings to catch on!
It worked! I wasn’t sure I could do it, but I could, and it looks awesome (while I feel so professional). I’m so glad I waited for this step. Thank you, Tasia!
Yay! I’m glad it worked out! It’s totally professional and way easier than it seems and now you can use this new technique on other jacket cuffs!
I raced ahead and finished mine in my excitement, but when I make another I’ll definitely try your cuff method. I just wanted to say thanks so much for doing this sew along. There are so many little tips and bits of info that have been useful to me – I know it must be a lot of work but i think its made a lot of difference to my sewing experience with this pattern, so thank you!
You’re welcome! It is a lot of work, you’re right. But when I hear that it’s helpful and encouraging and you enjoy learning all the little tips and tricks, it makes it feel worthwhile. So thank you for the feedback! And I’ll be posting a ‘show us your Minoru’ post next week, come back and leave a link if you have photos so we can all check it out!
I was going to order this pattern, but there wasn’t a place to select the size. Are all the sizes in each envelope?
Hi Candydawn! Yes, all sizes are included in each envelope, from 0-16. Thanks for asking, I’ll add that to the product descriptions so it’s clearer!
I too haven’t done the sew-along but have the pattern! I love your tutorials, they are
clear and allow time to catch up and learn. I haven’t done sleeves this way but I will
be as I don’t enjoy hand-stitching! Thank you for all the time you put into instructions
and photos. I will be looking for fabric soon to make mine.
No problem! I’m so glad you’re enjoying the instructions and sewing steps. They’ll always be here online, whenever you are ready to start your jacket!
Great alternative to slip stitching. I’ve already completed this step, but will be saving your tutorial for future projects! Thanks
Well wahooo it works. I am very “spacely” challanged and I got it. Thanks for the great pictures as it really, really helped. Love this pattern thanks so much.
Such a great explaination, took me two reads to get, but I get it! And I’ll looking forwards to getting this pattern in the next few weeks! (Wish Australia was closer to America)
Thanks for this super helpful tutorial.
hello, thank you so very much for taking the time to photograph and write the details of this cuff finish. I am an amateur sewer (that looks odd doesn’t it ! sewer) and I thought I could figure the cuff finish on my own but I couldn’t. I almost gave up and hand stitched it. no need to reply. madeleine