Today, I have a tutorial that’s been requested several times: how to sew the V neck on the Renfrew Top. This is the most requested tutorial we haven’t done yet, so here it is!
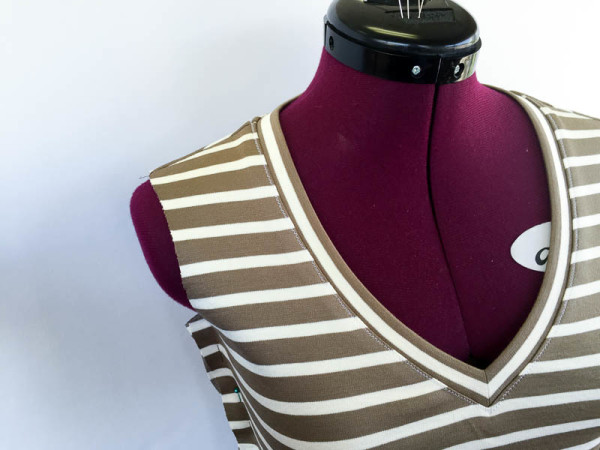
In the pattern instructions, this is Sewing Step 4 and 5. I’m going to break it down in detail and show you how to sew the V-neck band with tidy results. I even made a little video to show part of the neckband construction in 3D!
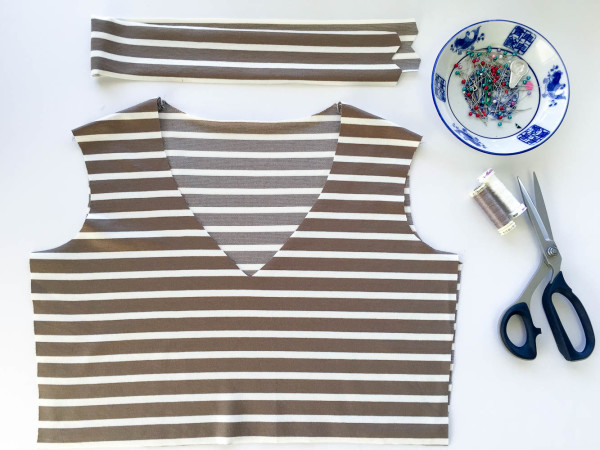
You’ll need:
- your Renfrew top front and back, sewn together at the shoulders but left open at the side seams
- your neckband piece for View B
- pins, scissors, thread, sewing machine
Some tips before starting:
- Our sample looks really nice because of the stripe placement. Here are some tips for cutting out your neckband on a stripe, including the band for the V-neck version.
- It’s important to sew your shoulder seam allowances accurately. If you sew too narrow of a seam allowance, your neckband will be smaller than the finished neckline. If you take too much seam allowance, your neckband will be larger than the opening. It’s only two seams, but it does matter!
- Make sure all your notches are marked on the neckband piece. A small snip into the seam allowance (1/8″ or 3mm) is my preferred method.
- Read the whole post first, before beginning your project! I talk about options and alternate methods a bit so you may want to choose the approach you like best.
Let’s go! First, sew the neckband seam between the notches, right sides together, with a 5/8″ (1.5cm) seam allowance.
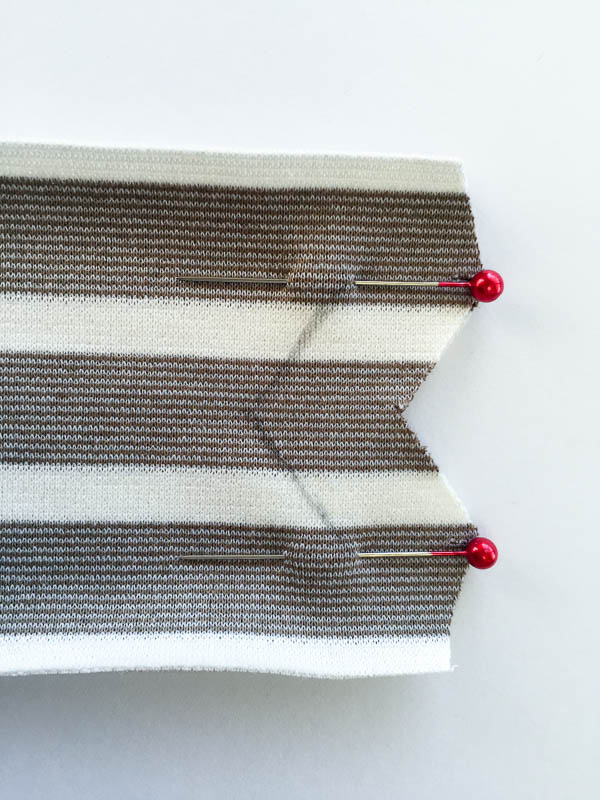
If you like, draw in the stitching line before you start so you have a guideline to follow. I used a regular pencil to draw in the line.
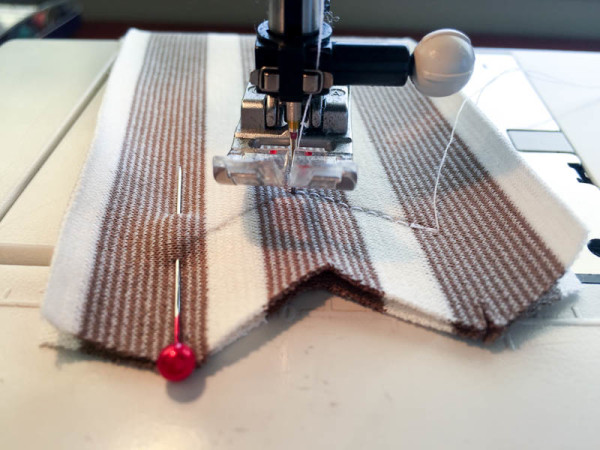
What’s important here is to only sew the seam between the notches, not from edge to edge. You’re starting 5/8″ (1.5cm) in from the edge, pivoting at the centre, and stopping 5/8″ (1.5cm) from the other edge. For the scoop neck version you do sew the seam edge to edge, but not on this one. Doing this makes it easier to sew the neckband to the neckline.
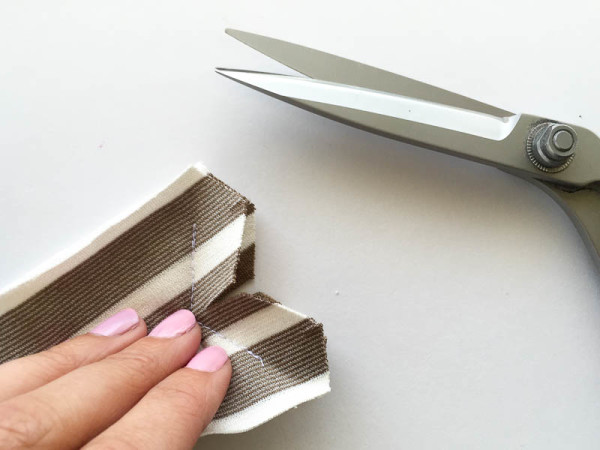
Clip at the centre of ‘V,’ making sure not to cut your stitching. This is in the instructions, but read the entire post first, as in the video later on I show what happens if you don’t clip.
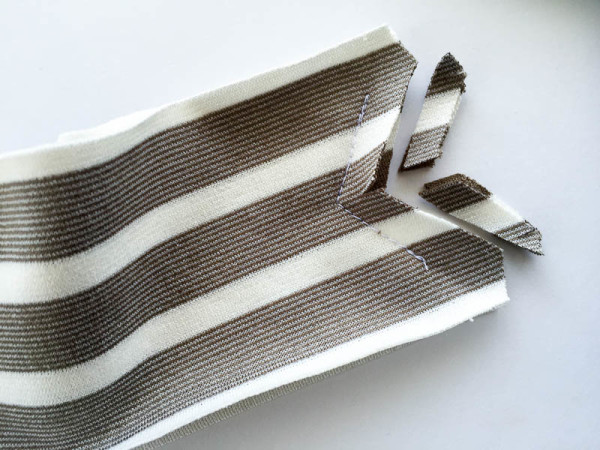
Trim your seam allowance. An easy way to trim is to cut your seam allowances in half, so when you’re trimming, aim down the middle of your seam allowance. If you prefer specific numbers, trim your seam allowance to approximately 1/4″ (6mm.)
Press that seam open, and fold band lengthwise so the right sides are out and the wrong sides are against each other.
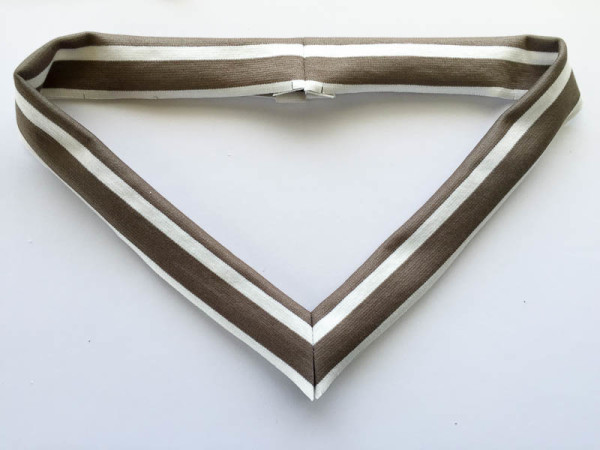
Note: You might notice that my band in this demo has an extra seam at the centre back as I was short on fabric. I’ve tried to hide it in most of the photos. Your band will only have one seam and that seam goes at the center front.
Another note: the shirt in this demo is a little half-shirt, your shirt will look longer!
When I was writing this tutorial, I was taking photos of the part where you turn the V-neck seam into the V-neck band… and made a little video! Does this help to visualize what is happening?
If you follow this folding step, you can skip the clipping step. I’d still trim the seam allowances to reduce bulk, so you don’t get a faint outline of seam allowance through the band when you press it. Neat eh? The next step suggests that you baste the raw edges together. You don’t have to, I skipped it on this demo, but if you find your fabric rolls a lot or slips, basting them will keep the two edges in line with each other.
Now, we’ll pin our band into the neck opening!
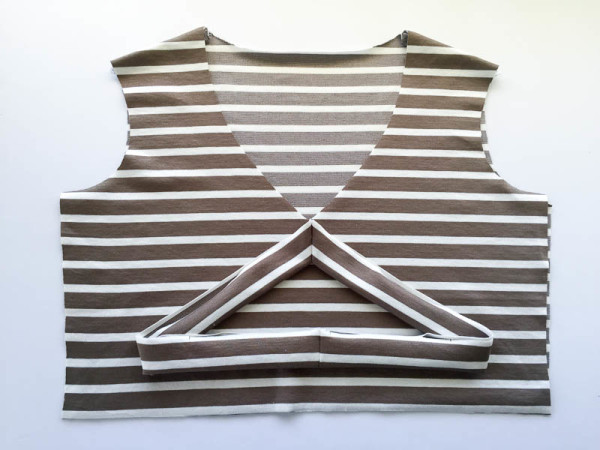
Lining up the Neck Band:
- Double Notch goes at Back
- Seam goes at Front
- Single Notches line up with shoulder seams
The most important part of this step is the center front. Clip the body at centre front. Spread open the clipped body to match the neck band.
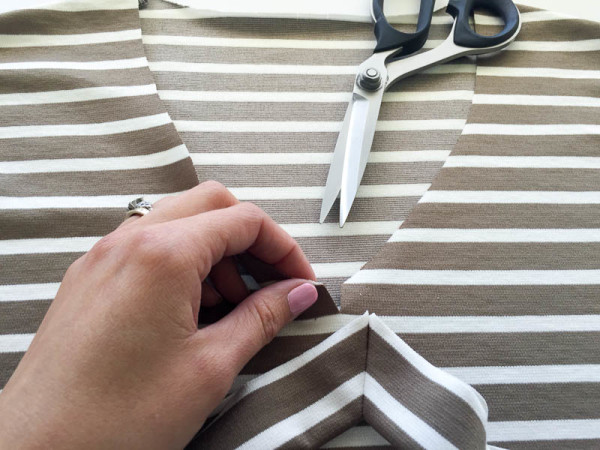
Here’s what it looks like from the other side. Spread the slash nice and wide, so the raw edges of the neckline line up with the raw edges of the band.
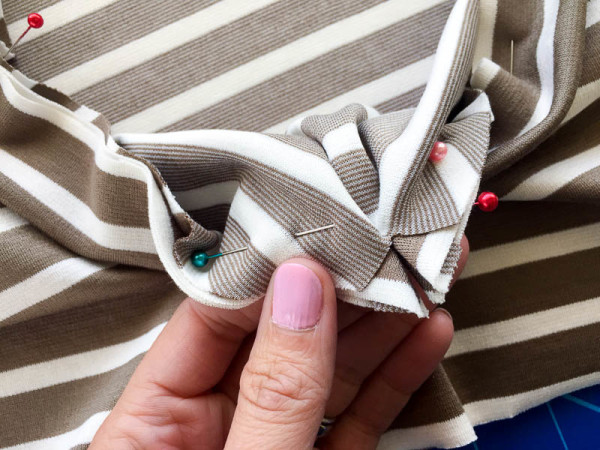
Once it’s pinned in place, sew the neck band to the body! I like to start at one shoulder or centre back but it doesn’t make a huge difference.
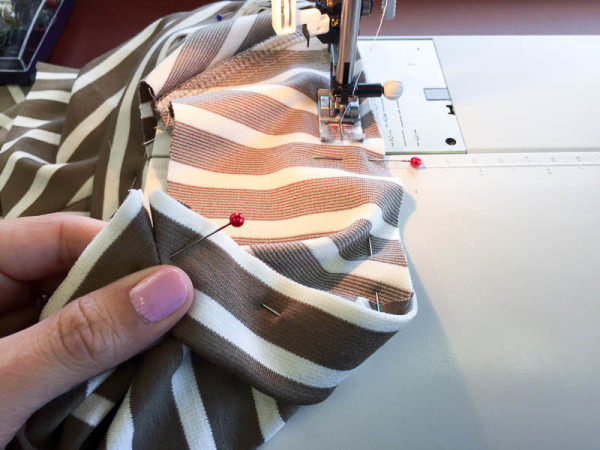
I sewed with the body side up, not the neckband side. This helps make sure the slash at centre front is where it should be. Because I’ve cut the neckband along the stripe line, I know it should work out well. You could also flip over the garment once the V-neck part is done and sew from the band side, so the stripe is even all around the neckline.
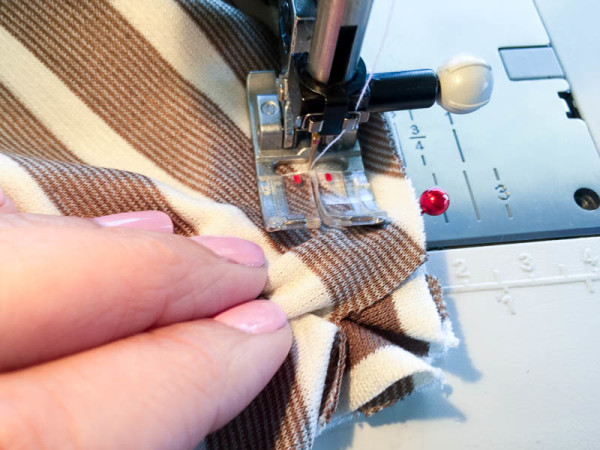
Pivot at the centre of the V with your needle down, lifting the presser foot to turn your work. Most important and tricky to demonstrate step of them all. You want to sew right to the middle of the slash, right to the middle of centre front on your shirt body. Make sure not to catch any extra folds of fabric.
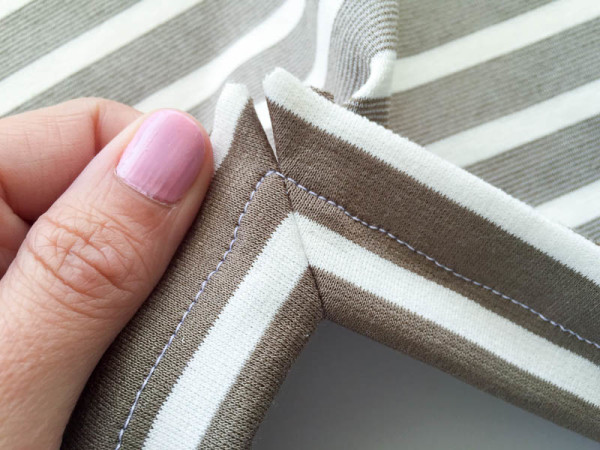
This is a great example as my stitching isn’t perfectly centred. (I did it for educational purposes.) If this happens, simply sew again to even it out.
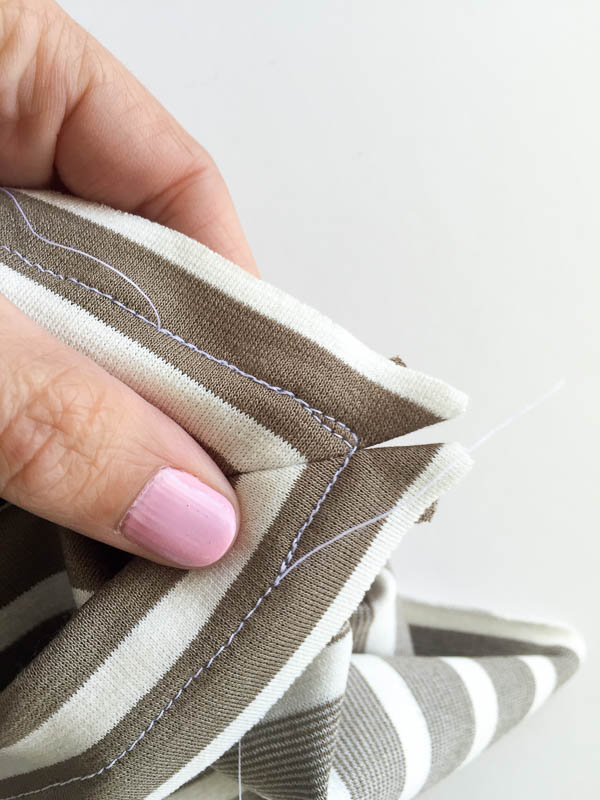
Trim and finish seam allowances. It’s not necessary to finish them, but it’s a nice clean look if you serge and trim the seam allowances in one step.
Press the seam towards the body, away from the neck opening. I like to press mine lightly, just to flatten everything out nicely.
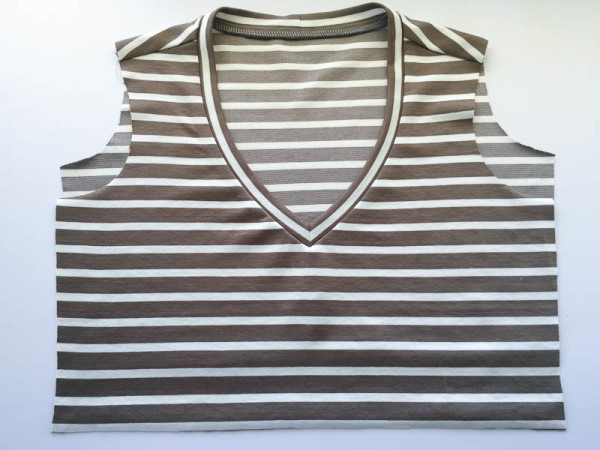
Zigzag around the entire neckline, on the body side of the band. This secures the seam allowances in place. I like this step because it keeps the seam allowance from flipping outwards around the neck.
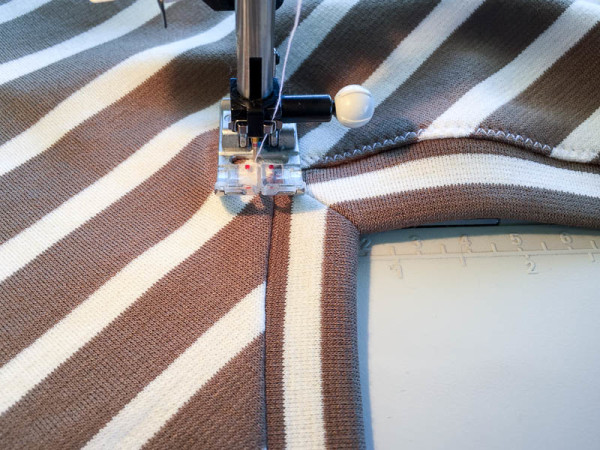
Pivot with the needle down when you reach the V point. I pivot when the needle is on the outer side, away from the neckband, so when I turn my work it’s ready to zag back in towards the band.
Test your zigzag stitching on a scrap to decide on the stitch width and length. I use a very small, very narrow zigzag on the original samples so it’s not an obvious zig and zag. In this demo I used a 2.0 width and a 1.5 length.
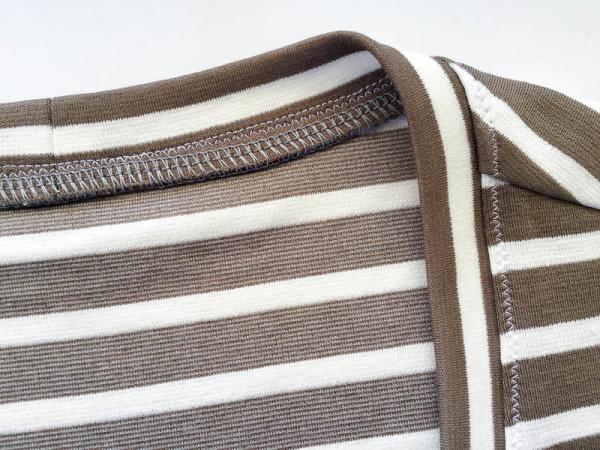
Some people have mentioned they don’t like the look of the zigzag stitching. If you really dislike the look, you could skip it, but then your neck seam allowance may flip outwards. Up to you!
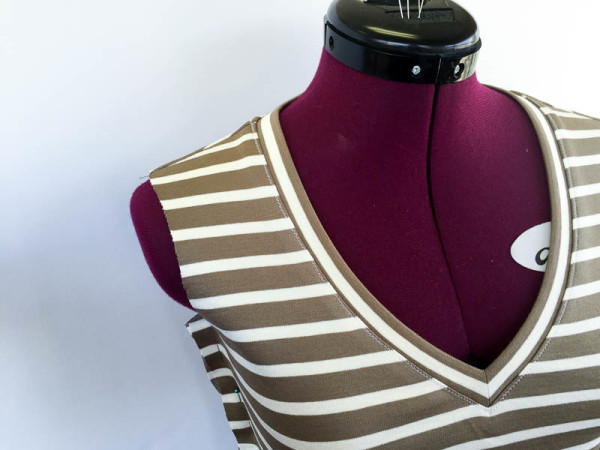
That’s it! It’s only a little bit more complicated than sewing the scoop neck band.
Here are more blog posts about the Renfrew Top. (Get the pattern here.)
- Three Tips for Sewing Stripes
- What’s a Stable Knit Fabric?
- Cutting Knit Fabric: Making Sure Your Project is Cut On-Grain
- Thoughts on Cutting Knit Fabric
- Why Add Twill Tape to the Shoulders? Plus Possible Substitutions
- Sewing & Stabilizing the Shoulder Seams
- Renfrew Top: Finishing It Up! Sleeves & Bands
- Renfrew Top: That Tricky Cowl Collar

I will fully admit that I turned up the volume on my computer before I watched the video in hopes that you would speak. It’s funny how I always want to hear the voices of my favorite bloggers, probably because blogging is such a visual medium.
Thanks for the tutorial!
Ah, sorry! I turned the sound off because I didn’t talk during the video and you’d just get the radio in the background otherwise. It was just a quick thing to see if it was worth doing, I’ll try to work in another video with talking next time. You can hear my Canadian accent then :)
Another way you can do it is to add a voiceover afterwards…. perhaps this might suit you better so you can narrate after you’ve edited it…
That would work well for me! What program or tools would you suggest?
Also – thanks for the suggestion! I’ll look into it for future videos. That would be much easier than trying to get everything perfect the first time.
Thanks! This is excellent and super useful. Adding the video is fantastic for me…I am a visual learner. I also appreciated that you included the zig-zag settings and how to fix mistakes!
Glad to hear it was useful! Video is great for steps that are hard to photograph clearly.. it’s much easier to show the piece in motion and turn it around in my hands to give you a better idea of how it goes together.
I love this tutorial. Thanks so much for providing it. Also, do you have a link to the fabric shown in the video?
Happy to help!
I bought the fabric in 2012 so it’s been around for a while and might be harder to find…It’s 65% Viscose, 30% Polyester 5% spandex which can sometimes help in finding the same fabric.
This one looks really similar and it’s the same content http://www.voguefabricsstore.com/Saint-Tropaz-Striped-Knit-1-Off-White-Navy.html
and so does this one http://www.hartsfabric.com/saint-james-interlock-stripe-white-navy-61303.html
Thanks so much for your reply, Tasia. Your fabric looks as though it would have a great drape. I’ve been looking for 100% pima cotton jersey knit by the yard which has been futile. I’ll check out your fabric recommendations.
Many thanks for the tutorial! I tried the V-neck only once and created some little wrinkles at the V. But luckily, everyone thinks it was on purpose :). Now I will have another try as there are some more shirts on my sewing list.
Glad you like it! Wrinkles could be caused by not spreading the slashed part of the body enough, or not having the V of the band centered exactly over the V at the neckline. Or if you take too small of a seam allowance on the body side, then when the seam allowance is pressed downwards it could cause bubbles or wrinkles.
The video was nice and I encourage you to use that method to demonstrate in the future. A couple of tips on construction: 1. If the fabric you are using frays or “runs” a bit, sew a line of staystitching a needle’s width inside the seam allowance for 1 inch on each side of the V before you clip into it. I hope that makes sense! 2. Instead of a zigzag stitch to finish the neckline, a straight stitch will work just fine providing the neck opening isn’t stretched when you put the garment on over your head. You might also try a twin-needle straight stitch, or a low-density decorative stitch, especially if you are using a solid fabric. Pretty!
Thanks for the extra tips! Good point that the neckline isn’t stretched to put the shirt on and off, so you could probably get away with a straight stitch. Twin-needle looks nice too. You could even do the twin needle so it straddles the seam, one line on either side of the neckband.
Thanks, helpful as always. I will check this out next time I make a Renfrew v neck. This post also reminded me of your cowl neck tutorial. Cowl neck is the only neckline I have yet to try on Renfrew, I’m hoping it will be a big feature of my fall wardrobe this year.
Glad it’s helpful! The cowl neck is a nice one for fall when you want a little extra warmth.
Great tutorial! A trick I like to use when I don’t want obvious zig zag topstitching is to set the stitch width to 0.5 and leave the length at my normal 2.5. This gives you the look of straight stitching, but it has just enough give so the stitches don’t pop, if you’re careful. It won’t work on seams that really need to stretch, but for a top like the Renfrew where the v-neck is deep enough that it doesn’t have to stretch when you pull it on and off, it should work nicely.
Good tip! On all of the Renfrew neckline options – V-neck, scoop and cowl – there’s likely enough room so the stitching isn’t under strain.
Is there a reason you sew the band to the shirt with a sewing machine and then serge the edges, rather than just serging the two pieces together (and finishing the edges at the same time)?
I can see where you might want the extra control when sewing a striped fabric, but for solid colors, is there value in a 2-step process?
It would be really hard to nail that V-neck using just a serger! More power to you if you can do it though. :) The Renfrew instructions are also written so you don’t need a serger, so that’s part of it too.
I really like this shirt! Your sewing examples are clear and concise. The video uploaded just fine. Thank you for sharing! I hope you add more videos.
Thank you! It’s good to hear feedback about the video, so far it seems like it’s definitely worth doing or adding to future tutorials.
thanks for the tutorial. I liked the added video i’m a visual learner so the more pics or videos the better!
Great tutorial! My husband wants me to make him some undershirts…… with V Necks!! Having never sewn one of these before I’ve been hesitant in starting. Your instructions are very clear and I may even whip him one up (as well as a Renfrew for myself) this weekend!
Great! I don’t know if you have a pattern yet, but Thread Theory offers a free downloadable pattern for a men’s undershirt! http://threadtheory.ca/collections/patterns/products/arrowsmith
Many thanks, I have always avoided v necks because they never seem to come out right and now I know why. Patterns never tell you to notch the v and spread out. Incidentally, mum always sews a line of straight stitch close to the seam on a neck band to stop the facing from flipping over, if you dislike the zigzag stitch just use straight stitch. I also catch the facing down on the shoulder seams with a few hand stitches for extra safety to help the facing stay down, and again on any other seams as well. Thanks again, can’t wait to try a v neck again, this time successfully.
Clipping the centre front makes a big difference, it would be really hard to get that V sharp otherwise. Unless you’re sewing the type of V-neck that starts as a scoop neck, then you pinch the point of the V and sew across the ends diagonally to make it stay V-shaped. Glad this helps and I hope your next V neck turns out great!
I’ve never tried the v neck version of the renfrew. This tutorial is super helpful and clear, particularly with the video! Thank you! Now I’m keen to give it a go ;)
It’s only a little bit more challenging than the scoop neck, if you’ve sewn that one! Glad that the tutorial is helpful.
thanks a lot for this tutorial. I learned a couple of useful things!!! ;)
Excellent! Glad to hear it.
I too wanted to hear your voice on the video! Alas, not this time, but in future perhaps (?)!
Anyway, thank you so much for the tutorial and the video. I am a visual learner and it helped me no end. TFS, Annette
Next time perhaps! I’d mentioned it in another comment, I turned the sound off completely since I had the radio and other background noise, and thought it would be distracting. It’s good to know what you want to see in future videos! I can talk next time. :) Glad to hear the little video is helpful!
I clipped my the center front of my bodice way too far and now there’s an unwanted peek-a-boo hole there after I attached my neckband! Oops! Any ideas on how I could possibly hide it? I’m playing with the idea of attempting to ruche with elastic in that spot..Lol..
Depending on the fabric used a nice piece of appliqué would cover the hole and provide a nice eyecatching extra or you could enlarge and shape it to form a real peek-a-boo feature and finish off with buttonhole stitch to stop the edges from fraying, or do what a friend did and cover a similar mistake she made with a large decorative clip on button or flower that she changes to suit the rest of her outfit.
Just finished my first successful v-neck top, slightly complicated by the fact that there is also a center front seam on the top so matching the center seams was fun. I sewed it first by hand, and unpicked and restitched until everything matched up. I hadn’t intended to have any facing showing on the outside but followed your instructions picture by picture and it has worked. Now for the rest of them.
If there is a center seam on both the top *and* the neckband, maybe you could sew the band to the top first and then sew the centre front seam through both pieces? Might be easier, depending on the fabric and how the pieces are drafted. Glad the tutorial was useful!