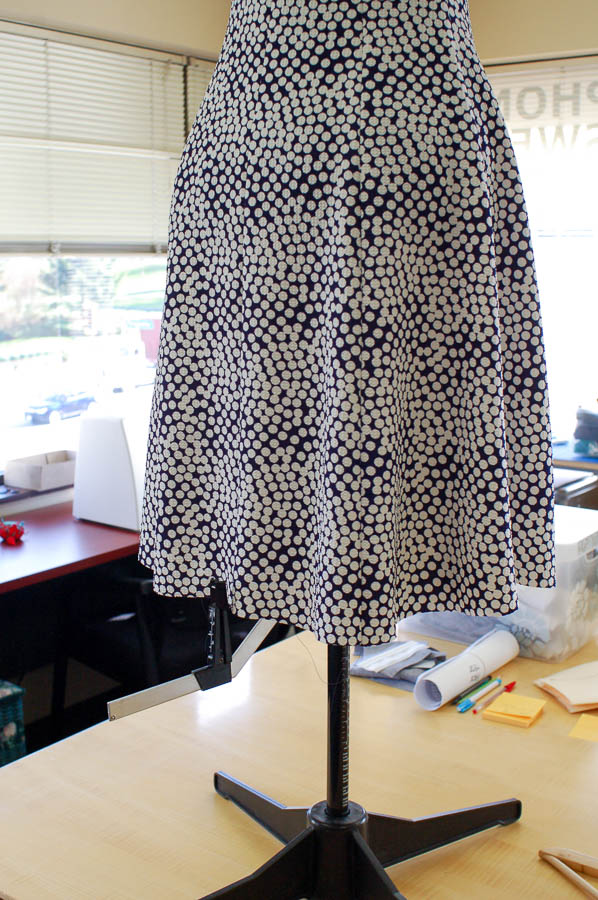
Today I’ll show how to hem a dress evenly, using the hemming attachment on a dress form. This might be common knowledge, but just in case, I thought I’d post about it while I was doing it. Whenever we talk about dress forms, I often forget that I like this feature on a dress form. It’s super handy!
If you have someone to help you measure up from the floor, that’s even better. But if you don’t, this is a good starting point. I still suggest you try on the dress after marking the hem, and make sure it fits the same on you.
You’ll want to do this after the dress has hung for 24 hours, so the hem can stretch and settle. This is especially important on styles that have bias seams. It’s not hugely important on the shorter version of the Davie Dress but I did want to even out the hem on the knee length version.
How to use your dress form to mark a hem:
First put the dress on your form. If your form is adjustable, like mine, dial her up or down so she’s as close to your measurements as possible.
Now there are two ways to proceed – either choosing where you want the hem to be, or finding the longest possible point where you can have an even hem. I’m going to go for the second method, since I know I like where the hem hits, I just want it to be even. (If you wanted to be more particular about where the hem falls, or if you plan to cut a lot off the length, then try on the dress and place a pin where you want the hem to end. Then add hem allowance, and use that as your guide to trim the rest of the hem.)
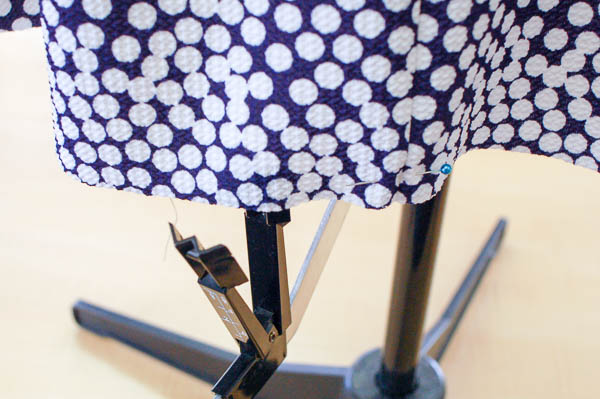
Next, find the highest point of the hem. If you don’t, that’s all right, but as you work around the hemline you might find a section that is higher than your marking and need to start over.
Pinch the hem in the hemming attachment, and place a pin through.

The attachment is designed to hold your fabric in a ‘W’ shape so you can pin straight through and catch the fabric twice.
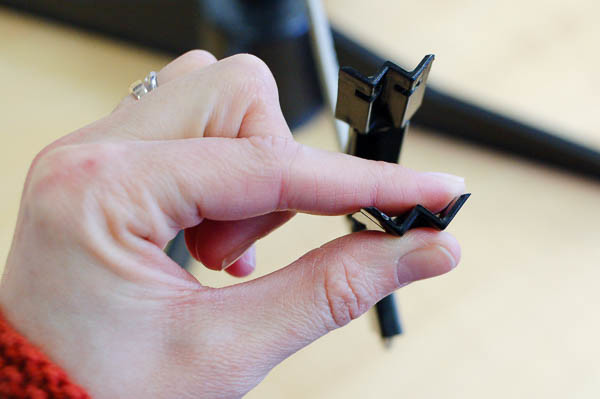
Open the arms of the hemming attachment. The pin will remain in the fabric and won’t be caught in the attachment arms. Neat eh?

Turn the dress form a little, and place your next pin about 3-4″ away from the first (8-10 cm). Repeat all around the hem, until you reach the beginning.
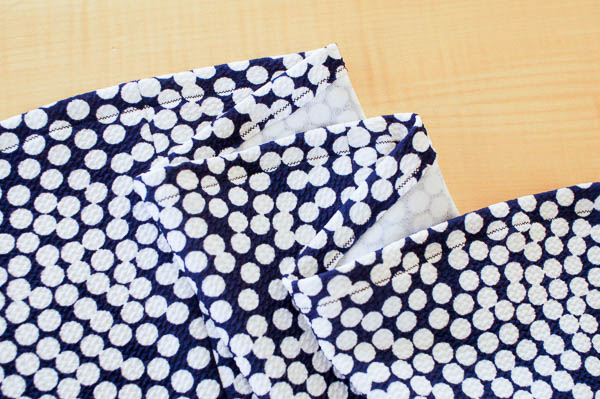
Now try it on yourself, to ensure the level hem on the dress form is the same as a level hem on your body. Trim just below the pins. Or depending on your fabric, you may want to draw in the hemline and remove the pins, and then cut. I went for the quick and easy method! Sometimes it’s easier to see if the hem is level on the body after you trim the excess, in that case, trim and then try on the hem to see if you need to shorten it a little anywhere.

Proceed with hemming the dress.

For this version, I used a narrow zigzag stitch. I tested it on scrap, liked the way it looked, and went ahead with it on the dress itself. It suits the texture and thickness of this fabric.
What if you don’t have a hemming attachment?
- Measure up from the floor with a yardstick. You can do this on the dress form, same as if you had an attachment.
- Get someone to help you measure up from the floor, while you’re wearing the dress. This is ideal, but not always possible!
- Get a skirt hemming tool. I’ve never used one of these, but it’s the same thing as the dress form attachment, just free-standing.
- Tie a string across a doorway, rub it with chalk or flour, and then step close to it with your dress on to mark a line. I have also never tried this, and I wonder if it’s brilliant, or one of those popular tutorials that everyone pins and no one has tried! (Have you tried this? Did it work?) Thought I’d share it anyways, as I like sewing tips that don’t require someone else’s assistance.
Thanks! I never knew that thing was for hemming!
Awesome! I thought there might be people out there that didn’t know what that attachment did. :)
That is a very cool little gadget. Unfortunately, my dress form doesn’t have a hemming attachment. What I have done in the past is use a laser level, purchased from the home improvement store. I put my dress/skirt whatever on my dress form, attach the magnet on the laser level to the leg of my nearby cutting table and shine the laser onto my dress and mark the line with pins. :)
A laser level! Neat idea. I bet there’s a way to invent a new hemming tool that takes advantage of laser technology..
Funny that, I have just spent some time marking the hem of my dress on my own! I have tried the chalked string, but that didn’t work for me. Instead, I tape a sharp piece of chalk or a fabric pen to my yardstick at the right height, mark the fabric around me. I often have to rotate the yardstick side to side to rub my chalk against the dress, but it has worked well for me when I don’t have anybody to help me.
Good to know the chalked string didn’t work, I was curious about it! Thanks for sharing your tip.
I think the chalked string can work – but it isn’t easy. I tried it on a denim skirt and was able to get enough of a line to make it work. But that was a straight skirt that fit close to my legs so I was able to get some pressure on the string. Might not work as well with a skirt with more swirl?
Good point – that was my thought, too! You’d need to push against the chalked string and that pushing could change how the hem hangs and make it less accurate.
Thank you, I have a dress form with this attachment and cannot wait to try it out. Annette
Great! It’s useful, but do check it on your body as well like Jo mentioned below.
I have found that levelling dresses on a form doesn’t work for me, because it doesn’t replicate my posture or the large bottom I have which the fabric needs to travel over! So I think this method only works if your dress form is very similar to your body. I tried the chalk on a string thing once and it didn’t work, because it was a full skirt and it couldn’t reach the folds! Sadly for my husband, he’s my best option right now! Haha, though I do like the “chalk taped to yard stick” idea, might have to try that!
I agree, it works as a starting point if your hem is all over the place, but not if you know your posture makes a big difference. Or shoes, or curves that you have that the dress form doesn’t. (Depending on your form and body, padding up certain areas might help, but maybe not. Posture is a tricky thing to replicate on a dress form.) I can see what you mean about the ‘folds’ of a full skirt, that would be hard to push against a chalk string!
I had no idea some dress forms came with such a thing! Where I work we use a chalk puffer, it’s a bit like the stand alone hem tool, but it has a tube with an air bulb on the end that you hold, and a reservoir of chalk dust at the height you want. It works well on other people, I’ve never tried to do it on myself, but it is possible, I’m sure!
I love the name chalk puffer, by the way. Lots of people recommending this tool so it must work! Does it make a strong enough line to follow?
My favorite hemming tool is a chalk puffer, like this: http://www.wawak.com/products/product.cfm/pid/4092/Deluxe-Chalk-Marker/
Just squeeze the bulb and it puffs a line of chalk on your dress. Repeat all the way around and done! Easy to do on yourself, too.
Best,
Quinn
Cool! I’d originally read that these didn’t work that well, years ago, but perhaps they’ve improved over time. Or maybe brand has an impact on quality.
Yeah, I vote for the chalk puffer that Quinn mentioned. I found I needed to be pretty generous with the puffing, but it worked, and no helper needed.
Nice! Good to know.
I bought a new dressform and this was exactly what i needed! thanks a lot!
Happy to help!
oooooohhhhh, I need a chalk puffer now!!
My thoughts exactly after reading the recommendations! Andrea in the comments below did say it didn’t work for her though.
I bought a chalk puffer and it did not work! The chalk just sprayed everywhere and left no line. I also have desperately tried the doorway string thing and that was also no good. Can you tell I’m traumatized by hemming with chalk methods? I like the laser idea though!
That’s what I had heard too – they don’t work well! I remember reading it on other sewing blogs years ago, not to bother with getting one. So it’s interesting to hear that it works super well for some, and yet not for others. Wonder if brand/make has an impact?
Hi I’ve got this attachment, but I don’t use it.
Tailoring for me is a much preferred professional finish.
I have a pretty significant swayback and cannot use my dressform to get an even hem; I have to wear the skirt or dress. I duct tape a marker to the wall and step into it all the way around. Then I fill in the dots smoothly. I use a permanent marker about three inches below the hem I want and cut off the marker line.
Smart idea! Thanks for sharing.
i have always wondered how my hemming attachment worked, thanks!
I have a question though about the numbers on the dress form stand – what do they correlate to?? Height? A length of something?
They’re inches and centimetres, measured up from the bottom. At the very bottom of the stand it says so – or it does on mine!
I need help with the dress form I don’t see how to use the hemmer. thank you.
What part are you getting stuck on? Let me know, and I’ll do my best to help!
I learned a technique more than 30 years ago that has always worked for me. Find a table, shelf or other surface you can tape your chalk to that is slightly lower to the ground than your full hip. Securely tape your tailors chalk to the surface with one corner or edge hanging off the chosen surface. Wearing the garment and shoes you plan to wear with the garment brush against the chalk all the way around the garment. Just keep your elbows in and spin slowly against the chalk. Raising your arms is a no-no. Now go to a mirror and determine how far down from the chalk line you wish to hem your garment. Since the line is below your full hip, everything should hang from that point and wearing the shoes you plan to wear takes care of the posture issue. Yes, you have to true the line a little and check from right to left, but I find it works well. I have even used this technique to hem pants. Beware: If you don’t know, some tailors chalk contain wax. Wax can melt and set in your cloth and NEVER come out. (Ask me how I know). Be sure to check your chalk on a scrap of fabric first.
Oh my goodness, you just saved me $25 and a lot of frustration! I had NO idea this thing was on my dress form! Thank you!!