 Here we go: Full Bust Adjustment time! Today I’ll show you how to adjust a princess seam blouse for a full bust.
This is the method shown in Fit for Real People, which you may have seen before. It comes highly recommended by sewists with fuller bustlines!
This pattern adjustment is a little tricky, but it’s a great way to adjust for a fuller bustline while keeping the shoulders and armhole intact. Otherwise, if you just cut a larger size all around, your blouse will be too wide in the shoulders and gaping or pulling in the armhole.
Catch up on the first five sew-along posts here!
- Pendrell Sew-Along #1: Prewashing your Fabric
- Pendrell Sew-Along #2: Measuring and Choosing Your Size
- Pendrell Sew-Along #3: Shortening the Blouse Length
FBA Fine Print: I’ve never made this adjustment for myself, or for anyone else. I’m hoping the FBA experts will jump in with their comments and opinions, which would be wonderfully helpful! I’ll also include links to other FBA tutorials so you have as much information as possible to make your own adjustment.
You’ll need:
- Your pattern pieces: Front (1) and Back (2), Side Front (7) and Side Back (8)
- Yourself! Wear the bra you’ll likely wear with the finished blouse.
- Tape measure
- Ruler
- Pins
- Scissors for cutting paper
- Scotch tape (I am out of scotch tape, so I’m using clear packing tape…)
- Pencil and eraser
My Imaginary FBA
As you might know, there is no need for a FBA in my world. So for today’s demo, we’re using Diana (our dress form), dialed up to a fuller bust – as I can’t demonstrate on myself! Diana’s newly enhanced bustline is now 98cm (instead of my usual 81cm) so we’ve got a bit more to work with here.
First, let’s determine how much to add. (If you already know how much you want to add, skip to the next step below, where we draw 3 lines on our pattern piece.)
There are two ways to figure out how much to add: either by tissue-fitting, or by making a muslin. Since I’m not making a muslin, I’ll show you the tissue-fitting method, but the same idea applies if you’re working with a muslin.
Take your pattern pieces and pin them together along the seamlines. Make sure to pin using actual, 5/8″ (1.5cm) seam allowances. Pin the seam allowances outward, like I’ve done below:
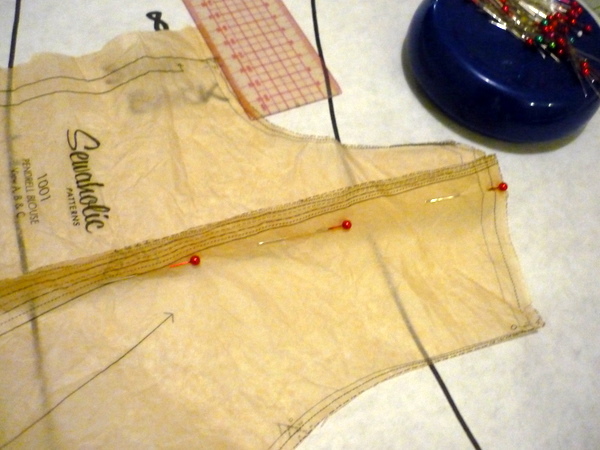
Pin all the way along the seamlines, as shown.
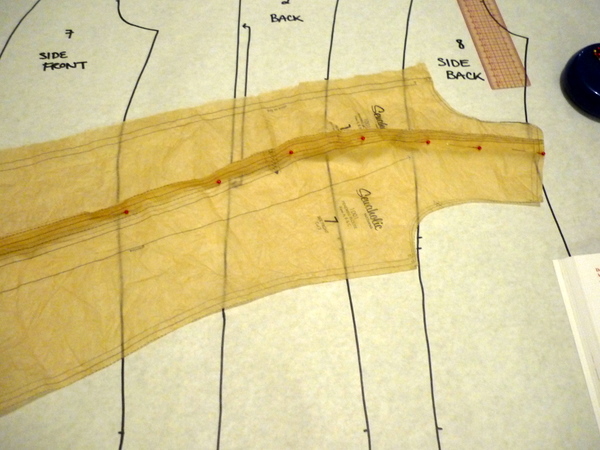 Now we’re going to try the tissue on Diana. If you’re following along at home, you’ll want to try it on yourself. That’s the best way to follow your own curves! Unless you have a custom-made dress form, and even then you’ll still want to try it on your own body to be certain it fits.
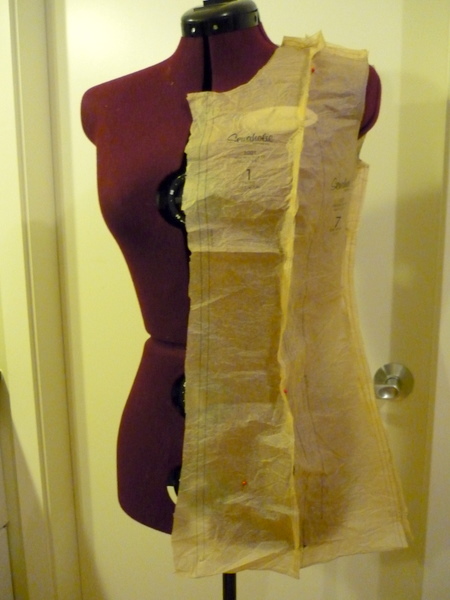
What we’re doing here is fitting the half-shirt on Diana, lining up the centre back and centre front. Now likely, your centre front won’t meet the dress form’s centre front, at the bustline. That’s why we need the FBA!
See, in the photo below, I’m demonstrating with my left hand where the centre front line should be. You can see that the tissue doesn’t quite reach across the body.
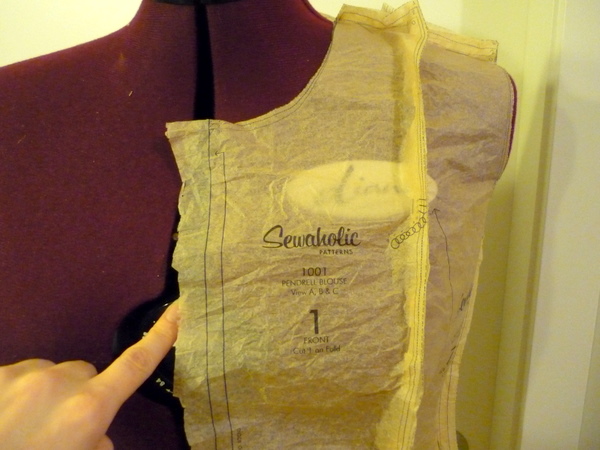
In order to make the pattern tissue meet at the imaginary centre front line, we’ll unpin the princess line right over the bust. We’ll open it up and spread the tissue, and that will help us figure out how much to add.
NOTE: if you’re following along with a muslin, the same theory applies. Just unpick the seam allowance over the bustline, instead of spreading the tissue.
Gently unpin the seam allowance over the fullest part of the bust. Pull the front panel so that it lines up with centre front. If you’re trying this on yourself, pin the centre front part to your bra or a camisole.
Next, measure the opening. (Make sure to fold back the seam allowances, and don’t include them in your measurement.) That’s going to be the amount of our FBA. Diana needs a 1″ FBA so that’s the measurement I’ll demonstrate with.
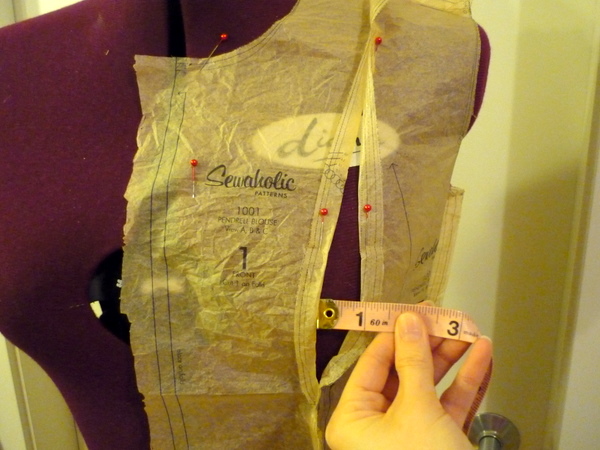
In Diana’s case, she only needs an additional inch even though I’ve added 17cm to her bust measurement. Why? Because this blouse has plenty of ease. It’s supposed to be roomy! That’s why some of you who usually need a FBA, won’t need one with this blouse.
Grab your side front pattern piece and draw 3 lines:
Line #1: Draw a line UP from the hemline along the seamline, so 5/8″ (1.5cm) from the cutting line. Stop around the full bust point – if you’ve made a muslin you can find this point easily! For me, I’m going to look for the curviest part of the seamline as my full bust point.
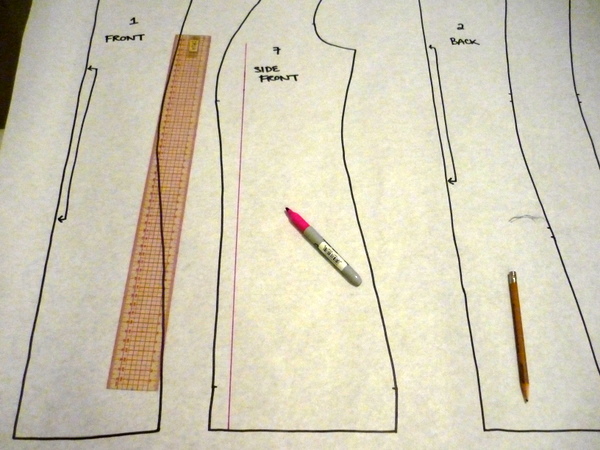
Continue Line #1 from the full bust point and connect it to the armhole. We want it to be 1/3 of the way around the armhole, so it’s easier if we start drawing our line at that end. first and then connect it to the first, long line.
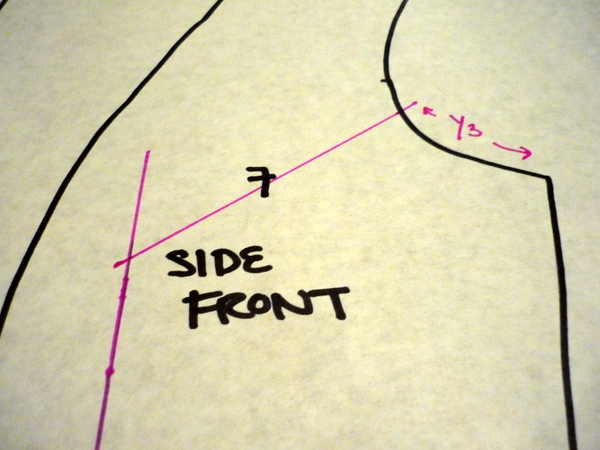
Line #2: Draw an angled line where a bust dart would be, like mine below. Mine looks like it’s halfway between the first two lines, angled towards the sideseam.
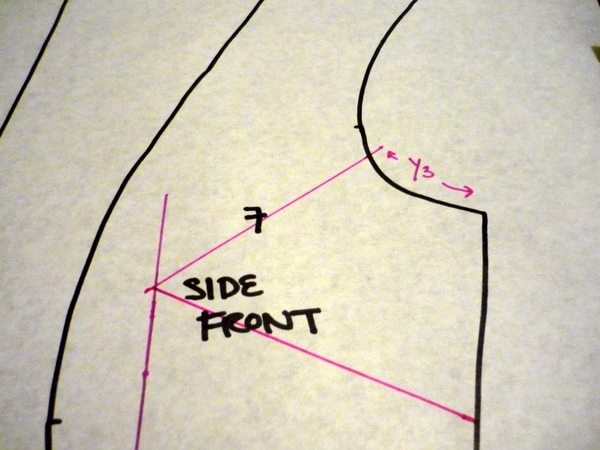
At this point I realized it was a good idea to draw in my seamlines. Draw in your seamlines, 5/8″ (1.5cm) from the cutting lines. You can see mine lightly traced in pencil in the photo below.
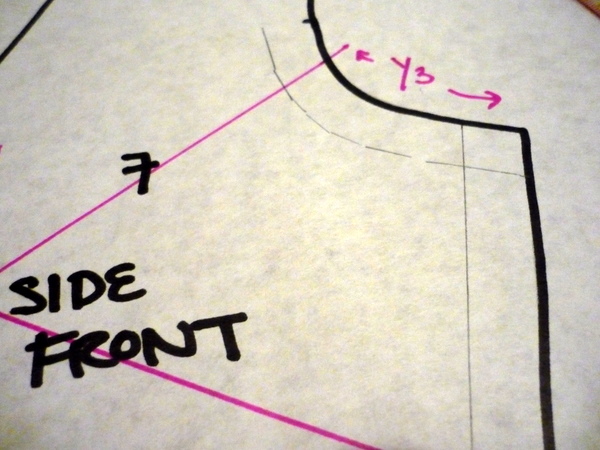 We’ll need them for some steps later on, and it’s easier than just eyeballing where the seamlines should be.
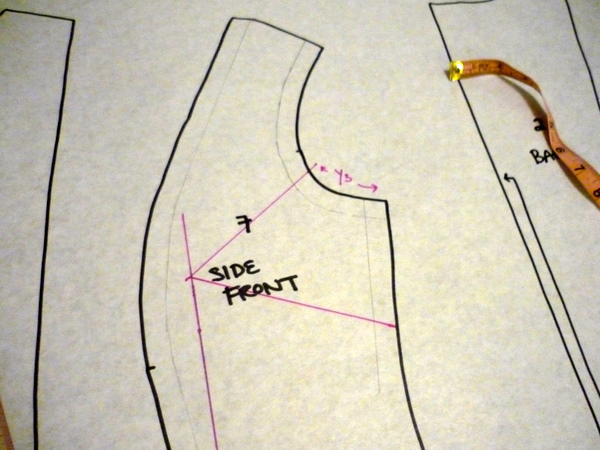
Line #3: Draw a straight line, at a 90 degree angle to the first line, somewhere near the bottom. I missed taking a photo of this step, but you can see the little line number three in the photo below where I’ve started to cut the pattern apart. (Look for it near the tip of the scissors.)
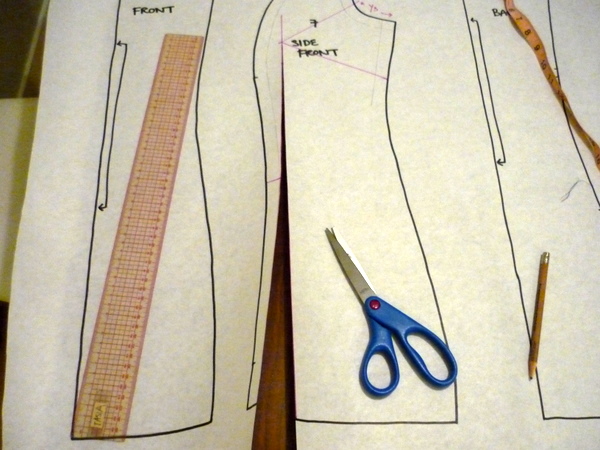
As you might have guessed, now we’ll cut our side front apart! Cut along Line #1 as shown in the photo above. Cut from the hemline up, all the way to the corner of the line, and follow the line around the bend. Stop at the seamline at the armhole.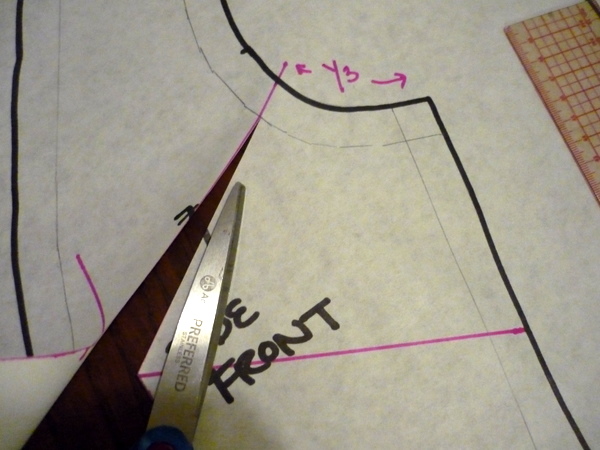
Now cut from the armhole inwards, snipping a little cut into the seam allowance. You’re leaving just the tiniest little bit of paper at the seam allowance, to act as a hinge for pivoting the pattern piece. You’ll see in a minute how it all comes together!
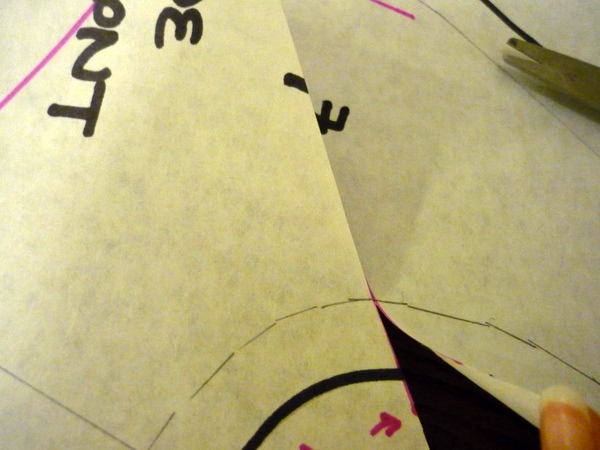
Now, cut along Line 2 from the sideseam, inwards. Again we’re leaving just the tiniest little bit of paper uncut, where this line intersects with Line #1.
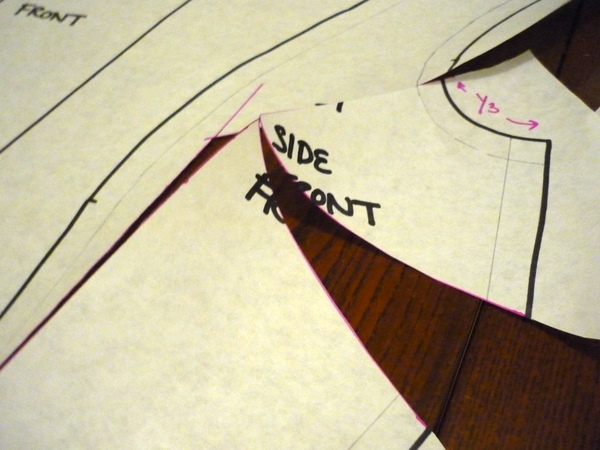 Next, cut up Line #3, all the way through. (I’ve started to spread out the pattern pieces in the photo below, but don’t worry! We’ll go through all of the steps together.)
 Ok. Time to spread out our pattern pieces on these special cutting lines. Again, this is the same concept no matter how much you have to add. Remember how much we have to add? Diana needs 1″, so I’ll spread Line #1 apart by 1″.
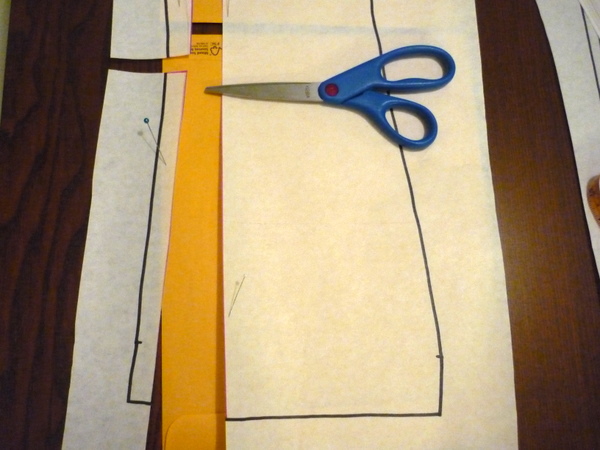
But first, I’m going to tape down the left side of the opening. It’s really hard to slash and spread if the pieces keep moving! Add extra paper underneath the opening, and tape the left side to the paper. Take a look at the example below – you can kind of see the clear tape along the left side. Also, there’s no shadow where the piece is taped down.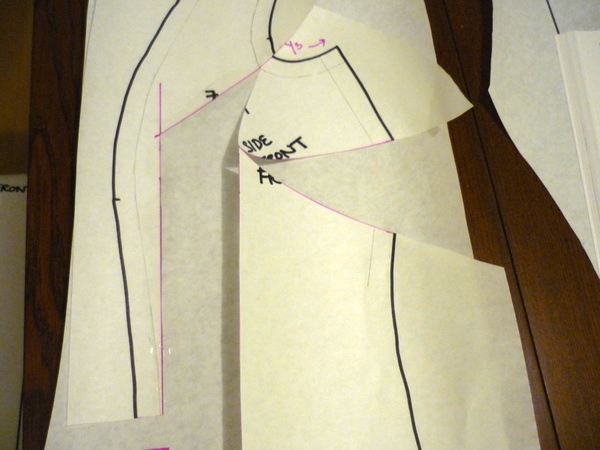
Now that we have one side of the opening secured, let’s add in the correct amount. Measure the amount to add, at the top part of the opening. 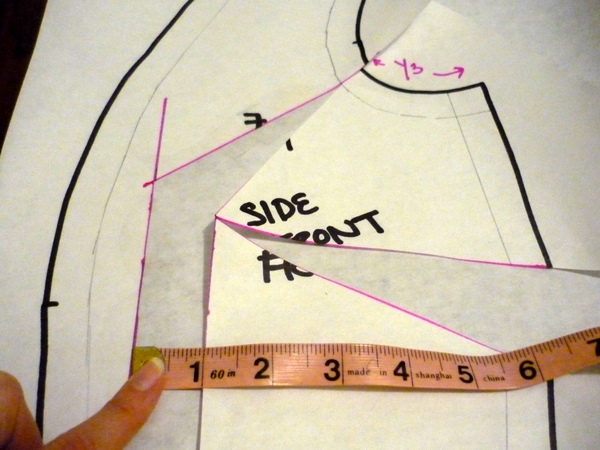
Before you tape it down, measure the opening all the way down and make sure the distance is the same all the way from top to bottom.
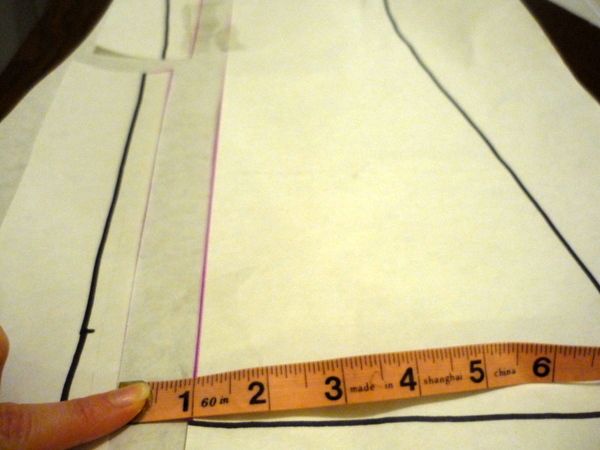 Move down the lower seam allowance piece, on the left here, so that the hemline is lined up on both pieces.
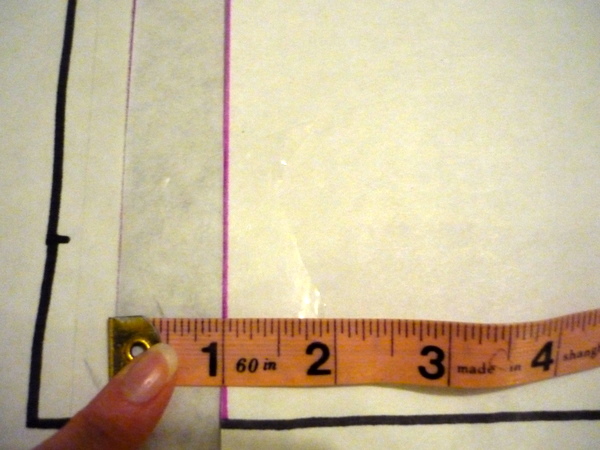 Here’s what your piece should look like, so far:
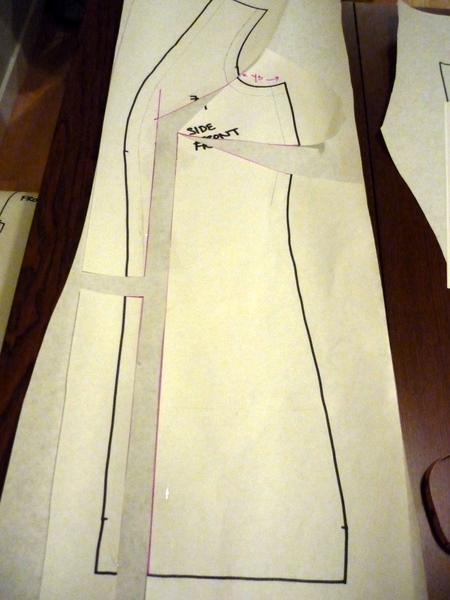 Almost done with this piece! We have added a dart in the sideseam, and we need to get rid of it. (That would look really strange, a princess-seam blouse with a bust dart too!)
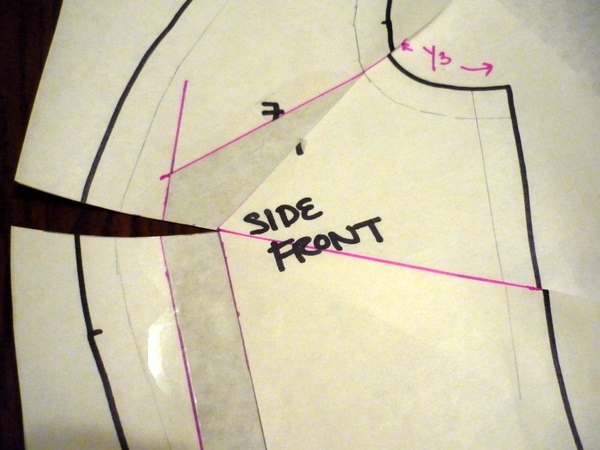
Take your imaginary bust-dart-line and extend it into the princess line. Just draw a straight line, using a ruler, as shown below:
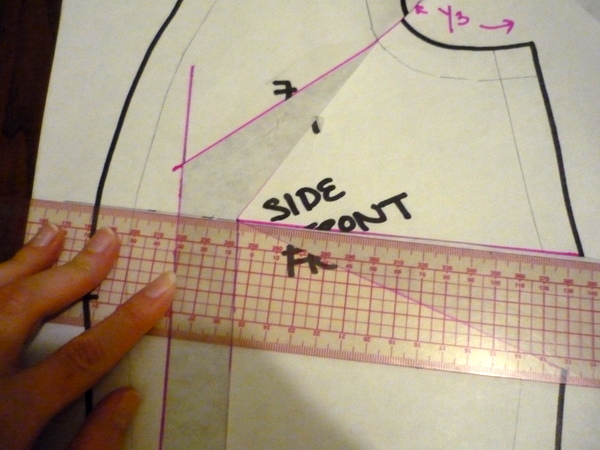
Here’s the line with the ruler out of the way:
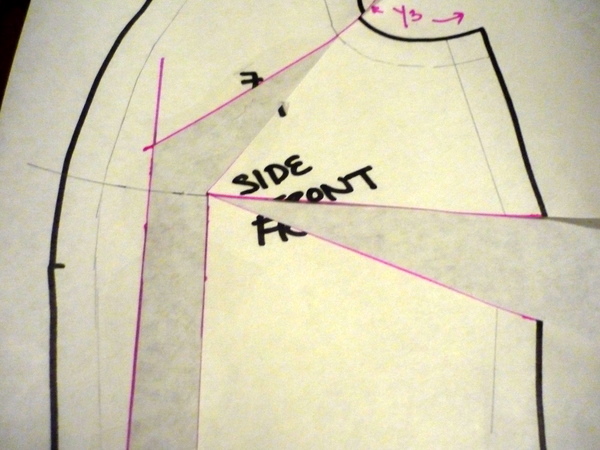 Now, we’ll cut up this line from both sides. Start at the princess line and cut inwards, stopping where the arrows are pointing.
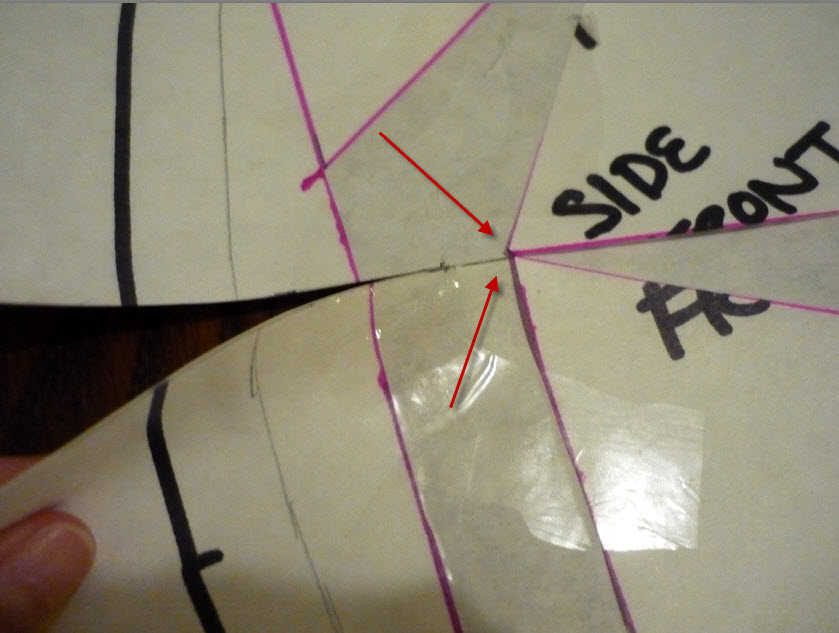
Next, cut from the sideseam inwards, stopping just before you cut through to the other side, leaving just a tiny bit of paper as a hinge. (Note: I need to cut this piece because I have extra paper taped underneath. If you just filled in paper where you needed it without any extra, you might not need to slash here.)
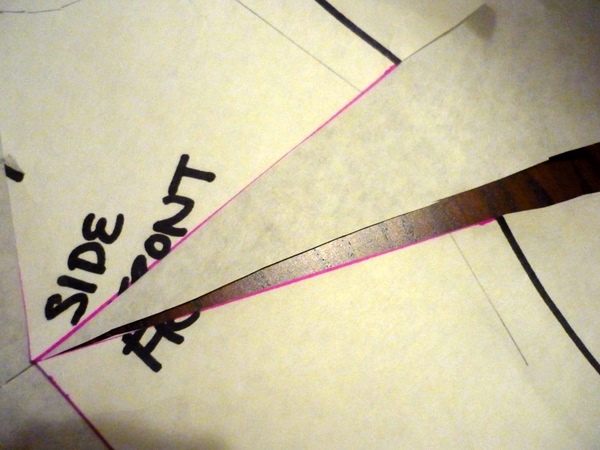
And now, the dramatic final step! Pivot the bust-dart closed, so it opens up at the princess line. It’s not so dramatic, but it’s still cool watching it all come together. Now we have extra width to cover the bust, and extra cuppage along the princess line – without affecting the shoulders or armhole!
Add a little extra scrap of paper to fill in the bust curve.
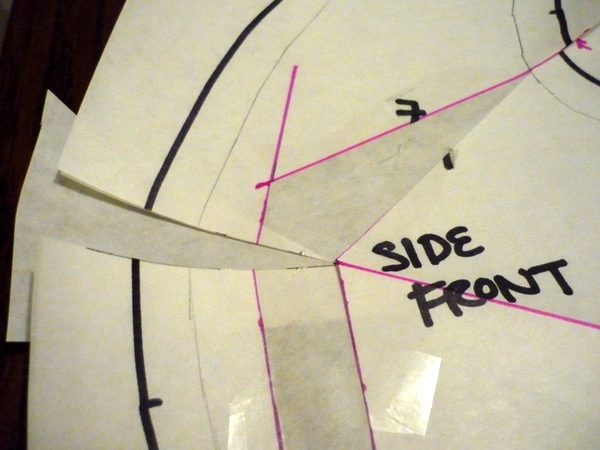 And draw in the cutting line, continuing the curve as shown.
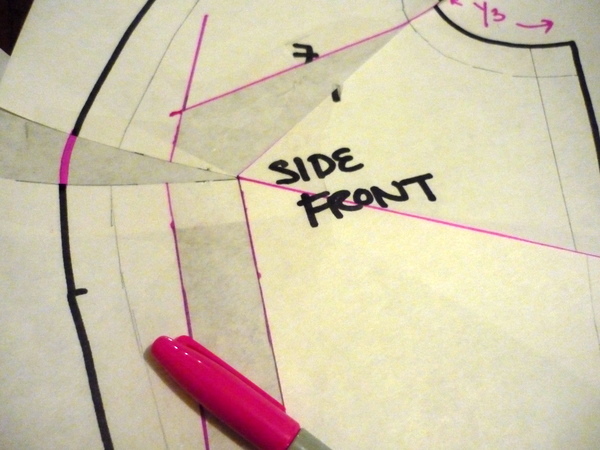
Ta-da! A full-busted side front pattern piece!
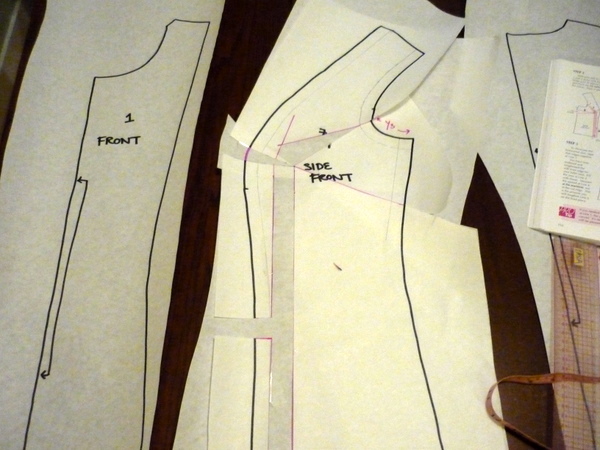
Ok, we’re very nearly done. Now that we’ve added to Side Front, we need to add to our Front piece as well, so it matches. Our Front piece right now is too short to match our curvy Side Front.
This adjustment is much easier! First, measure the amount we added at the Side Front bustline. Measure along the seam allowance, not the outer edge.
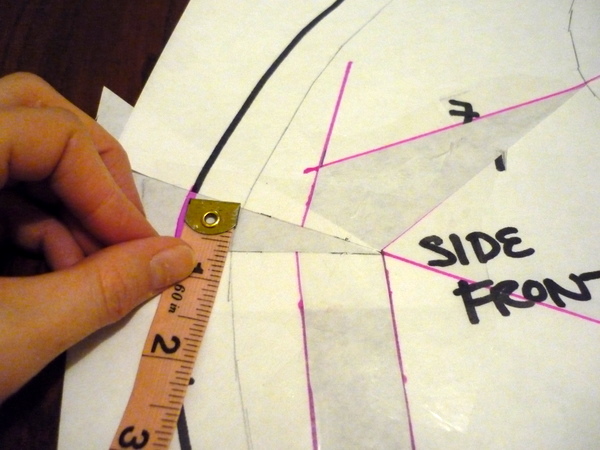
I also measured how far up the adjustment was, above the notch.
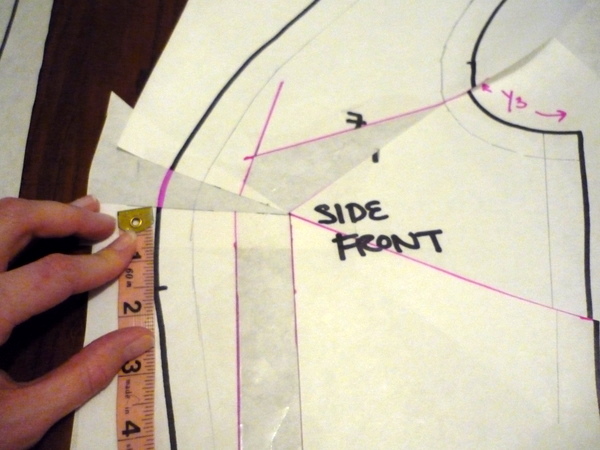 Then we go back to the Front piece, and measure up from the notch, the same distance as the Side Front.
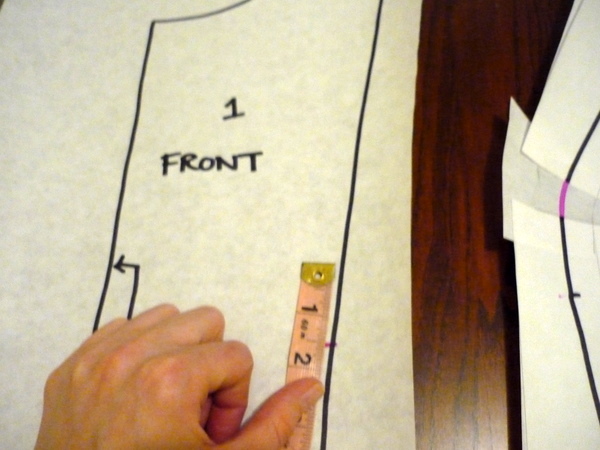 Draw a straight line across the pattern piece.
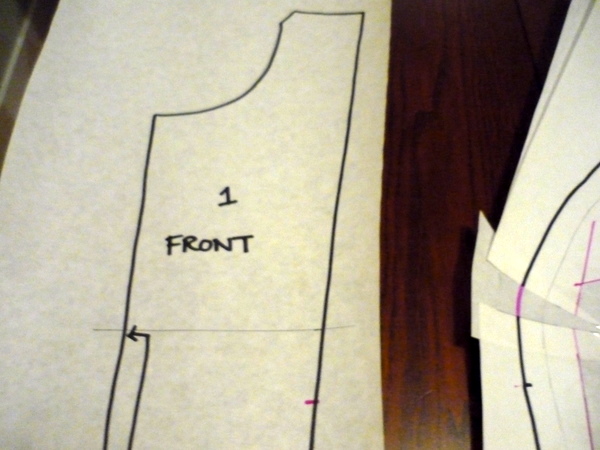 Slash along this line, and add an extra piece of paper underneath. Tape the extra paper to the top edge of the slash.
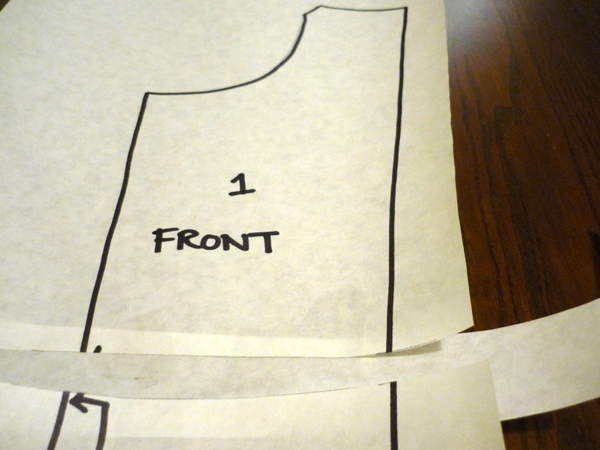 Now, measure off the distance from the Side Front and tape down the lower edge. Draw in the cutting lines, using a ruler.
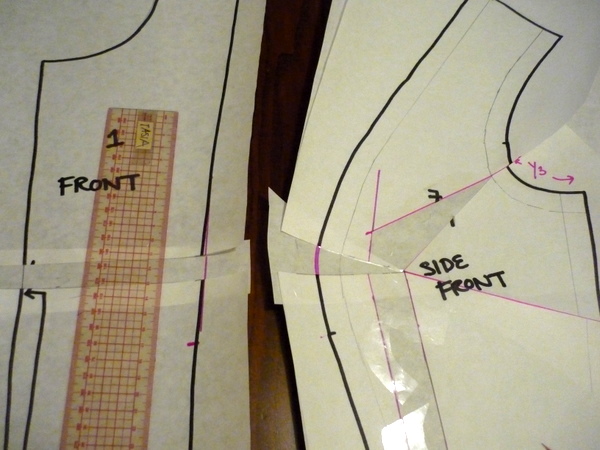 Last step! Measure the extra space added at Line #3, on the Side Front piece. We’ll need to add this amount to the Front piece as well.
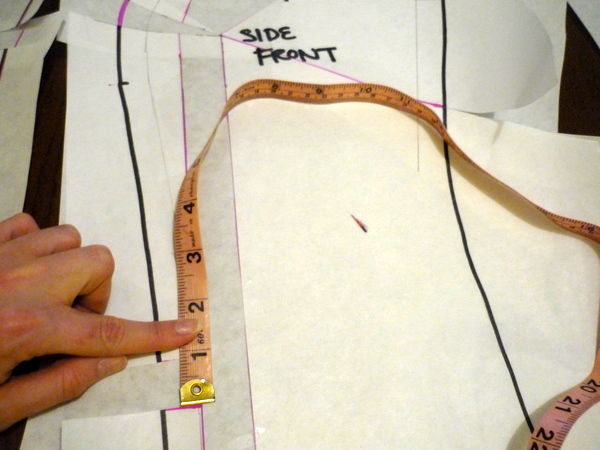 Add this amount to the Front panel as well. I measured up from the hemline so the additions are in the exact same spot, slashed and added in the right amount. Same as we did in the previous step!
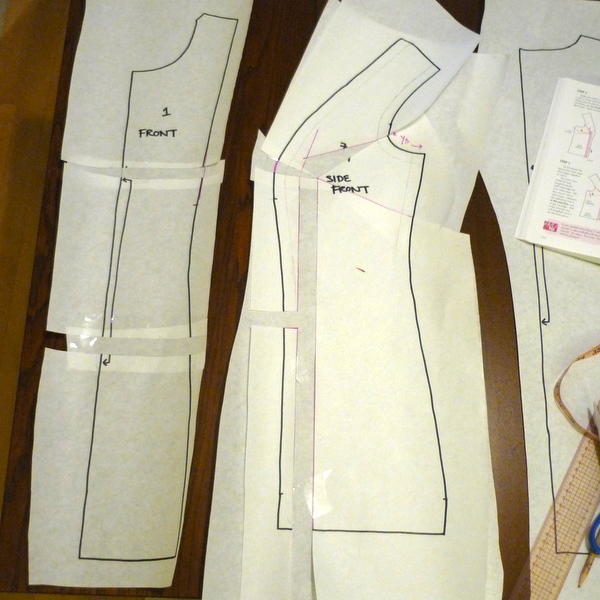 Those are our pieces – we’re done! Phew. That was an intense adjustment! Does everything make sense, for those of you following along with your own adjustment?
I’d highly recommend Fit for Real People, as a fitting resource! See if you can borrow a copy from your library to see if you like it. The photos, illustrations, and real-life examples illustrate a variety of fitting issues. You get to watch the pros work their magic and fit garments on a range of different bodies. That’s where this method comes from!
I also rounded up a bunch of FBA links, for more references!
A Round-up of Related FBA Links:
- Full Bust Alterations (or Adjustments) ~ FBA (From the Sew, Mama, Sew blog)
- Helpful Links for Bust Alterations (From Gertie’s Blog for Better Sewing)
- Guest Post: Lady Grey FBA! (From Gertie’s Blog for Better Sewing)
- Alterations: Full Bust Alteration for Princess Seams (From Stitches and Seams)
FBA-adjusters, what do you think? Is this the method you use? Any other links to add to the list above?
Also, is there anyone who’s muslin-ed or made the blouse that has done a FBA? Or, anyone that didn’t need one, that usually does? Feedback is welcomed on all things FBA-related – leave us a comment below!

It’s interesting how you do it. Great post!
I did this same adjustment for my Lady Grey, but it adds fabric to the waist-line so I had to do a lot of altering to decrease the waist. This time I was already a tad smaller in the waist than my over-bust measurement and then it just added more fabric when I did my FBA on the Pendrell.
So do you think it’s okay to just carve off some of the excess fabric from the waistline of the Front and Side Front pieces? I’m planning on doing a muslin anyways to check how my bodice shortening went but it’d just be nice to perhaps have a chance at not even having to alter the muslin!
This post is right up my alley since I usually have to do a RFBA (ridiculously full bust adjustment). Thanks for the extra links too – I love to have lots of examples!
This is perhaps the clearest FBA post on princess seams I’ve ever seen. Excellent work. I need an FBA sometimes (I have large breasts but a narrow frame (which gives some ease) so depending on the cut I do an FBA…) On the Pendrell blouse, I thought I”d need one but I did not. Having said this, I should probably have gone down one size (I traced the 10, should have done the 8) and done an FBA, if it was required. I think the overall fit of the blouse would have been better from the get go…
This is a great tutorial- good job. I always have to do a FBA, and while this is the method I usually use for princess-seamed garments, I have to take the extra width back out of the waist and hips. Depending on the cut of the top, usually I can split it among the front princess seams and the side seams. I would definitely play around with it on the muslin, though. Unfortunately, I’m not participating in the sew-a-long, but I would love to sew a Pendrell when I have time!
I thought I was going to need an FBA but didn’t. My tissue fitting is on my blog. :)
I use the FFRP method all the time! It works wonderfully for me and has totally changed my sewing. The stitches and seams link is one of my favorites because of that little animated diagram that shows where you slide everything open.
One thing that might be helpful to add here is that some people might need to add some of their width to the center front rather than all of it on the side front piece — it depends how you breasts are positioned. If they’re fairly far apart, then adding just at the side will cover the breasts, but you might end up with the princess seams too close to the middle (rather than going right over the nipple).
Another note — there are FBA methods that don’t add width at the waist, if you don’t need that extra width there (as one commenter mentioned). But for something with princess seams, I think it’s easier to use this method and then just take out the extra around the waist at the front seams and side if need be, rather than messing with additional flat pattern alterations.
This is beautifully done! I’ve never had this problem either. My cups definitely do not run over. All I can say is, thank goodness for padded bras. Ha. Would you recommend doing this process in the reverse for SBA?
I completed this adjustment and it definitely helped. Just a couple of words of warning:
1. If you have a full bust, you may also need to lower the bust fullness. I didn’t notice this during the tissue fit, but it became very obvious once I made up a muslin. Fit For Real People tells you that it’s important to lower the bust fullness before you do the FBA… but I did it afterward, obviously, and it seemed to work out just fine. (I highly recommend checking the book out for instructions on how to do this – I haven’t blogged about it myself, yet.)
2. Like others above me posted, it does add quite a bit of ease to the waist/hips, which will need to be removed if you only have a full bust. The good news is, the princess seams allow for it to be taken out in small increments. I took a lot out from the front & back centre pieces, because it was the easiest (no altering seam curves/length!) and because I thought the princess seams could be a little further toward the centre on my body. Also, I took the opportunity to add a little more shape to the back, which was fun.
this is the method i learned (mumble) years ago when i learned to garment sew. you do have to be careful, though, to always wear the same or very similar style bra as a change can cause quite a mess. i wore a bali bra for years and then the style was discontinued and i had to refit the muslin almost entirely. not only were the cups shaped differently, they were also spaced differently from the center and from my shoulders, and the more fitted the muslin is at the waist, the more exaggerated the problem becomes.
I’m not sewing along, unfortunatley (too many projects!) but I love your posts on it! If you don’t mind, I’d like to chime in about the FBA. I have a fuller-than-average-but-not-huge bust (really, how does one describe these things? =) ), and the method from Fit for real people leaves me with a lot of work getting rid of the extra inches at the waistline (glad to hear I’m not only one, btw!).
Instead, I use a way that gives me more width where I need it (for some strange reason above the bustline) but don’t mess with the waistline. If there is someone out there that has a problem with the rest of the blouse being fine, but it’s just a little tight at the overbust, I could make a little how-to. However, your blouse seems to so well-made in the fit that I doubt I’d need to change much on it! =)
Another very detailed and helpful explanation, as I’ve come to expect from Sewaholic.
I second Nicole’s comment that some of us need width between the bust points as much (or more) than at the side.
I have used the slash-and-spread method on other bodices with good results. For a princess seam, though, I take the lazy way out and simply redraw the bust curve along the seamline, adding 1/4″ or so to each side of the seam at the bust point (I also lower the bust point at the same time), tapering to nothing about 6″ above and below.
Don’t remember which fitting book I learned this method, but it works like a charm for my shape issues, adding a bit more fullness for “the girls,” plus the extra width I need across the bust, split between sides and center, without changing anything else. I do make a muslin to test these changes, as “tissue fitting” on myself (I don’t have a dress form) is my idea of sewing hell.
I definitely don’t need this adjustment either but it was really fun to read through it and see how it all comes together! Oh, and I’m all finished with pattern adjustments and ready to cut out my fabric!
Well done for such a detailed post!
I finished a Pendrell Blouse, posted on Burda Style under my alias ‘Zeegang’
It’s my first one and a learning lesson – next time I’ll try a more suited fabric and go a bit smaller in the size.
Incredibly detailed post! I’ve bookmarked it for when I do need to do a FBA. Thankfully my muslin indicated that one isn’t essential for me for this pattern (woohoo!).
Oh I just found this! I hope it’s not too late to join- I just bought a pattern but will have to wait a few days for it (am in Australia!)
Very excited about cutting! But I’m wondering if you have fabric recommendations for underlining a polyester chiffon? It’s a print. Thanks!
Hey all! got my pattern, posted my fabric,and joining up today, just in time for the hard stuff! Woohoo!
Whew! What a relief to hear good feedback on this post. I’m no FBA expert, and this was my first time making this pattern adjustment. So if I can do it, you can too! It’s like cooking, if you can read and follow directions, you can cook. (Theoretically.) Sewing’s the same, and so is pattern adjusting! Just take it slow, one step at a time. In fact it’s easier than cooking, because nothing can burn. :)
Ok, answers to your questions!
@Moeno: Of course! Just take in the extra width at the waist or hips along the seamlines. It might be easiest to do it on the actual blouse, so you can customize the fit in the real fabric, on your real body. If you’re already planning to make a muslin, that’s a good time to figure out how much to take in, too. Just remember not to over-fit or you won’t be able to pull-on the blouse!
@K-Line: Thank you! glad it was all clear. There are so many ways to get a pattern to fit you – change sizes, adjust for full bust, cut along different cutting lines – there’s no one right answer.
@Nicole: Good point! You’re right, it might look better on different bodies to have the addition on the front panel instead, or evenly added to both pieces. Thanks!
@The Cupcake Goddess: I’ve never done a SBA but I am sure I’ll have to for the Colette Crepe dress. In standard patterns, I’m fine, but I find the bust is larger on Colette Patterns so I’ll have to adjust accordingly. Want to see a SBA when I get to it? :) I think the concept is the same, but instead of slashing and spreading, we slash and overlap.
@ms. modiste: Another good point! Fit for Real People is a fantastic book. There are so many possible factors that affect fit, this FBA post is just one example.
@Reana: It’s never too late to join! All of the posts are conveniently listed on the Sew-Alongs page, so you can find the ones that you need and follow along:
http://sewaholic.net/sew-alongs/
@Pam: Hi Pam! Ok, underlining for poly chiffon, let me think.The most natural choice would be to use a poly charmeuse in a coordinating colour, or cream or white to make the print pop. Take your chiffon to the fabric store and test it over different coloured fabrics based on the colours in the print. You’ll see what looks best! If your print is really bright and you want to tone it down, choose a darker colour. Or use the brightest or lightest colour to really make a statement! You could also use lining fabrics, maybe a bemberg rayon lining? It would feel nice against your skin. Both of these ideas will keep the blouse soft and drapey. If you want a more substantial blouse, you could underline with cotton batiste or voile. It would be way easier to sew than poly charmeuse, and would give you a soft cottony feel when wearing the blouse. But, you’d lose the drape and softness. I hope this helps!
Amazingly clear post- I confused myself slightly reading fit for real people but you sorted me out again! I love all the different fabrics you and the other sew-a-longers have been using, its such a versatile pattern! I’m looking forward to seeing the lace one made up-it’s going to be beautiful!
I lowered the bust fullness on my non pear shaped homage to Pendrell, using the fit for real people method and described it on my blog if any one wants to know how to do it.
Sorry- hit enter too early- the link is
http://monkeysockslearnstosew.blogspot.com/2011/01/pendrell-homage-fba-p1.html
Really looking forward to the later posts, yours is one of my favourite blogs!
Hi Tasia, that was very interesting. There is a far simpler way to do an FBA on a princess seam however, that doesn’t upset the other measurements. I simply redraw the fullest part of the side front, adding fullness at the curve and blending it into the original seam above and below as much as is needed, and then add a bit of extra length to the centre front to compensate for it. That is an easy one -measure from shoulder to waist and check the measurement against the pattern to see how much extra to add. Works really well on fitted bodices too. And if one is in danger of making the side front too deep, I balance the extra fullness needed between the two pieces.
Also, I always check that my fuller busted sew victims have got the correct bra size and are wearing supportive bras not 5 year old tired ones! Women often wear a size or two too big in the back and too small in the cup. One lass was resized from 14C to 10F. This of course impacts the placement of the bust fullness too when FBAing. :)
I am in a bit of a different “boat.” I do not need a FBA, but I need to move the entire princess seam in a whole inch! My muslin has the princess seams too much to the side of my bust. I have been working on this for days, and I am confused!
Wow! It looks a bit complicated, but by far the most understandable demo I have seen. Thanks so much for the help!