Hey everyone! We’ve received lots of questions about the Davie Dress, so I wanted to answer some of them here so the answers are public and all in one place. This post covers a long list of good questions that you may or may not have wondered as well, and our answers.
I broke the questions into two sections: design modification questions and fabric questions. If you have any other questions, just ask!
Davie Dress Design Modifications:
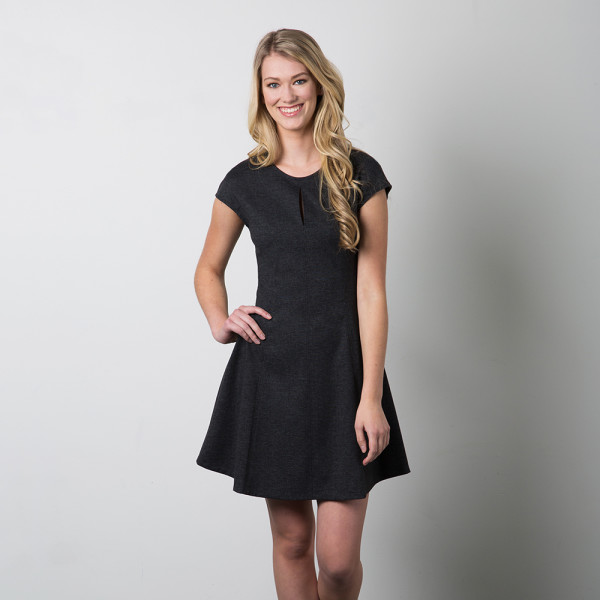
Q. Can I skip the keyhole?
Sure! The keyhole is a design feature, it doesn’t affect the fit or the ability to get the dress on and off. When the instructions call for you to leave the seam open, simply sew it shut!
Q. Can I eliminate the centre front seam?
Yes! You totally can. Some of you wanted to eliminate the keyhole neckline, so why not just cut the front on the fold and remove the seam allowance? Align the pattern piece along the fold, extending the front edge 5/8″ (1.5cm) OVER the fold. Or trace and trim 5/8″ (1.5cm) along the center front edge of the pattern piece, then you can line up the cut edge of the pattern piece along the fold of your fabric. Speaking of cutting knit fabrics on the fold, here’s a related post that might be useful.
You could do the same with the center back seam, too. However, having a vertical line down the middle does add length visually. So it’s nice to have it there as well.
Q. Can I lower the neckline?
Yes! It’s easy to lower the neckline too, since the neckline is bound with bias tape. Simply trace a new neckline, lower than the original one, and cut off the excess. If you’re going way lower (more than 1″) then I might make a little mockup of just the neck area, draw in the desired neckline right on the fabric and make sure it looks good on you.
Q. Can I make the Davie Dress into a maxi dress?
You sure can! Simply extend the panels down, at the same angle, so they maintain the same shape and flare. It’ll be quite flared this way, so you may want to reduce the flare. (Or not – might be more dramatic that way!) It might be heavy, so consider your fabric choice carefully. Something like the blue printed jersey below would be nice, something like the grey doubleknit will get really heavy in a floor-length garment.
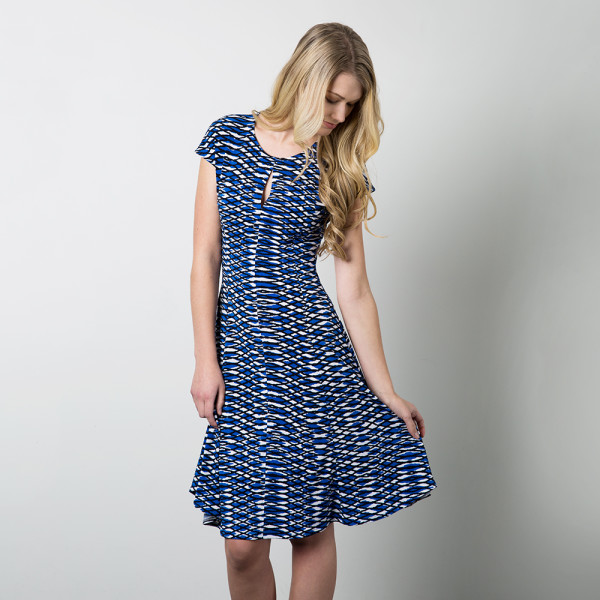
You can see the flare of the panels in the longer version above. Imagine that the seamlines keep going from the knee to the floor, and that’s how it will look in a maxi-length version.
Q. Can I add sleeves, say from the Renfrew Top pattern?
Again, this is something we haven’t tried. But if you love that idea, give it a go! What I’d do is use the armhole from the Renfrew Top as well as the sleeve. The armholes on the Davie Dress are designed to be sleeveless, and they won’t fit the Renfrew Top’s sleeve exactly. I’d trace the armhole from the Renfrew Top onto the Davie pattern, and then you know the sleeve will fit exactly into the armhole! Start with the sleeveless version of the Davie Dress, as the cap sleeve version is extended over the shoulder and is very different from a set-in sleeve armhole shape.
Q. Can I add pockets?
I’m not sure where to suggest adding pockets that won’t add bulk or weigh down the dress. You could add inseam pockets, but I find they gape and sag in knit fabrics. They’d be better in a dense knit that doesn’t stretch too much but then they’d be even bulkier. Patch pockets would conflict with the long vertical lines of the princess seams so I wouldn’t recommend them either. I’d consider doing an inseam pocket that closes with an invisible zipper, so the mouth of the pocket doesn’t gape open, if it didn’t add too much bulk. If you have a better idea I’d love to hear it, and so would the people who’ve asked about adding pockets!
Q. Can I skip the topstitching?
Sure! It’s optional. I skipped it on a version I’m working on. I like it on thick dense knits as it keeps the seam allowances pressed open and finishes both sides of the keyhole nicely. You don’t have to do it if you don’t want to, or if you prefer to serge your seams together. It sure does save time if you skip it. If you aren’t sure, make a test! Cut a scrap of your fabric and sew a seam, press it open, topstitch, and see if you like it.
Davie Dress Fabric Questions:
Q. Can I sew the Davie Dress in a striped fabric?
I’m always hesitant to give a resounding yes to anything I haven’t done personally, but I can’t see why a striped knit wouldn’t look amazing! You’d want to line up the stripes across each panel so they match as they cross the body. It shouldn’t be too hard to do. On the longer version, the stripes will meet like a V at the flared part of the hem.
Here are some posts that might be useful:
http://sewaholic.net/cutting-striped-knit-fabric-matching-stripes/
http://sewaholic.net/three-tips-for-sewing-stripes/
And if you make a striped Davie Dress, I’d love to see it! I picture it as cute and sporty, especially if you choose the shorter length.
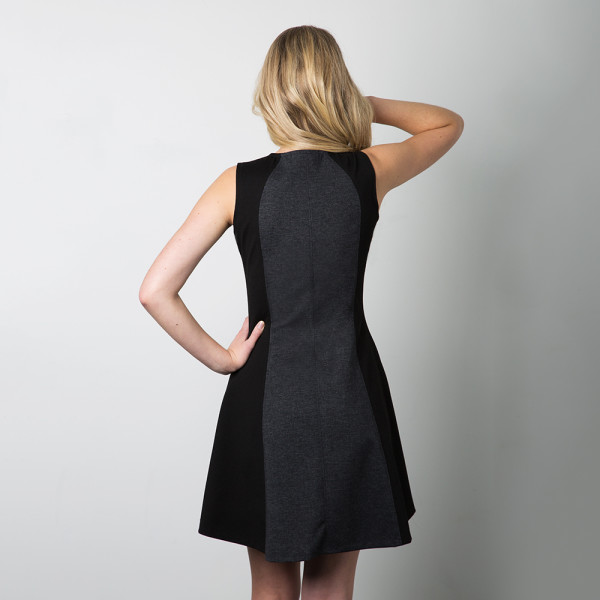
Q. I love the contrast panels! How much fabric will I need if I want to use contrast fabric for the sides, and a different fabric for the centre panels?
Excellent question! When this one came up I knew it was worth taking a little extra time to figure it out. Our sample is sewn in a reversible fabric, so we’ve simply used the black, reverse side for the side panels. The cutting is exactly the same, since you’re cutting pairs of each piece.
If you want to mix two different fabrics, we’ve calculated the fabric requirements for each view for you!
View A – 44/45″ (115cm) wide fabric:
- Front and Back Panels 1.75 yards (1.6m)
- Side Panels 2.25 yards (2m)
View A – 59/60″ (150cm) wide fabric:
- Front and Back Panels 1.5 yards (1.4m)
- Side Panels 1.75 yards (1.6m)
View B – 44/45″ (115cm) wide fabric:
- Front and Back Panels 1.5 yards (1.4m)
- Side Panels 2 yards (1.8m)
View B – 59/60″ (150cm) wide fabric:
- Front and Back Panels 1.25 yards (1.2m)
- Side Panels 1.25 yards (1.2m)
View C – 44/45″ (115cm) wide fabric:
- Front and Back Panels 1.25 yards (1.2m)
- Side Panels 2 yards (1.8m)
View C – 59/60″ (150cm) wide fabric:
- Front and Back Panels 1.25 yards (1.2m)
- Side Panels 1.5 yards (1.4m)
If your fabric is between the two widths, go with the narrower fabric requirements. These are a ballpark based on the largest size, but because of the shape of the pieces you don’t save a ton of fabric if you cut a smaller size. They’re also calculated using a with or without nap layout, so if your fabric allows you to turn the pieces you may be able to save a little fabric. Keep in mind if you plan to lengthen or shorten the dress, that will affect the amount of fabric you need as well.
Q. Can I sew the Davie Dress in a woven fabric?
The Davie pattern is specifically designed for knits, but it works well in knits without a lot of stretch like ponte and double knits so it may work OK in a woven. You’d want to change the armhole finishing, and possibly size up or choose a stretch woven. But it does have princess seams to fit over curves, so it might work out ok! Would love to see if you give it a try.
Q. Can I line the Davie Dress?
Lining a knit dress is sort of a pain – I wouldn’t recommend it. I feel like the layers will separate and move apart, if it’s sheer enough to need lining then you’ll see the seam allowances, it’s just not a good idea for this pattern. The two layers of fabric will shift and move and generally be annoying. If I absolutely had to, then I’d underline it and treat the two layers as one. Maybe use spray adhesive to keep them together during construction.
Hope this answers some of the questions you have. Let me know if there’s anything else you’d like to know, or if you have suggestions to add to my replies!
I am making the Davie dress and I used a medium weight viscose knit fabric. I am finding that the fabric is too heavy – the bodice is a bit stretched out – the bust point and armholes are hanging really low! I am going to try lifting up the shoulder seams to compensate but I wondered if there is anything I can do to stabilise the fabric or whether it was just the wrong choice?
Thanks
Louise
It sounds like it may be too heavy of a fabric! Heavy in combination with being drapey. A heavy knit that doesn’t stretch a lot like a doubleknit or ponte works well, and a drapey knit that isn’t too heavy also works well. But if it’s both heavy and drapey, it’ll do exactly what you described.
A couple of options: lift it up at the shoulder seams to move the bust and armholes back into position. Take the dress in overall so it can hug the body and stretch less. If you made the longer version, shorten it to reduce the weight of the garment.
Thanks! I still find knits a challenge to get right – this one is definitely heavy and drapey – it’s such a shame as I love the pattern and the fabric but it’s not a good combination!
Louise
That’s both the beauty of knits, and the trouble with knits! Each fabric is going to behave differently depending on the fibres, the thickness, the type of knit, the amount of spandex. Even two fabrics with identical fiber content that feel the same weight may behave differently. I’m glad you’re not discouraged! I find that dense knits like ponte are more predictable, it’s the lighter and stretchier ones that are more of a gamble.
Sewing the Davie Dress…. On the instructions it looks like a straight stitch is used. I’m used to sewing with a zig zag stitch on knits (like the Renfrew) – but I am a newbie with knits. Can you explain this to me?
You can do either a straight stitch and stretch your fabric gently (not a lot, just enough so the stitching is sewn with the fabric more stretched than completely relaxed) or use a narrow zigzag. Or a triple stitch or stretch stitch. Or skip sewing on the machine and serge your seams instead. I’d suggest sewing a couple of test seams on your fabric to find one that works well! For example, on the grey doubleknit we used, a straight stitch is totally fine, the fabric is dense and doesn’t need more than that. Because these seams are vertical, not across the body, they don’t need to have as much stretch as a waist seam would.
The short answer is there are many options and there’s no hard and fast rule on what you *must* use. If your seams have a gentle amount of stretch and the stitching doesn’t pop, that’s the goal. If you’ve had great results using a zigzag stitch then go for it!
I was wondering if this pattern could be used to make a top? I tend to wear more tops than dresses and really really love the shape of this dress. So do you think the flare would give it a mini peplum sort of effect?
You could definitely use it to make a top! If you simply cut it off around hip length, it wouldn’t have a lot of flare like a peplum, it would fit fairly close to the shape of the body. If you wanted that mini-peplum effect then I would flare out the panels from waist to hip. (If you tried that and didn’t like it, it would be easy enough to take the flare back in!)
On the flip side, you could use the pattern as a skirt, too! Cut it off at waist height and add an elastic to the waistline or a wide knit band.
Thank you, now I’m gonna have to try that! Can’t wait to see your versions!
I love this dress Tasia. I can’t wait to start my own – I am definitely doing contrast panels.
Thank you! I’m glad you like it. I like the contrast panel effect, I have one with a high-contrast black and white print and solid black side panels. It’s dramatic, but very cool!
With regards to pockets, my thinking is that you’d want to create a whole new pattern piece in the front side pieces. Sort of like the pockets on the new Melissa dress by Muse, you’d get a single line/seam at the top of the pocket at about hip height, then the pocket would bag down. The front side piece could be one looong piece with folds in it, or two separate pieces.
I’m not sure how to properly explain this though!
That makes sense to me! We’re working on a new design that uses this exact construction, it’s a cool method and wouldn’t be too bulky. Perhaps I could do a demo if there’s enough interest, or at least sketch it out.
For in-seam pockets in a knit, make the pockets out of lawn or voile. If you feel the knit is too light, reinforce the seam above the pocket with some lawn or voile selvage. I’ve found this works really well, although pockets will almost always be more visible in a knit than a woven. :)
Thanks for the suggestion! Makes sense for a thinner, less obvious pocket.
Thank you for the post it help a lot. I can’t seem to find your archives on your home page any more so I can’t read the posts I miss last week. It was there last night and now its gone
Archives are back! You can always go to the home page to read all of the posts, or choose ‘older posts’ at the bottom of the post you’re reading.
Thank you so much Tasia
This is so cool. Thank you Tasia. Posts like this are one of the reasons I love indie patterns – well, the ones from pro designers like you:)
Glad you liked it! It’s pretty cool that we can take all the feedback and questions we get, answer the questions, and put that information somewhere that’s useful. It’s neat to be able to react quickly – the joys of being a small company!
Hi Tasia, I’m a bit confused on the instructions for the neckline. It calls for double fold bias tape, but, and this may be obvious to everyone but me, I’m not sure if you mean bias tape made out of woven material or knit material. If the bias tape is supposed to be woven, is it possible to bind the neckline with knit material instead? I have problems finding bias tape and hate making it.
It’s regular woven bias tape, the kind you can buy pre-packaged. You can also make your own if you prefer. Knit binding would be too thick if you follow the instructions as written, you’ll want to change the method depending on your fabric and the look you want. There’s a great article on the Coletterie about knit bindings, showing four different ways to finish a neckline that might be useful if you want to change it up! https://www.coletterie.com/tutorials-tips-tricks/how-to-bind-knit-edges-the-ultimate-guide
Great! Thanks for the reply, I can’t wait to sew this dress!
if you underline it in a knit,what fabric would you suggest the underlining be?
Jumping in to add my input to this question. If I were you, I’d use a tricot knit lining — normally comes in black, white and nude colors. Adds some opaqueness but not much bulk. Something like this: http://gorgeousfabrics.com/shop/knit-linings/44-inch-wide-tricot-knit-lining-black/
I have a long torso and usually lengthen tops – where would be the best spot to lengthen as it is so shaped – between the 2 notches?
I’d lengthen between the armhole and waistline – so below the underarm and above where the dress starts to curve out for the hips. Choose a point about 1/3 of the way up from the waist between waist and underarm.
I just finished my Davie dress and had quite a bit of pooling at the back, I guess maybe I need to do a swayback adjustment? Do you have any suggestions for how to make this type of alteration on the Davie? Thanks.
I’m tracing out the pattern for my first trial, and have to grade between sizes. I’ve got the front and back pieces done no problem, but I can’t figure out how to grade the side panels. I guess it’s the way all the sizes are offset so it’s easier to see, but I’m not sure how I’d tackle grading sizes from the hip to the waist. Has anyone else done grading on this pattern?
Hi Steph! What I’d do is look to see what the difference is between sizes, even if the next size line shifts inwards instead of outwards, and draw in the curve on the outside of the cutting line. For example, if there is a 1/2″ difference between sizes, then I’d add 1/2″ outside the cutting line where I want it to increase in size. Or if that seems too confusing, then figure out how much more I want the waist to increase, divide that amount by the number of seams, then add it to each piece. For example: you want 2″ more in the waist, and there are four seams. Divide that 2″ into four, and add half an inch to each seam.
Thanks Tasia! That makes so much sense, what a relief! Thank You!!
No problem! Glad it makes sense. Sorry for the delayed reply, I’ve been away and just returned!
Hi Tasia! I just wanted to let you know that I made the Davie with inseam pockets, and it turned out really well, so it’s definitely possible to have them work! The knit I used was a stable cotton jersey, but I cut the pockets from woven lining so that they wouldn’t stretch. I considered using some kind of stabilizer on the side seams, but it turned out my knit was stable enough that they don’t weight down the dress. I love my new dress – thanks for another great pattern!
That’s really great to hear, thanks for leaving a comment! Your dress looks amazing, what a gorgeous little black dress!
Hi,
I´m sitting here in my half-done Davie dress….All went well until I basted the side seams and tried it on. I evidently swank so I have to take some more in the back. However the biggest problem is the half-sleeves. The opening will be too big when I hem them, especially under my arm. It´ll show my bra!
So, either I did something wrong, or the sizing is wrong, but I did measure myself first and compared to the patternchart on the envelope. Now, I think I should have chosen a smaller size but on the other hand, too big is always “fixable”….I can´t find a tut for the Davie dresss which is why I ask here… Do you have any tips on how I can solve this problem??
Love the Davie dress! I have made one for me and two for my daughter with more in the queue (perfect to pack for her summer internship in D.C.). We love the look of the contrast center panels in a print and solid sides. Ponte di Roma is our fabric of choice, although a patterned “ponte” I bought at Girl Charlee seemed too lightweight to be a true ponte. I used it anyway for the center panels and stabilized the shoulder/sleeve seam. The woven bias tape binding stabilizes the neckline.
With so many Davie versions in knit (did I mention how much we love having fun with prints for the center panels?), I’m considering a version in woven with an invisible zipper down the back. I think bias tape would still work for the neckline with a hook and eye closure above the top of the zipper. What do you think?