Glue-basting is awesome! It feels like cheating, but if David Page Coffin recommends it then it can’t be wrong. I used his book Shirtmaking for the construction of my Granville Shirt and one of the things in it is glue-basting. I thought I’d talk about it in detail as it will come up again and again when I talk about the collar and cuff construction.
You get better control from glue-basting than basting with machine stitches, because the machine isn’t stretching or pulling the fabric. You also get a chance to lift and reposition the interfacing a few times to get it right.
This works for sew-in interfacing, not fusible as the fusible already has adhesive applied. I used bleached muslin as interfacing, which is nearly the same thing as regular muslin but bleached so it’s pure white.
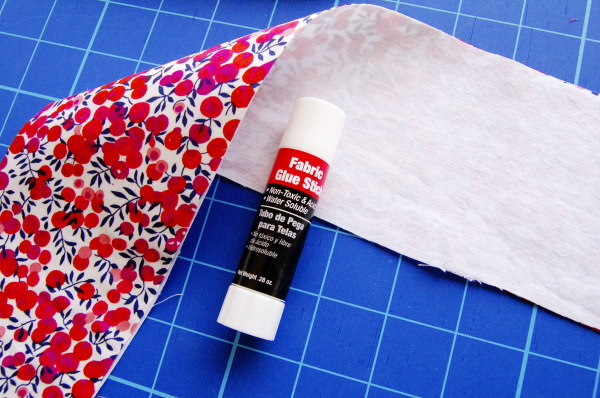
You need fabric glue stick, not a regular craft glue stick. This glue is water-soluble so it will wash out the first time you wash the garment.
How to glue-baste:
Cut a layer of sew-in interfacing to match the fabric piece.
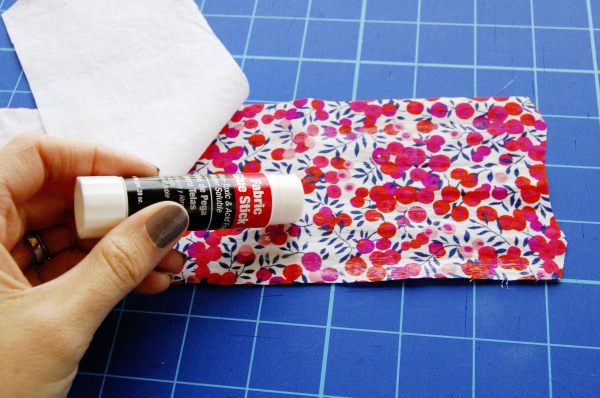
Open the glue stick and twist it just a little so it’s barely above the edge of the tube. Rub the glue stick on the wrong side of the fabric. Try not to get gobs of glue on the fabric. That’s why raising the glue stick just a little is important, so you can’t overglue.
Gently place the interfacing on the wrong side of the fabric, starting at one end, and smooth it down along the piece. I start at the end that’s most important to line up, if there is one. On this front band, I want the curved top edge to match more than the bottom of the band.
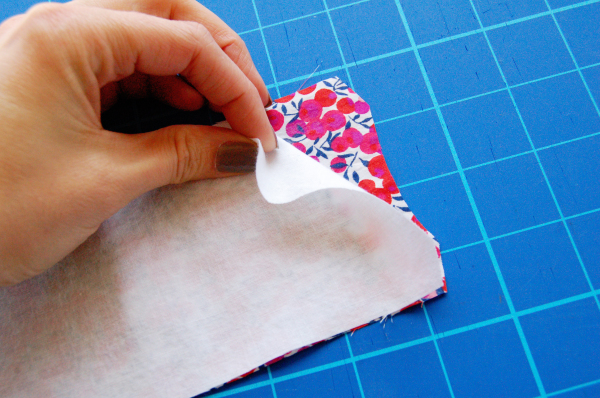
If the edges don’t line up, or if there are bubbles or lumps, simply lift and reposition the interfacing so it lines up better. You can do this until the glue dries. I tried to figure out how long it takes for the glue to try, it starts to stick after about a minute so you don’t have a lot of time. (Your glue may be different and also it was in the window so it was warm, which could have made the glue dry faster.)

If you are basting a long piece, start at one end, glue down about 4″ – 6″ (10-15cm), then work your way down the length of the piece.
Check out more posts on shirtmaking here!
So easy! Thanks for sharing this! Glue basting sounds so intimidating… but I can see here it’s so not. Adding this to my tool bag!
No, it’s super easy! As easy as gluing paper when you were a kid. :)
As you said, I thought using glue was almost like cheating. Now that you say it’s not, I’d believe it’s a good method. :) I’ll try it out.
I know right? It does seem like cheating since it’s not a traditional needle & thread method. :)
I’ve used washable Elmer’s school glue (not Glue-All, which won’t wash out as well) for basting, and pressed it dry with an iron. It washed out just fine. I’ve also read that you can use any regular glue stick, as long as it is the washable kind, not the permanent ones. Elmer’s glue only works on natural fibers like cotton. Maybe fabric glue stick will work on other fibers too? And yes, it does seem like cheating. I’ve glued down the edges of pockets after I pressed them over a heavy paper template, then glue basted them in place before stitching, and they came out almost too perfect looking.
Here’s another really cheap method I sometimes use to temporarily stick two layers of fabric together. Like Elmer’s glue, this only works on natural fibers (cotton, linen, etc), and it washes out easily. In a spray bottle, mix about 3/4 teaspoon (4 mL) cornstarch in 1 cup (240 mL) cold water. Protect your ironing board with a piece of cloth. If you use a cotton/poly blend fabric for the protective cloth and press cloth, it won’t stick to your garment fabric as much. Shake the spray bottle frequently as you use it. Spray your fabric until it is wet and layer it together. Use a press cloth to keep your iron from getting gunked up. Press the fabric with your iron on the wool setting until it is dry. Carefully peel the press cloth off. Be sure to test on scrap fabric first to make sure you have your iron set to the right temperature. If your iron is too hot, the starch will scorch.
What a cool tip! Thanks so much for sharing.
Thanks for the tips Leila! Smart idea about gluing the corners of a pocket. I used a template to press mine (which I’ll talk about in a future post!) but gluing the corners would add another level of precision. Smart!
I need this! I’ve been aware of it and thought it would be handy for certain things, but for some reason I never thought about basting sew in interfacing, which is pretty much all I use. Amazing!
Yup! Thanks to the Shirtmaking book for that good idea. I don’t like basting it in because the layers tend to slide, even if I work from the middle out like I usually do.
An easy tidbit. Thanks for sharing!
Any time!
I’ve been glue basting forever. It’s not cheating … it’s sewing smarter. :-) As Leila mentions, yes, you can use any kind of washable glue stick. You don’t need to pay the premium for a “fabric” glue stick. Just be sure it’s dry before you start sewing so it doesn’t gum up your needle.
Sewing smarter, I like that! I didn’t find the fabric glue stick too expensive but then again I’m not sure what a regular glue stick costs either. :)
I second Leila’s comments above: I’ve used Elmer’s glue in a pinch and it does work too. I think I used it on a cotton-poly blend and my fabric was fine.
I’m thrilled with both your new patterns Tasia.
Good to know, I’ll have to keep that in mind if I run out. I’m so glad you like the new patterns!
What are the advantages of glue basting over fusible interfacing?
They aren’t related. Basting is a method for temporarily holding a fabric in place so it can be permanently stitched. Interfacing provides body and structure to the fabric.
Glue basting is for more than just fusible interfacing, you can also use it on folded edges and such. In regards to choosing sew-in interfacing versus fusible, I like that there’s no fusible glue to come un-glued over time and I like the quality feel of using bleached muslin as sew-in. It’s soft and all-cotton and feels nice to me. Fusible is faster. It’s really a personal preference thing, and also availability. If you have one on hand and not the other, you might want to use what’s available to save time!
Great suggestion, quick tip to add: I’ve had far less bubbling issues when I cut the pieces after fusing them together, so do that first if you can. This was a tip I read somewhere in a fashion incubator comment at one point and it really helped me.
Thank you Hannah, I will have to try this one next time. I love Glue-Basting, don’t you!? Annette
PS. Also, I have to say, Leila’s post is another good one too! Thanks A
That’s a good idea! Works well if one fabric is shifty, or stretchy, or with lots of bias edges.
I’ve never really liked fusible interfacing (it always bubbles for me and is weird) – so I usually skip it in button up shirts… but some fabrics could definitely use some structure. I’ll definitely be giving this a try in the future! Thanks for the tips!
For sure, you’ll want to have some sort of reinforcement in the collars and cuffs, so they don’t lie limply. More tips coming up! :)
Very interesting, thank you very much.
Glue basting is the way to go, isn’t it!? I don’t have any tips to add, you’ve covered them all very nicely! Thank you, Annette
I do like it! Comes in handy for small areas and it’s so quick.
I’ve used Elmer’s (school) glue sticks before, and when I made a shirt out of that ruffled knit, I used Elmer’s school glue (the white liquid) to hold the ruffles down for cutting (I started out with a glue stick, but that was taking forever and was very tedious.) Both ways worked like a charm, but the glue stick definitely dries faster. :-)
Nice! Thanks for the tip. Makes sense for cutting ruffled knit, good idea! (I probably would have just cut it as-is but spent more time adjusting as I went.. preparing it sounds like a smart move!)
I’ve used Elmer’s liquid school glue for doubled bias bindings too: first the raw edges, drying with the iron, then stitching; and then the folded over edge, dry and stitch. Works great and no pricked fingers from the pins!
Good to know! And it washed out no problem?
To this day I get “that’s cheating!” giggles in my workshops when I first pull out the glue stick; and I still can’t see why. To me it’s just a better sort of glue in every way than anything heat activated that won’t wash out! And I’d say that any sort of glue stick is OK if it washes away (dissolves when re-wetted) and is acid-free (most are; I think it’s basically just paste) if any survives the first wash or two. I always nail it down by ironing it dry when the pieces are positioned just right…and the layers peel away easily even then if more fiddling proves necessary. I like to use a pin point to pick up and position tiny dots of the glue in small spaces, such as at the tip of a placket tower, both when forming the point and when holding it down for topstitching. Final tip is to keep the stuff in the fridge if you live in a dry climate or don’t use it often; and just toss it if it ever gets stringy…it should be sort of like rubbing with a stick of butter when it’s fresh. Long live the stick; best sewing tool ever—If I had to choose between a serger and it, the glue would win every time! (And glad you’ve found my book useful,Tasia; thanks!)
Great post Tasia! This is something I haven’t tried yet but am keen after reading this to give it a go. And thanks for your extra tips here in the comments too David!
and….big question, david – or tasia!!!
does anyone know where i can still grab the book in hardcover? is it no longer in print? i have a library copy but would like to own it :(
thanks for any info!
I don’t know, I got my copy for Christmas 2010! I can see it on Amazon for Kindle, and used copies. I’ll keep my eye out for it locally or online.
Found a link here! http://www.tauntonstore.com/shirtmaking-david-page-coffin-070393.html
I have been reading this book from my local library. BEST sewing book I read so far! So many techniques and tips, not only for shirtmaking but general sewing. Glad to see the master himself comment here :D
thanks, lady!!! i did also see that info on amazon, but i’d love a new copy that i don’t have to worry about, aha! the link you sent didn’t show the book for sale, but i messaged them. barnes and noble will try and order it for me, but they’re not sure they can get it in. we’ll see!
Ack such amazing tips! I am going to try this soon.
Do you think it would also be suitable for flat-lining garments? Just to baste the edges together before stitching the garment. Or would the glue not hold long enough like standard basting stitches would?
I feel like this should work for flat-lining or underlining! I used spray adhesive once and while it smells toxic (do it outside if you can, and try not to breathe it in) it worked well for the entire construction process.
I am so thrilled that you commented on my blog post!! I’m super flattered that you are reading my blog and I was pumped to see your name in the comments section.
I love both the Shirtmaking book and the Making Trousers book, they’re excellent resources and full of good information. I always feel like sewing more shirts or trousers after reading them!
Do you still teach workshops? Where can I find out more?
Thanks also for sharing your tips on glue-basting here! The fridge thing makes sense and so does the dry ironing.
Well, I was thrilled to see you liked my books, Tasia; thank you:)
I do still teach whenever anybody thinks to ask, which hasn’t been often lately, altho since I’ve been working on a new sewing book I’ve been a lot more active online lately, which resulted in my being asked back to give workshops at the Creativ Festival in Toronto last October, and to Denver in Dec to film a Craftsy class. I expect I’ll be back in Toronto this Fall (a favorite city), and will be speaking at a Sewing Guild get-together in Portland, OR this May; wouldn’t be surprised if a few more opportunities spring up… I need to get busy posting more at my own blog, and when I do, I’ll definitely keep my schedule up to date. Thanks for asking! I
From what I’ve already read about your new shirt patterns, they look like classics in the making; congrats! And that means they’ll no doubt also make excellent blocks for tricking out with the detail ideas in my new book:)
Another fan of using a glue stick. As mentioned it doesn’t have to be specifically marked as fabric glue. I use the cheapest one I can find as long as it says washable. I glue stick anything and everything!
Interesting, good to know regular glue works too!
No, I do not glue baste. Glue has been around for an awfully long time, but you will not find professionals gluing when they can baste with thread. Glue can get very messy, and if you need to rearrange something, it can be difficult to take apart something that has been glued. With basting, which does not take long, you just snip the stitches.
The only place I would ever consider glue basting is on the triangular tip of a very narrow tower sleeve placket.
I look forward to trying the glue-baste method. I do so hate all the ripping out of basting stitches!
Why? It’s fast.
Tasia – have you seen this? http://www.amazon.com/The-Shirtmaking-Workbook-Construction-Resources/dp/1589238265/ref=cm_wl_huc_item
Oh no I haven’t! Very cool. I will definitely add that one to the library. Thanks so much for the link!
Do you cover the whole collar with glue? Or just enough to secure the interfacing?
Somewhere in between – it isn’t saturated and covered completely, but I do make sure the edges are covered and there’s enough in the middle. Just like if you were gluing a piece of paper – you’d probably go around the edges, then across the middle.