Hello everyone! Today we’re going to go through a FBA (full bust adjustment) for the Saltspring dress. Most patterns (including Sewaholic) are designed for a B cup size. It’s important to keep in mind that your cup size in pattern making may be different from your bra cup size. To figure out your size, start by measuring across your bust. Then measure your high bust (for this, measure above your bust, running the tape measure just under your arms). If the difference between these two is more than 2” (5 cm), then you are larger than a B cup.
For example:
- Bust measure = 41” (104 cm)
- High bust measure = 37” (94 cm)
- Difference = 4” (10 cm), so in this case you could do a FBA for a better fit!
Choosing your pattern size:
If you are larger than a B cup, then you want to choose your size based on your high bust measurement + 2 inches (5 cm). Then look at your actual bust measurement. The difference is how much extra room you are going to need to add to the bust. For example:
High bust measure = 37” (94 cm)
Add 2” = 39” (99 cm), so you should use the size 14 pattern piece as your base
Your actual bust measurement is 41” (104 cm), so you will need an extra 1” (2.5 cm) of space around the bust (keep this in mind for later!).
The method:
This tutorial is for an “imaginary full bust”, since we don’t actually have a full bust model or dress form to fit on. However, I did lots of research before putting together this tutorial to try to find the best way for you guys to do this. It seems that one of the most popular and well-reviewed methods is Palmer and Pletsch’s from Fit for Real People. So this is heavily influenced by that method along with lots of tutorials online. There are more links below and resources to help you out.
So let’s get started!
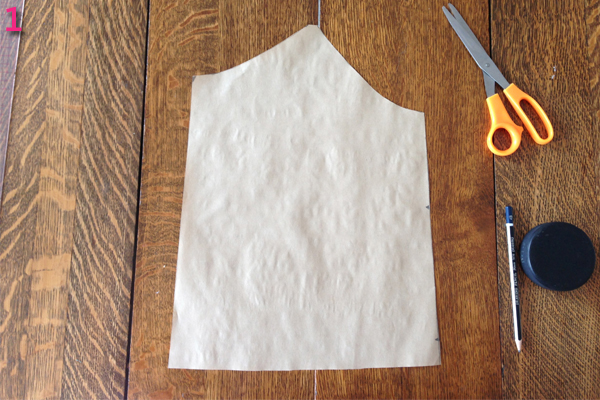
1. First we want to trace our Bodice Front piece.
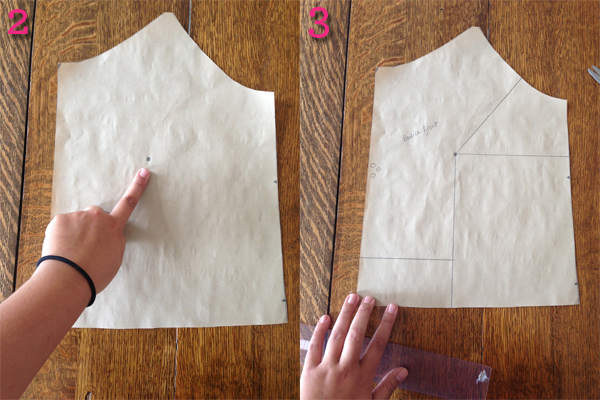
2. Take your traced piece and hold it over your body with the center front lined up with the middle of your body. Mark your bust point
3. Draw four lines:
One line from your bust point down to the waist, parallel to the grain line (center front).
A second line from your bust point to the side seam, perpendicular to the grain line.
A third line from your bust point to the underarm, about a third of the way up.
Finally, a fourth line at the bottom left of your piece, from the center front to your first line, perpendicular to the grain line (tip: you can use our ‘lengthen and shorten” guidelines to know where to draw this line).
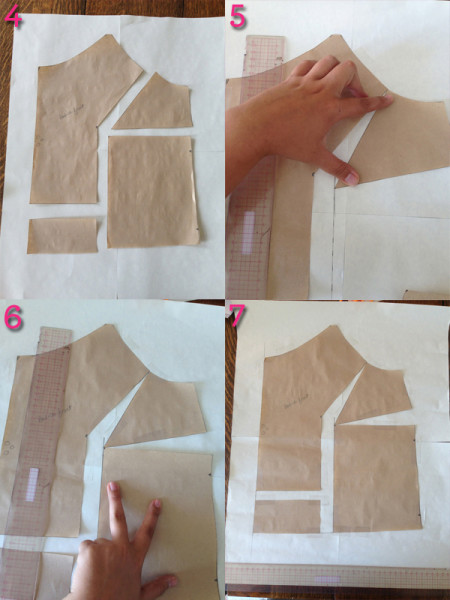
4. Cut along these lines to split your bodice front into four segments. Tape down your top left piece in place.
5. Now remember how much room we need to add to the bust? For this tutorial, it’s 2” (5 cm) total, so we need to open up our bust by 1” (2.5 cm) on this piece, which will add up to 2” (5 cm) when we cut on fold. You can see in the photo above, I am pivoting my top right piece like a pie, so that my armhole stays together, and I am opening an inch away from the bust point. Tape this down in place.
6. Now place your bottom right piece as shown, we want to line this piece up so that there is a 1” (2.5cm) space all down the middle, parallel to the grainline. Tape this guy down too.
7. Slide your bottom left piece down so that it lines up along center front and waist. Tape this in place.
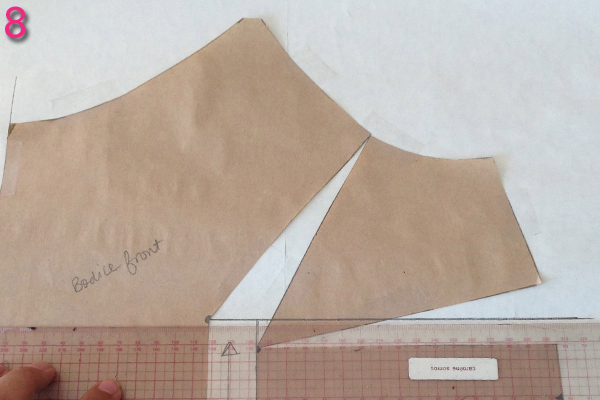
8. I decided to keep the dart in this tutorial – I feel it will be the best way to get a lovely fit around the bust! So to begin drawing our dart, draw a new line from the original bust point to the side seam, perpendicular to the grain line.
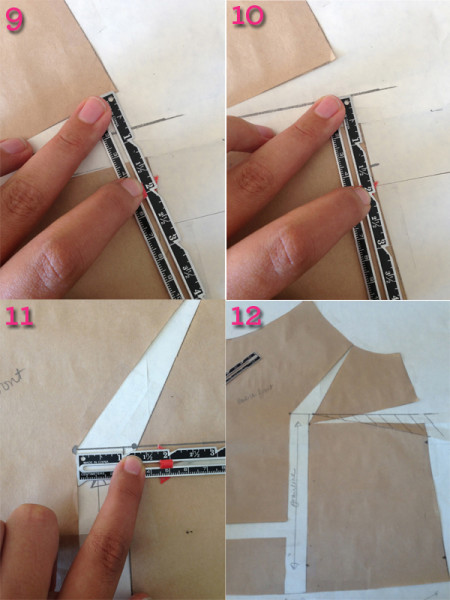
9. Measure the original opening at the side seam
10. Mark this measurement along the side seam, extending below the line you drew in step #8.
11. Mark your dart apex: it should be around 1 to 1 1⁄4” (2.5 to 3 cm) from the original dart point.
12. From the dart apex, extend your second line to your side seam marking to create a dart!
13. Close and pin your dart.
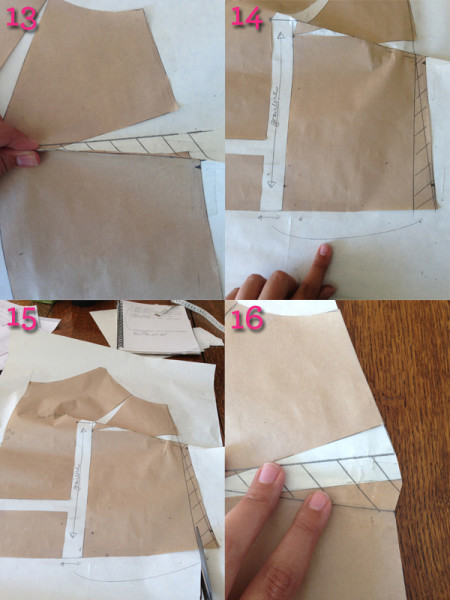
14. Now if you look at the waist, we ended up adding an inch (or whatever extra space you needed) when we added space for the bust. But we don’t need this extra space at the waist. So let’s trim this amount off the side seam and taper down to nothing at where the dart begins.
15. It’s finally time to trim down our pattern piece. Keep the pin in the dart as you trim, so you get a perfect dart hat at the side seam.
16. See? That’s a dart hat!
17. We just need to check our side seam notches! Since we have a dart now on our bodice front piece, let’s add notches at the side seam at the top and bottom of the dart. Now let’s compare our front bodice to our back bodice side seam, to be sure our pieces will match up nicely. I raised the notch on my back bodice side seam so that it lines up with our dart seam.
18. Same thing goes for my lower side seam notch, where my waist seam will be. Make sure those line up on your front and back piece! I had a tiny bit of excess on my front bodice, so I just trimmed that off.
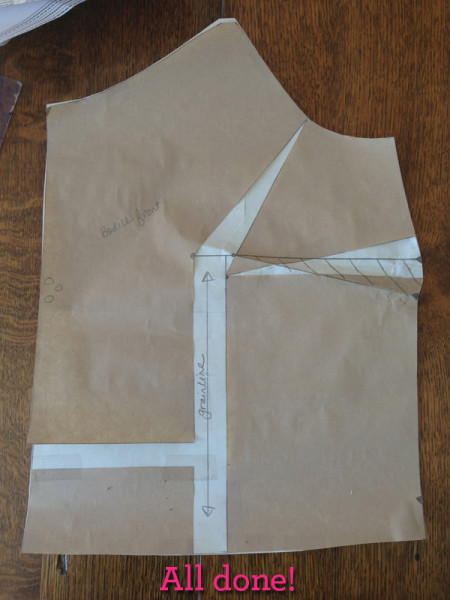
Now you we can admire our lovely FBA!
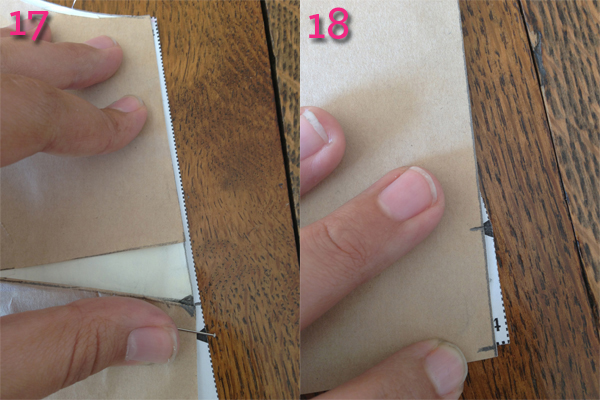
Remember the bodice lining is 2” (5cm) shorter than the bodice piece. So you can trace your bodice piece, and trim off two inches from the bottom to get your lining piece.
Here is a round up of some of our favorite FBA tutorials and tips from around the web:
- Gertie does a great round up of FBA and SBA (small bust adjustment) links.
- We did a really similar FBA tutorial for the Lonsdale dress! More links can be found in that post, too!
- As mentioned above, this book comes highly recommended.
Alright, so that just about rounds it up. Please do let us know if you have any questions or anything to add in the comments.
Oh excellent! I knew most of this other than how to position the dart when adding one, that was extremely helpful, thanks!
Thank you! I don’t need an FBA even though my bra is a d cup! Revelation, most appreciated. One less adjustment horrah
This is wonderful! I´ve always wondered how a FBA was done. I´m gonna read through your post ten times to learn it by heart! :-)
If you do it this way the waistline will become longer. I don’t know where, but I have also seen an FBA adjustment where the waistline still stays the same. Depends on the kind of garment also of course.
Sorry, I see you cut it off at the sideseam…
Hi Tasia, this is interesting. Can you explain why you add 2″ to the high bust measurement? I’ve never done that when adjusting a pattern for full bust. I pick the pattern size based on my high bust measurement and then do a FBA to create the room needed for my full bust measurement. I’d worry that adding 2″ to the high bust would result in a poor fit at the shoulders…
Same question about the 2″ added to the high bust.
Hi Claudia and Amy! Here is why I suggest adding 2″ to your high bust measurement when you are choosing which size to trace as a base:
– pattern is designed for a B cup
– if you are a b cup, your bust measurement should be about 2″ more than your high bust measure
– so to decide which size to begin your FBA adjustment from, you want to take your high bust measure plus two inches (imagining you are a b cup for the sake of choosing a size).
From there you can follow my steps above to determine how much you need to add for your FBA. Hope this makes sense!
If you have a method that you are used to and more comfortable with, then go with that! For example, the method in Fit for Real People is slightly different from the way I do it. These are major alterations, so I’d definitely suggest making a muslin, and you can go from there and see how it fits!
That’s interesting, Caroline. I see a sewing experiment in my future! Thank you.
Thank you! I definitely need this tutorial…
This is a really interesting post. I really like how you used the extra length at the side seam to create a bust dart. It annoyed me to see on the colette tutorial that they said to lengthen the back piece by the same amount. Because the whole point of an fba is you’re only adding to the bust, not the back!
If there is an existing bust dart there, which is common, it simply increases in size which works great.
I’m always waffling on about fitting on my blog because I so want to understand it lol. There’s so much to learn but with great tutorials like this we can all get there (I hope!)
To clarify, Colette’s anise and hawthorn tutorials.
Huh. Looks like they’ve updated it a bit? That’s good. Or I’m nuts? Either way, time to stop talking trash and spamming your blog lol!Thanks for the tutorial. Saltspring is lovely :)
Thanks for your comments Jo! I’m glad you find our tutorial helpful! It’s always nice to see different methods and choose the one the works best for you! Thanks for participating :)
Thanks for the great tutorial. I learned I should use this adjustment and I am so glad I haven’t cut out my fabric yet! What a relief to know the rest of the dress won’t have to be oversized. Can’t wait to get this dress sewed up!
This is the best tutorial I’ve seen for this adjustment. Thanks so much for posting it!
Thanks for this tutorial and the links, Caroline! I have figured out over time that I can *just* get away with not doing an FBA, but I’d like to try one sometime or will at least file this away for future reference. Well explained.
Hi,
Just thought I would let you all know that in Australia we do not measure our bust or bra size that way. I have purchased bra’s off American sites so I know that they measure across & above the bust, but most Australians would not know that, nor would they understand what ‘high bust’ means. We measure for bras across the bust for cup size & under the bust for the band size. I have also found that when ordering a bra from the states I order a band size smaller than the sizing tells me too otherwise they are too loose.
I am not disagreeing with the way you have altered the pattern at all, just letting you know that the way you’ve got the measurements would be confusing to some people.
Imo the bra band sits under the bust so it is logical to measure underneath, but I’m assuming there must be a reason for the way you guys do it – Could you please explain why the band measurements are taken above the bust and not under?
Thanks & I love your site!
Hi Selina! This theory is just for patterns, not for bras. Bras in Canada use band measurements and bust measurements as well I believe. This is strictly for pattern adjustments only, to determine a starting point. Hope this makes sense, and sorry for the confusion! You can see an old example of measuring the high bust here http://sewaholic.net/pendrell-sew-along-measuring-and-choosing-your-size/
Caroline:
Great information! This is very real, practical help. Thank you.
Lora
Hi there! I know I’m a little late to the game here, but I just had a quick question about bust adjustments. I usually do an SBA and just reverse the method that’s given for a FBA.. so my question as to do with the length of the bodice. If I take out 3/8″ in the bust, that means that the front bodice pieces will be shortened by 3/8″ in length, is that correct? Either I can shorten the back pieces to match, or add more length to the front pieces to compensate.
I just wanted to make sure I’m doing this correctly! I referred to the FBA for the Lonsdale dress, and have also referenced a couple of different books on the matter, and I’m always left with the same question! Anyway, just wanted to make sure I’m doing the bust adjustment correctly. :)
Thank you so much for your help! This is an adjustment I make for every pattern, so I want to make sure I’m doing it right!!! :)
Hi Amanda! Sorry for the delayed reply here. I’m not an expert in SBA unfortunately! But here is my thinking…
Once you make your adjustment, you will be left with a shorter bodice front piece at the side seam. In my opinion, you should trim and shorten your bodice back piece to match. If you think about it, the reason the piece ends up being shorter is because you’re trying to fit to a smaller bust, so you do not need as much length in the bodice. If you lengthen the bodice pieces, then the waist of your dress may sit lower than you want it to, throwing of the proportion of the dress.
Hope this makes sense! In the end, I think it’s super important to make a muslin in this case. Since all of our beautiful bodies are so different, there really isn’t a right or wrong way to adjust – we just have to figure out what works best for us!
Happy sewing!
Hey Caroline! Thanks for the feedback! It totally makes sense.. there isn’t as much curve to cover in an SBA, so naturally the bodice will be shorter. Thanks for pointing that out, I never thought of it that way! I went ahead and added the 3/8″ back to the length of the bodice, though, only because I’m long-waisted and usually end up lengthening my bodice anyway, so it sort of kills two birds with one adjustment, hehe. :)
I’m glad to have some reassurance from another seamstress that I’ve been doing it right along the way! This is a good pattern to practice the adjustment on, anyways, since it does have a looser bodice. Thanks again so much for your help!
BTW.. I was thinking this would be such a lovely, loose top. I’m thinking about just hemming the bodice pieces in one of my versions, to see how it turns out. How do you think this will change the instructions for the zipper?
Thank you for such a lovely sewalong! I’ve really enjoyed following along, and am certainly referring to all your tips as I’m putting together my dress this week (better late than never!!). ;)
Hey Amanda! You must read minds :) I have a special post lined up that shows how to use the bodice pieces to make a top! I actually omit the zipper in my version (I don’t think it’s necessary for a loose top), and I lengthened the bodice pieces quite a bit, and made them a bit more a-line shaped.
Look for a post on all of this soon!
Hey, just wanted to say thanks, this tutorial has really helped me understand the FBA. Now tomorrow I will see if i’ve done i right!