To get a really nice collar stand, the stitching around the centre front corner needs to be perfect. Each side needs to be exactly the same, too!
One way to get nice results is to make a collar stand template.
Here was my first attempt at sewing the collar stand:
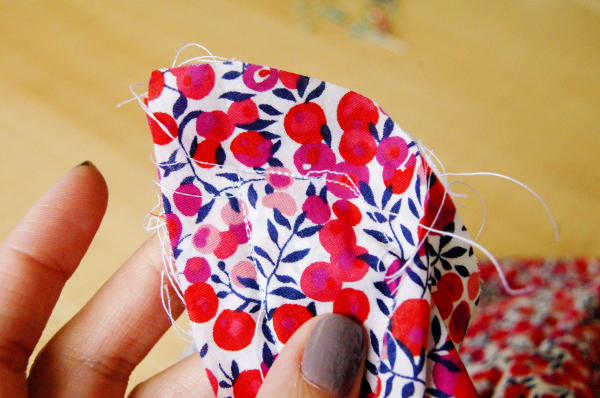
Yeah, no. Not good enough for my Liberty shirt!
So I unpicked the teeny tiny stitches and started again. I’ll post on making the collar stand later but first, I’ll show how to make a template for the collar stand.
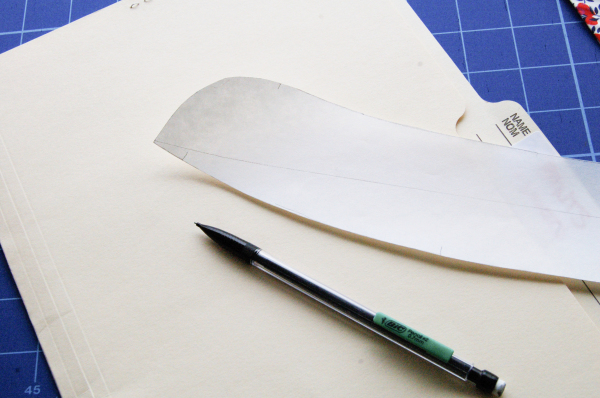
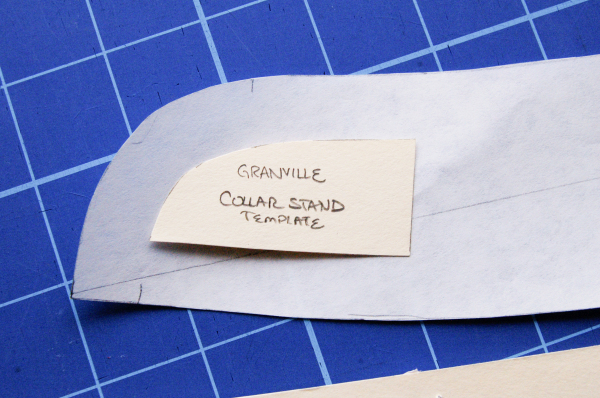
Take your collar stand pattern piece, and trace it off on a piece of card stock. I used an old file folder.
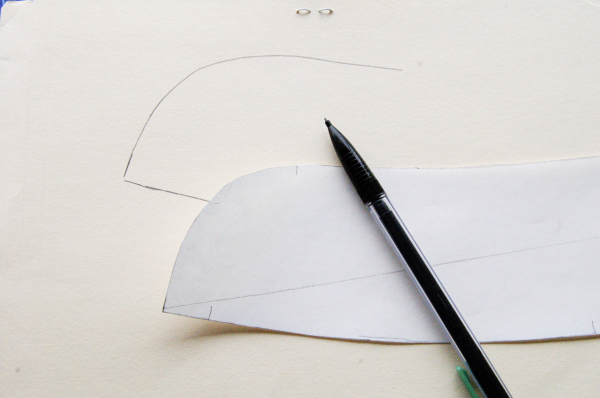
Then, draw in the seam allowances. You only need a small section of the collar stand piece, just to draw the curves in nicely and evenly.
Then cut out the template.
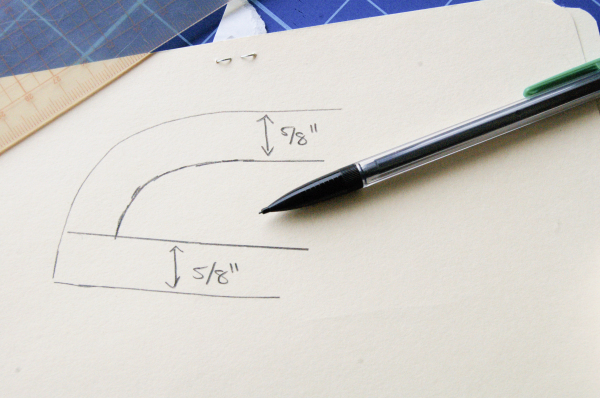
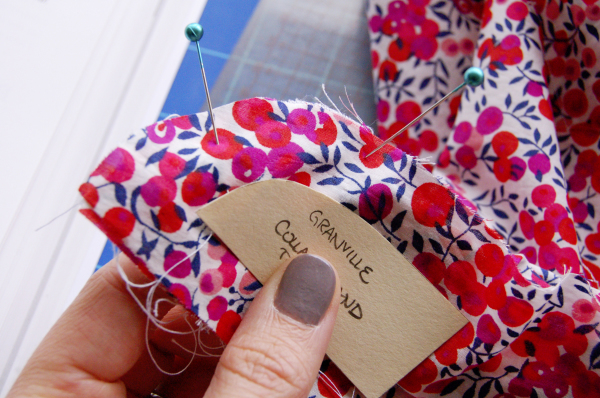
When you are ready to sew the collar stand curve, draw in the stitching line using the template. This will ensure it’s the same on both sides, and give you a guideline when it’s under the machine.
Next up: sewing the collar stand!
ps. Check out all our posts on shirtmaking here!
I love templates! I’ve been using heavy paper templates for the decorative topstitching on jeans pockets, but instead of tracing around the template, I stick it right on the fabric with double-sided tape and sew along the edge. It gives a finer line to follow than any marking tool I have, and the paper acts as a stabilizer, too. The presser foot glides right over the paper, making it really easy to sew curves.
What a great idea! I’d be worried that I’d sew through the paper but I could see how it would work well for decorative topstitching, where a chalk or marker line isn’t clear enough. Smart!
I can’t tell you how thrilled I am that you are doing these fabulous shirtmaking tutorials. I’ve been wanting to make a custom button-up blouse FOREVER but was procrastinating in the hopes you would one day do tutorials. Just like these! Hip, hip, hooray!
I’m so glad you’re enjoying the tutorials! It’s nice to have photo references for new techniques, even I like to refer to my own photos and notes for second, third and fourth shirts. :) If there’s anything specific you want to see, let me know!
Thanks Tasia, all shirt making help appreciated. I’ve bought the pattern and toile fabric so far. I haven’t made a shirt before, I’m wondering if you’ll be covering the plackards, as they are a bit more complicated than those in Sewtionary (I find pictures of sewing in action much easier to follow).
Yes, I’ll cover all construction steps for sewing a shirt! Especially the Granville plackets as they’re different from the more common continuous bound placket.
In case you want to get started sooner, here’s a good tutorial: http://off-the-cuff-shirtmaking.blogspot.ca/2014/01/tutorial-shirt-sleeve-placket.html
I’m not sure I understand the problem, but I use a Compensating foot, which rides the edge of the fabric.
It’s mostly to help both sides be exactly the same shape. If you use a template for the seamline on both sides of the collar stand, then they should end up identical! (As opposed to if one was cut slightly different, or stretched/distorted.) Drawing the seamlines in place also helps you keep on track, which might be what your compensating foot helps with!
Tasia, what a brilliant idea! This is such a simple technique that will make a BIG difference in the neatness of the finished shirt. I am almost kicking myself that I didn’t think of this myself after making so many Archers! There are so many layers right at the end of the collar stand, and I can never keep track of the 5/8 inch seam allowance accurately while I’m going around the curve. I’ve drawn in the seamline before, but I always just freehanded the curve. I’ll be using a template from now on! Thanks for a really useful tip.
Glad it’s useful! I have more template ideas coming up too. :)
Great idea!!! I guess I will undo my collar stand, because it looks ugly and uneven….Everything else on my shirt is going good so far.
Your post could not have been better timed! Thanks
I undid mine, but photographed it first so you guys could see everyone makes mistakes! :) It is tricky to go around that curve easily, the fabric edges can stretch and slip quite easily. Hope this helps!
Another great tip! Thankyou.
Instead of using double-sided tape, what about cutting the template out of freezer paper and then ironing it onto the fabric. I wouldn’t shift at all, and you’d be able to peel it off afterwards.
I’m not familiar with freezer paper, but from the sounds of it that could work! I didn’t tape mine to the collar stand, simply traced around it.
Pardon . . . what did you use to draw the seam line? I don’t actually see the line drawn in the picture. Thanks!
I draw it in the next step, I’m just holding it up to the stand as an example.. but when I do I just used a pencil! I like that it’s a very thin line and doesn’t smear like chalk pencils can. Look for it on Monday’s post! :)
This is amazing! I’m pretty sure I left a comment on your last post that started the same exact way, haha – but it’s really true! I unpicked the seam on my collar stand twice on the last collar I made, and I never did get both sides looking the same. This is brilliant and I am definitely going to be using a template from now on!
What a fantastic idea. I always manage to sew one side perfectly and then other side is horrible! Thanks for all your hints and tips
Nice tip!