Today I am going to talk a little bit about how to grade between sizes for the Gabriola Skirt. It’s quite simple, but I know sometimes all of the pieces can feel like a puzzle and it’s tough to know what to trace and where. So today I’ll be quickly reviewing how to trace your pattern when your measurements don’t correspond with just one size.
Sewaholic patterns are designed with the pear shaped lady in mind – that means a narrower waist and fuller hips. So if you are not a pear shape, you are likely spanning between a couple of sizes! Fear not, with this skirt, it’s super easy to grade between sizes.
Let’s look at body measurements chart to start.
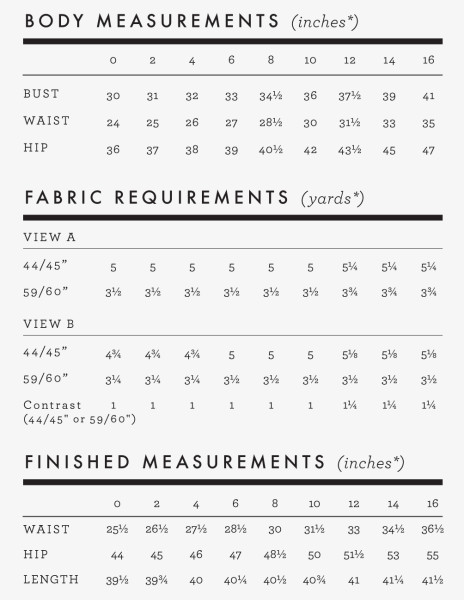
For this skirt, all we need to consider is our waist measurement and our hip measurement. The first step in this process is to measure your body, and determine what size you are at the hips and waist. Today I am going to be grading for a theoretical size 12 waist, size 8 hips.
Now here’s something to consider. If you are a size 12 waist and size 8 hip, you could easily just cut the size 12 and it would fit just fine. But you would end up with a lot of ease around the hip area which might not appeal to you! “Ease” is the extra room built into the fit of the pattern for ease of movement, too much ease will result in a loose fitting garment, and too much extra fabric. So if you’d like to get the true fit of the skirt, where it is skimming the hips, then you’ll want to grade down (or up) to your correct size at the hips.
So let’s start by looking at our skirt on a body to see where our pieces are falling.
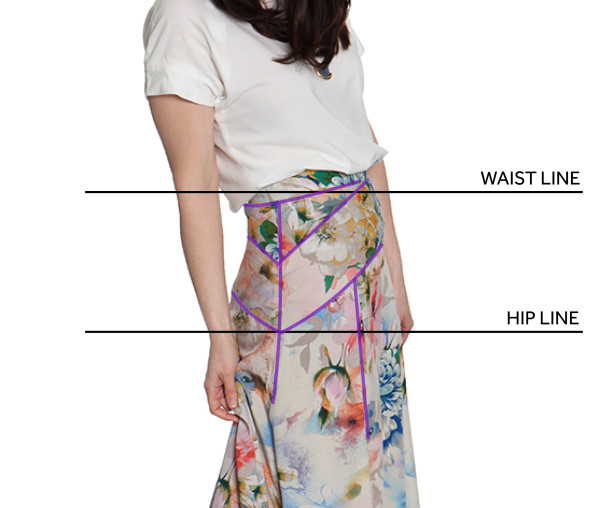 In the image above, I’ve traced the seamlines in purple so you can visualize your pieces. We’re pretty lucky here, because the bottom of the yoke is hitting the hips at the side seam. The waistband is also designed to sit right at your waist, so if you are a size 12 waist, then you can cut a size 12 waistband! But what about the yoke pieces?
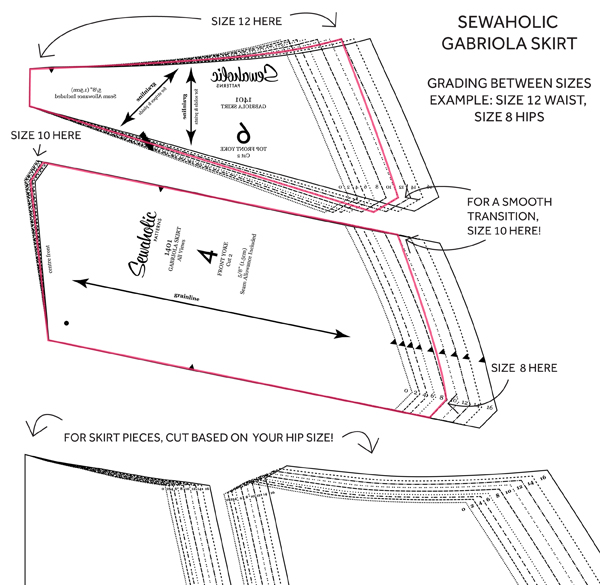
When you’re grading between sizes, the most important thing is to think about how these pieces connect. I like to lay out my pieces in the way they fit together, like you can see above. It just makes it really easy to visualize things. I am using the front for this example, but grading in the back will work exactly the same way.
We are cutting a size 12 waistband, so we need the top of top yoke piece to fit with the waistband. From there we want to trace down to a size 8 at the hips. But the hip point is at the bottom of the lower yoke piece, at the side seam – this point is on a different piece. So that we are grading smoothly, I am tracing the size 10 in between, at the point where we are connecting the top yoke and lower yoke pieces. Then we can continue to trace down to a size 8 at the bottom of the lower yoke. And since we have traced to a size 8 at the hip area of the yoke, we can cut our skirt panels in a straight size 8!
You can repeat this exact same method for the back yoke pieces.
And that is it! If you have any questions, feel free to ask me in the comments.
All of our Gabriola Sew-Along posts can be found here.
Thanks for explaining this!
One question: you say that the waistband for Gabriola is supposed to sit on the waist, so not below waist.
If I look at the size 8, for example, I see that the body measurements read a waist of 28.5 inches, whereas the finished width at the waist reads 30″ for size 8. Is this just ‘wiggle room’ or would it mean that the skirt does fall below waist after all?
Hi Sabine, this is just the wiggle room. When you move around (sit/stand/bend) your body with contract and expand a tiny bit in different places. So there is always a little bit of easy built in so that things aren’t skin tight. The 1.5 extra inches at the waist is just ease – it should still sit at your natural waistline. :) Hope this helps!
I need to shorten the skirt by 4in. I did so at the shortening line, then I graded it down to the bottóm to keep the full width at the bottom. Now the pattern is a lot more curved on top, where it meets the yoke. Is that ok? Or is there a better option?
Herzliche Grüße,
rebecca
Hi Rebecca, that should be OK! When you graded down, did you do so gradually from the top to the bottom? I would try to make the grading line gradual instead of a steep curve, it will just fall a bit more naturally that way.
Ladies! You read my mind. Was just about to shoot off an email asking this exact question..
Now to quickly redo the pattern pieces for the sewalong.
Sorry meant to ask, what about in reverse bigger hips and smaller waist? Do the same but in reverse? I actually need to go down in a waist size. 16 hips then 12 to a 14 waist?
Hi Stephanie, yes exactly, you can do the same in reverse!
Thanks..
Thanks.
My pleasure!
You’ve hit on exactly my problem, thank you Tasia, feeling much more confident now.
Thanks for this post Tasia! It’s also a great explanation of what grading in between sizes is.
Such a clear explanation, thank you. I haven’t really understood grading between sizes until now.
My pleasure Barbara, I’m so glad it helped!
You are so talented! I love this? Did you go to an art school to learn everything you know, or did you teach yourself? I read that you had worked in the fashion business before so I am simply curious!
Hi Sam! I studied fashion design in college, and I’ve been working for a textile company since then. I learned most of what I know of adobe photoshop and illustrator in school :)
Great info, thanks guys! :) I was very concerned this would be an issue for me as there’s a big gap between my waist and hip size – good to know it’s absolutely do-able! :)
Thanks so much for this — I love your patterns, but I’m definitely not a pear — more of a rectangle. A 12 waist and 8 hips is pretty much me, so it makes me a lot more confident to see this done!
I’m wondering about how fitted this skirt is through the hips. The photos make it look like it fits fairly close through the hips and then flares out, but the final measurements on the envelope back make it look like there’s quite a bit of ease at the hips. Basically, I’m trying to decide whether it’s worth grading between my waist and hip sizes (I’m a bit more pear-shaped than the pattern accounts for) or just going with the waist size and having a bit less ease in the hips.
Hi Ada! There is a fair amount of ease through the hips, even though the photos might not look like it! I think you would be fine just cutting the size without adjustments and having a bit less ease in the hips, however I would highly recommend that you make a muslin, just for the yoke portion, before cutting into your fabric. This will tell you for sure and you wont have to worry about your final project not fitting! Happy sewing :)
Hah, I’m usually disinclined to make a muslin, but I think I could manage it just for the yoke. ;) Thanks for the clarification and suggestion!
I am size 0 in terms of my bust and waist, but then the waist seems like it might be a bit big as I am 32.5 on my actual hips upto 34.5 at the widest point round by bum (i.e. slightly lower than my actual hip bones).
However, as I am at the smallest size I can not simply grade down to the next size on the hip. I thought I was pear shaped but now I am just unsure whether there is going to be too much fabric round the hips. Do you think I should make some sort of alteration and if so is there an easy way of doing it when you are already the smallest size?
Thanks
Sam
* I meant to say that “but then the hips measurement seems like it might be a bit big!”
Hi Sam! If you want the skirt to skim your hips, I think the best solution is to still trim down the side seams. You can use the same method as outlined, but you wont have a smaller size as a guide. You can still trace inwards and slim down your yokes and side skirt panels at the side seam. Just use the demo to get the idea of the shape you’re going for :) It should work out fine! Let me know if this makes sense to you.
Hi i need advice i made the skirt and found that its too big around hips my measurements is 30 waist and 40 hips so should i do size 10 for waist band yokes and size 8 for the skirt part? I did size 10 for the whole skirt and that seems to be big.
Does it fit in the waist the way you want? If so, then instead of starting again with a new size, I’d make the adjustments using your first skirt as a starting point. Decide how much smaller you want it to be than the skirt you made, then take that amount out of the side seams. For example, if you’d like it to be 2″ narrower through the hips but you like how the waist fits, then take 1″ out of each side seam, dividing that amount in half again to take 1/2″ off each side of the seam. Does that help?