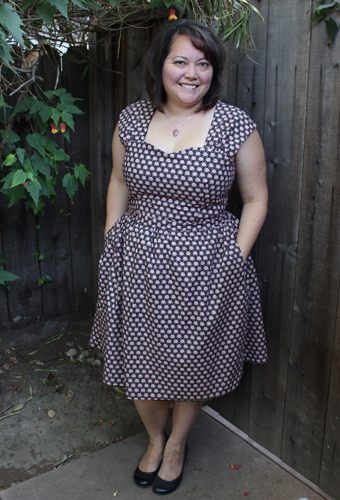
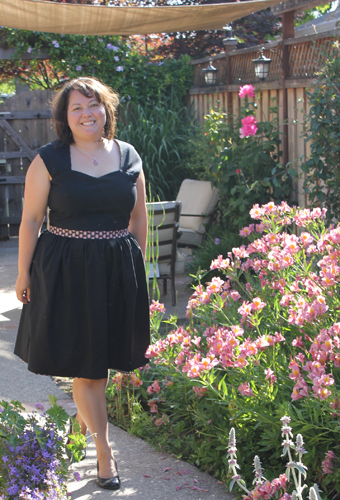
Yes, I said it – a reversible dress! Christine from the blog ‘What’s Up Cupcake’ made her version of the Cambie Dress reversible. One side is a fun print, the other is timeless black, and both look beautiful on her!
Here’s the outside: And here’s the inside!

Check out her blog for more photos and her project notes.
If you wanted to make your Cambie Dress reversible, the first thing to consider is the zipper. Either you’ll have to hunt down a special zipper designed for reversible garments, or have someone help you when zipping up the reverse-side of the dress. They make zippers for coats that are reversible, where the slider rolls around to the inside of the zipper, but I don’t know if they make dress-weight zippers that behave like that, and I bet both are hard to find!
Another point to mention is to keep the inside as clean as the outside. When the instructions suggest either stitching in the ditch or slipstitching, you’ll want to pick slipstitching or go very carefully with your ditch-stitching. Also, do you want pockets on the inside version, too? Or would it be better to eliminate them altogether? (I see that she’s not putting her hands in the pockets in the black version.)
Think about the colours for both fabrics, too. Christine’s black lining works as an outer layer, but a white lining used with a printed fabric might let the print show through to the inside. (Then you’ll just look like your dress is inside out. Not the look we’re going for here!)
I don’t think I own a single thing that’s reversible, but I like the idea for travel. One dress, two looks!
Get the pattern here.

That is seriously clever! What a great idea to have a reversible dress. I think my head may have just exploded a little bit at how marvelous that is!
I know! I immediately thought – why didn’t I think of that? Such a neat idea!
Oh my gosh – I think I actually squealed when I saw this! Thanks for featuring my dress :) And yes, to clarify, I do need help in zipping up the dress (which I usually do with all of my clothes… I just don’t have flexible arms). My hubby originally complained about not having a zipper pull to work with on the lining side (the black side) but is now totally used to it and a pro at zipping it up.
Oh and I left the sleeves on the lining side as the pattern instructed (without the gathers) because I didn’t want to create too much bulk.
Hey Christine! I’m glad you don’t mind me borrowing your photos for this – I thought people would be interested to see a reversible dress! Thanks also for answering the zipper question, I wondered if you got a super-fancy zipper with two heads or if you asked for help while doing it up. I’ve often thought of inventing a zipper-zipping gadget that might help – something like a coat hanger that you could use to reach behind and zip up your own zipper. (Come to think of it, maybe I should invent that!)
Your dress looks great and I love that you made it reversible!
This is a wonderful project Christine. Excellent job!
Cheers,
Lyric
http://www.sewlyricallyvintage.wordpress.com
the reversible dress is such a great idea. i love it :)
A fantastic idea.
Zipper puller-upperers (technical term) have been available for decades. They had a small hook attached to a long cord. A safety pin might work instead of the hook. Insert the hook in the zipper before you put the garment on, grab the cord and pull.
Interesting! I’d never heard/thought of those, but I guess it must be like how on wetsuits there’s the long tab to help you zip them up. And it makes perfect sense of course.
Awesome dress!
LOVE!!!!! Heading to Christine’s blog to subscribe.
This is really cool and you know, it’s quite smart too. I mean lining a dress is a lot like making a second dress…
How clever! Both sides look really classy. I like the idea for traveling too, I would wear the heck out of this!
Say what?!?! This is amazing!!! Great job, Christine!!
Wow! So impressive~ love the reversible action!!
It looks beautiful! thank you so much :)
I fell in love with the Cambie dress when I saw Chrstine’s version and how fabulous she look’s in it. I made my own in the meantime and there are only a few steps left to finish it. And then I will need some sunshine to take some nice pictures (no sunshine here :-()
My blog (which I just started) is in German, but there’s a picture (only a first glimpse) of my Cambie: http://sewmeow.blogspot.de/
I LOVE it so much! Thank you for this perfect pattern!