Today’s post is about how to change the Cambie Dress to a straight-across neckline instead of the sweetheart neckline! It’s so easy to do. Maybe you like the Cambie Dress, but think it’s a little too sweet with the sweetheart neckline, feminine gathered sleeves and full gathered skirt. Or maybe you’re about to use a really girly, sweet fabric and don’t want it to be too cutesy.
Changing just one of the details will make it a little less ‘sweet!’ You don’t even have to make permanent adjustments the pattern piece if you don’t want to, although I will show you how.
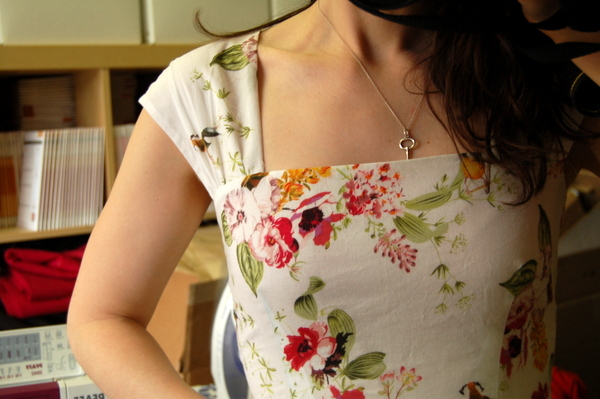
Here’s a peek of what the finished straight-across bodice looks like! This would be a good alternative for fabrics that won’t press nicely. Or if you wanted to add piping, a straight neckline would make it easier to add piping than the heart shape.
You’ll need:
- Pattern Piece #1 – Bodice Front
- Scrap paper – anything will do!
- Pencil
- Ruler
- Tape (Scotch tape is best, packing tape will work if you’re out of Scotch!)
Take your pattern piece. (I prepared this tutorial before the patterns were printed, so I’m using a printout of the bodice for this demonstration.)
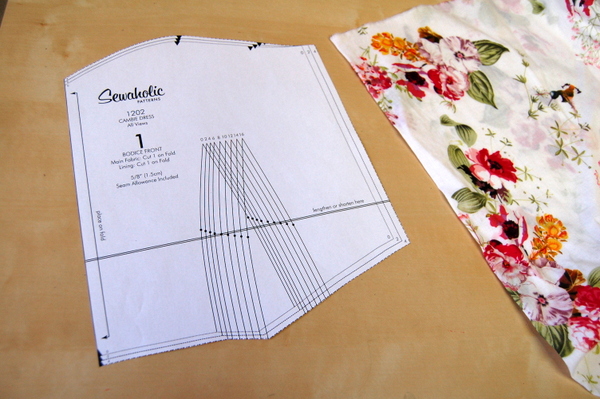
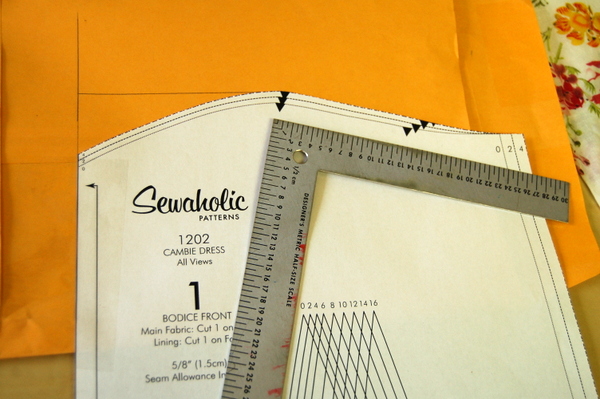
I’m going to use an old envelope as pattern paper because the yellow paper will show up better in photos for this tutorial! To start, draw a straight line vertically on the left side of your scrap paper.
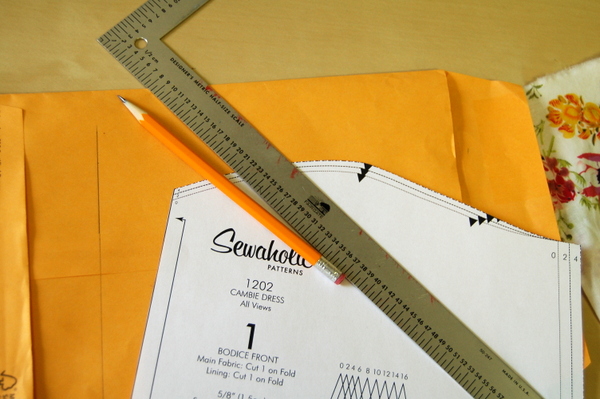
Now, line up the centre front of your bodice pattern piece along this new straight line. Take a square ruler like the one in the photo, and slide it upwards until the top edge is just barely peeking out.
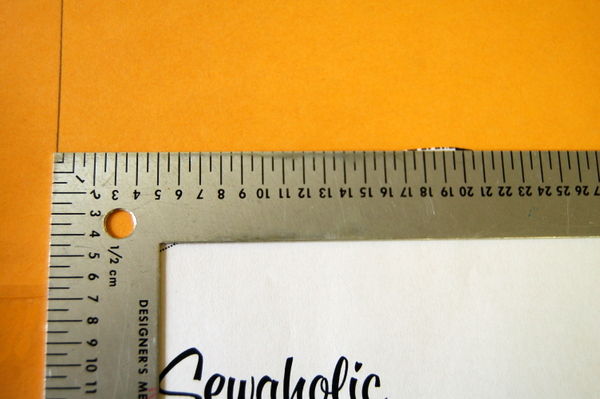
Now draw a straight line from the fold line to the first notch. If you don’t have a handy square-shaped ruler like this one, use the flat end of the ruler to square off the top edge. If you have the centre front on the line, it will naturally be a straight line from the notch to the fold.
Trim off the extra scrap paper, and your pattern piece is done!
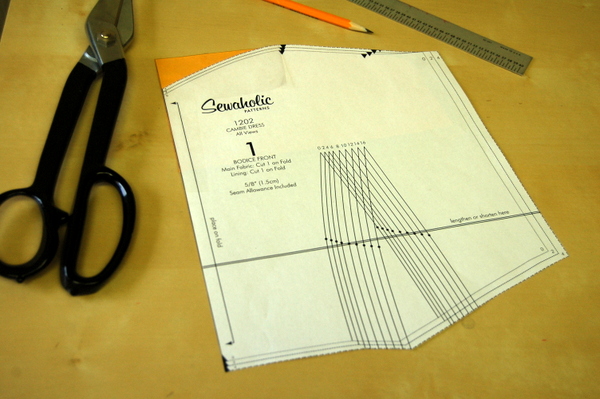
If you think you’ll only make it once, then you could simply follow these steps to draw a chalk line on your fabric, and use it to cut out the front bodice! (Remember to cut the bodice front lining the same way.)
It’s nice to make the permanent piece so you have both options ready when you sew your second dress! (And are less likely to forget and cut the original neckline on the lining fabric.)
Or, curve the neckline upwards, to form an upside-down scoop neckline! (Imagine instead of two curves forming a sweetheart neckline, there’s one curve across the bodice.) As long as the bodice stays the same from the notches to armhole, you can draw any type of neckline you want!
Get the pattern here. We also have a few more Cambie Dress sewing construction posts so you’ll be fully prepared to start sewing it up!

Thank you for posting this! The only part of the pattern that made me hesitant was the sweet heart neck line.
You’re welcome! Glad it was helpful :) It’s nice to actually see what it looks like sewn up, so you know what it will look like on yours before starting!
What a terrific modification! It’s so simple!
I’m so glad you posted this! I loved the dress, but was hesitant to consider it because I’m not a sweetheart neckline type person. Thank you! I’m going to pin this post and the dress so I can come back later (after pregnancy and nursing are all done). :)
I was planning to make exactly that alteration. Thanks for the quick how-to. It is always interesting to see how others change a pattern. I use to leave the original piece in tact and trace it out on pattern paper to make changes. Now I go ahead and use my pattern piece and make alteration to them by adding extra pieces and tape. I also write the date on them and say how I would change the pattern for next time. I find that by the time I use my patterns up, I know how to make the garment as if by memory and I can always re-trace a piece later.
By the way, I have noticed all the fabulous fabrics people have found for this pattern! It ups the ante for when my pattern arrives.
Nothy
http://www.aftagley.blogspot.ca
I love this. I have a fuller bust, and a sweetheart neckline, although I love them, is not as flattering on my body as a straight across neckline. I really, really, like this pattern. I found your blog just recently while looking for a basic tee pattern, but this one might get bumped up the list first!
Hi, I want to make the Cambie dress for an up coming event, my question is should I do a muslin first and do I need to add boning I notice that your bodice stands up nicely and was wondering if that is because there is boning in it. Thanks in advance, can’t wait to be this pattern.
Hi! Nope, there’s no boning in this dress. The only difference between this version and the ones posted last week is the straight-across neckline! You could add boning, but because the shoulders are cut wider at the back, and the gathered straps provide lots of support, the boning might not be necessary and in fact might make the dress less comfortable!
I always recommend making a muslin, because it’s a chance to make fit changes that make the finished dress even better. You can take it in while sewing, but you can only let it out so much, and if you’re using special fabric it might be hard to rip out seams without marking the fabric. So I would say yes, especially if it’s for a special event!
You read my mind! I love this pattern, but the sweetheart neckline is just a little too girly for my taste. I was daydreaming about purchasing it anyway and trying to figure out how to make the neckline straight across. Problem solved! Thank you. :)
No problem! It’s super easy to do. I know that I like super-feminine details, but not everyone does, so this is a great alternative!
Love the alteration, and the fabric!
Now you have me!
This never occurred to me! I think when I make the full skirt a straight neckline will be nice – I like the sweetheart neckline with the A-line skirt but it was a bit too much for me to pair that with a full skirt. Thanks for the idea and tutorial, Tasia!
Great hint! Thank you for even more options. The best thing about Sewaholic patterns is the options.
:)
My pattern arrived on Saturday which amazed me…great service! I love this neckline adjustment and can’t wait to start sewing…just need to crack on with the jeans that are currently on the drafting table. Soon, Cambie, soon!
Oh fantastic! That is super fast, I love it when that happens. Sewing the dress will seem like a breeze after making jeans I bet!
Pretty fabric! I’ll be doing this alteration on my Cambie.
Very pretty
I’m definitely going to try this neckline! Thanks for sharing!
Tasia, I love this pattern, with either neckline. Are you planning to do a sewalong? Cause it would be great if you did. Hint, hint!
I love both necklines! This one kind of reminds me of Tudor/ early Elizabethan gowns, which I adore.
Do you think one could move the lower part of the sleeves slightly more inward for a less square, rather trapezoid look?
Constance
I think you could – but you’d want to try it out first. The way the dress is sewn you attach the sleeves/straps to the front last, which gives you one last chance to check the fit. You may want to increase the size of the front sleeve instead of just moving it inwards, to make sure it’s still comfortable and still covers the shoulder like a sleeve.
Also, the inner sleeve is smaller than the top part, so remember to adjust both pieces if you do make them larger.
Hope this helps!
I love this alteration! I can’t wait to see the finished product :)
This is great! I love this dress, however have just found out that I’m expecting…think I could modify this to have more of an empire waistline and make it work for the first few months?
Congrats! I have no experience with maternity wear so I’d have no idea whether it would work or not.. but in theory, you could shorten the bodice to just below the bust, and sew the gathered skirt up higher for an empire silhouette. I’d probably leave off the narrow waistband, I think, as it’s more work than needed and might not feel comfortable. For a major adjustment like this I’d suggest making a muslin, for sure! You could even make the muslin as-is to check the fit, and trim off the lower half of the bodice and pin the skirt in place, to see how it looks. (Or just pin the skirt to an imaginary empire line without cutting the bodice to get an idea of how it will look..)
Hope this helps!
I love your dress patterns! They are gorgeous.
Great tip, thanks! It really is inspiring how much thought and effort you put into your patterns.
My pattern arrived today, much to my surprise! It was postmarked the 12th, so it only took 3 days to get from Canada to NZ – practically unheard of!
Anyway, I like this alteration. I’ve already done it to the muslin of my wedding dress because I didn’t want the patterned sweetheart neckline on that, but hadn’t really thought of doing it with this one. I’d probably still keep it with the A-line one because it would make a very nice semi-formal dress (I wear trackies and a hoodie to work so no need for it as office attire), but think I’ll straighten it out for the gathered skirt version. I see the point of what others said about it being a bit too girly.
Out of interest, how come the pattern’s printed in blue this time, not black?
That is lightning fast! Wow! That’s awesome to see how quickly patterns are arriving. You never know with the mail service, sometimes it’s slower, sometimes it’s super quick!
It’s printed in blue because the pattern printer changed their default ink colour to blue. (Quite literally, blue is the new black.) What do you think of it? I thought it was nice and clear, and the lines showed up well against the brown tissue.
I don’t mind it! I’m not sure how it’ll be when I come to trace it (I’m a preservationist) but as long as I do it on my nice light-coloured table it shouldn’t be an issue. Sadly, I’m going to have to wait quite some time…sigh.
Great alteration! I was already planning to make at least two version of this dress, and I think I’ll probably use the straight neckline with the full skirt, as others have suggested. And my pattern arrived on Saturday already! I just need to finish that other dress first…
Hi Tasia,
Great tip,useful also alter other creations!
Your blog is always inspiring.I really like it.
I’ve been following you for quite a long time and hope to try your patterns soon.
xx
Laura
I love this dress and pattern. And where did you find a fabric this cute?
I would like a low straight back (just above bra strap) but still keeping the cuteness of the sleeves.
Is this possible?
I’m new to sewing so don’t want to start altering when not sure what i’m doing.
Have bought some pink spot fabric and cant wait to start!
I don’t see where you found the floral silk crepe. Once I get the fabric I want the pattern with the straight neckline. Please share. Your site on pintrist has inspired me to get sewing again!!!
I’m so glad you’re inspired to start sewing again! The Cambie pattern comes with the sweetheart neckline but it’s easy to modify by following this tutorial. It’s a floral cotton voile that I used in this project, though a silk crepe would be quite luxurious!