 Today, we’re going to measure ourselves and choose our size. We’ll measure ourselves, compare the measurements to the pattern envelope sizes, and decide which cutting lines to follow.
This is also a good time to see if you’ll want (or need) to make any adjustments or alterations to the pattern.
Need to catch up? Here is the first posts in the series:
Ready to follow along as I measure myself? Let’s go!
You’ll need:
- a measuring tape
- a mirror
- the pattern envelope
- possibly a friend to help you, if there’s someone handy!
- pencil and note paper
Note: Wear the bra you’re most likely to wear with the blouse. I have a range of padded bras, some with lots of enhancement and some that give a more natural look. If you know you’re likely to wear the super-padded one with this blouse, then measure yourself wearing the right bra.
Measuring yourself:
The first measurement will be the bust. Measure this around the widest part of your bustline, making sure the tape is straight around the back. (This is where the mirror comes in handy! Take a glance at your rear-view and check if the tape is straight around your back.) If it dips down, your measurement will end up larger than it needs to be.
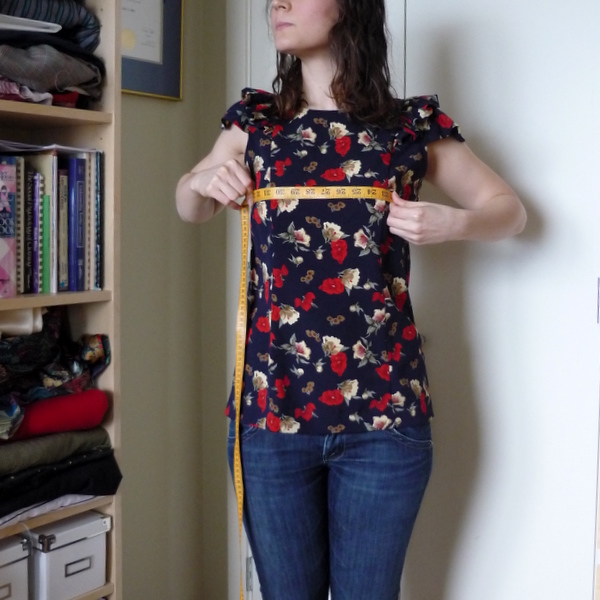 While we’re working on our top half, let’s also measure our high bust. This is a Fit for Real People trick, choosing a pattern based on your high bust size and adjusting for a full bust. Ever tried to go up a size to fit your bust, but ended up with wide, droopy shoulders and too-big armholes? This method helps to ensure that doesn’t happen!
This picture helps to demonstrate the ‘high bust’ position. You want to loop the tape measure above the bust in front, and under the shoulder blades in the back, where your bra sits. The tape measure is not straight for this measurement but angled upwards at the front.
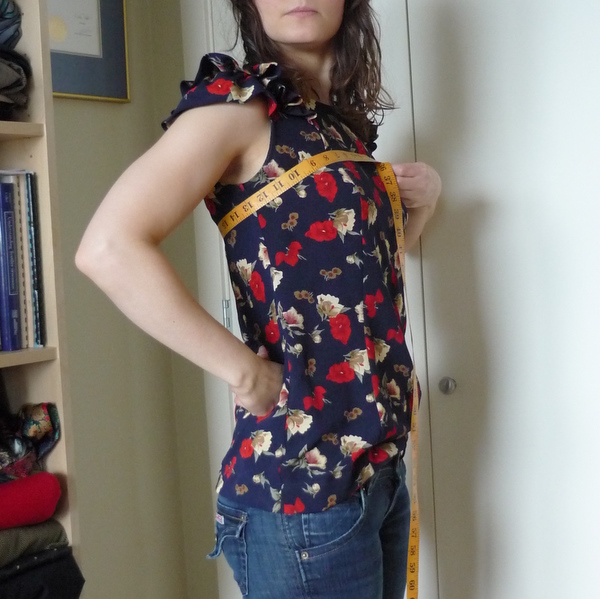
Next, let’s measure your waist. You want to measure your natural waistline, not where you wear your pants. Bend at the side, and measure where the crease in your side happens. Even if you’re very thin, your body will still ‘fold’ at the side when you bend.
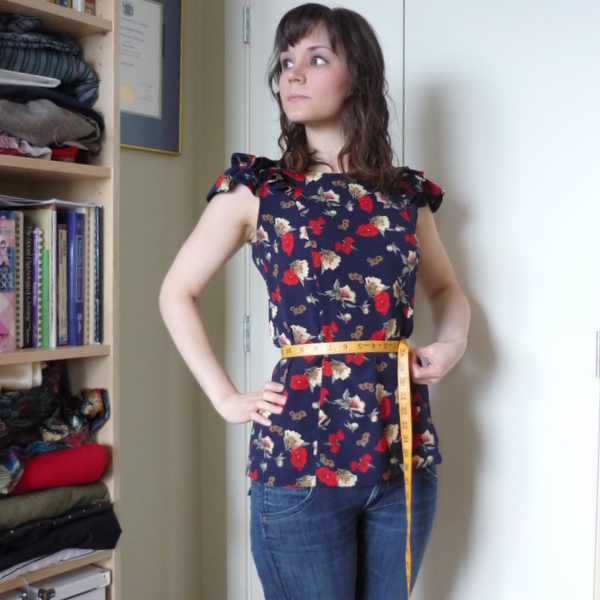 When you bend to the side, the tape measure will slip into your natural waistline. That’s where you want to be measuring. Awkward side-bend photo coming up! You can also tie a string or ribbon around your waistline, so that you can see the position of your waistline as you measure yourself.
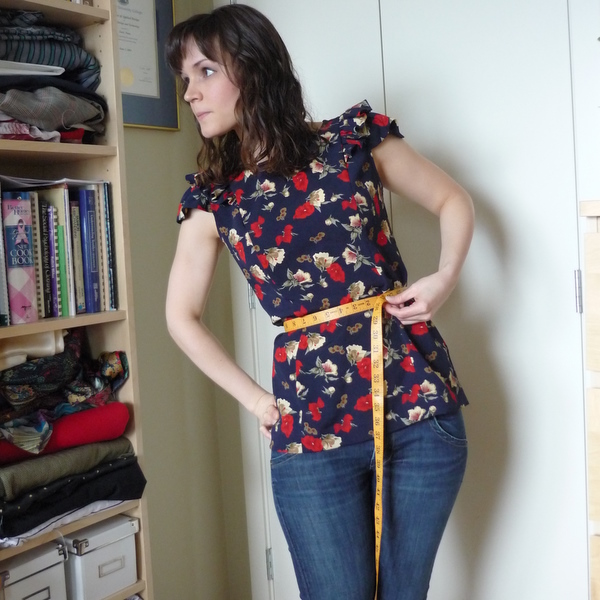
Now, measure your hips. Loop the tape measure around the widest part of your hips. Make sure it’s straight around your rear end, not dipping down or pulling upwards. Again, it helps to use the mirror as a guide, to make sure the tape is straight! Mine is fairly straight but creeping up a bit in the back.
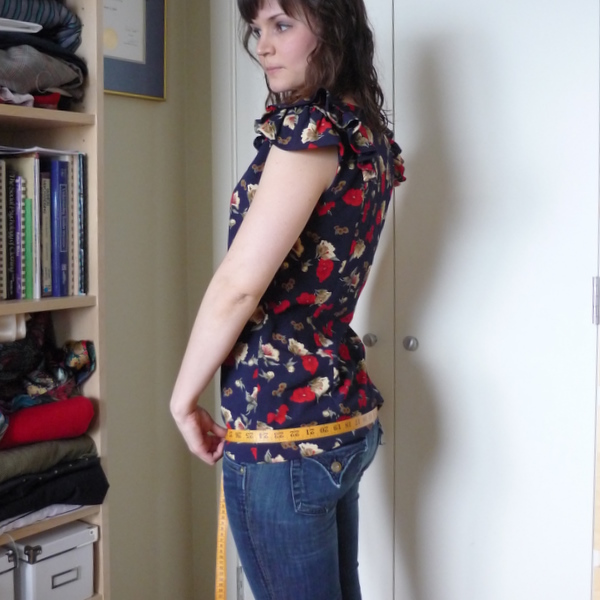
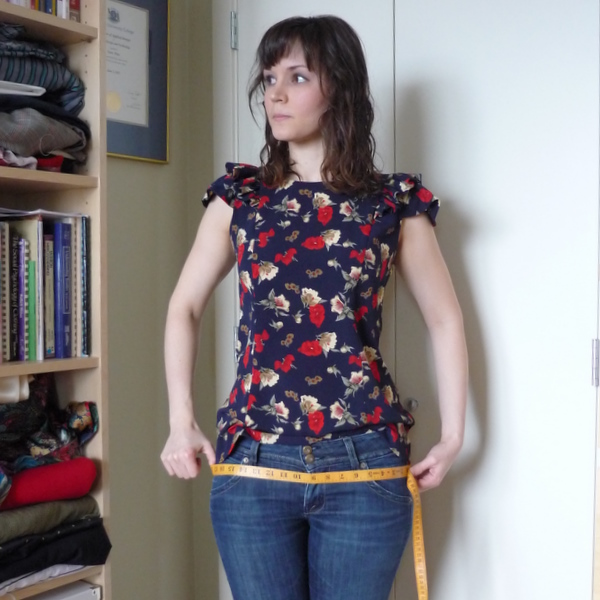
Another view of the hip measurement. You can see that from the front, my thighs are wider than my hips, but from the side and back, my rear end is still the largest part. Not the most flattering photos, but I hope they are helpful for educational purposes!
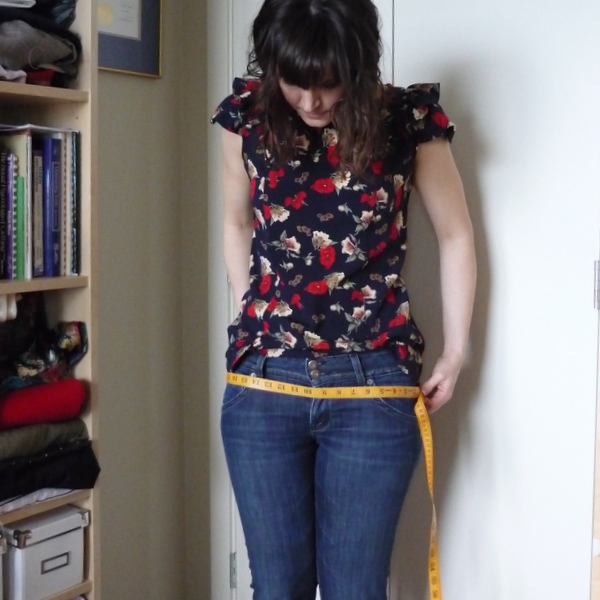
One other thing to note, don’t pull the tape measure too tightly. You should be able to take a breath in and out. The tape measure shouldn’t be squeezing in to make yourself smaller.
Also, don’t ‘cheat’ on your measurements either. Write down the real measurements from the tape measure, no matter what they are or if they’re increased since last time you measured. You’ll only be cheating yourself – and making it harder to fit – if you don’t use accurate measurements!
Choosing a size:
Compare these measurements to the pattern envelope back. If all of your measurements are in one column, then the pattern will be perfectly proportioned for you! You may still want to make some adjustments for your personal preference, but you should be able to make the pattern directly out of the envelope. Lucky you! (Isn’t it nice, to be all in one column for once?)
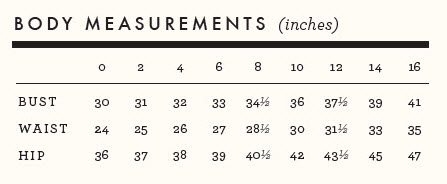
If your measurements are in different columns, then you’ll want to make some adjustments. Let’s see if you should choose the pattern by your high bust measurement, or by your bust measurement.
A little bit of math: take your BUST measurement, and subtract your HIGH BUST measurement. You’ll have a small number that is the difference between High Bust and Bust.
Now follow one of these two options:
1. If the difference between Bust and High Bust is LESS than 2″, then choose the size based on your BUST measurement.
2. If the difference between Bust and High Bust is MORE than 2″, then choose the pattern based on your HIGH BUST size, and plan to do a Full Bust Adjustment (FBA).
For example:
- If your BUST is 33″, and your HIGH BUST is 32″, then choose a size 6.
- Your BUST is 39″ and your HIGH BUST is 36″, then choose a size 10 and plan to do a Full Bust Adjustment.
Full Bust Adjusters – do I have this right? If you’re an expert at the FBA (or at least, experienced!) please jump in and correct me if I’m wrong.
The reason we choose the pattern based on the bust size, is because it factors in the shoulders. The whole blouse ‘hangs’ from the shoulders, neckline, and bust. In comparison, the hips and waist are easy to alter! If your bust and waist are in one column, but your hip measurement is in a different column, then choose the size based on your bust and waist, and we’ll adjust for the hip later.
How’s it supposed to fit?
One thing I wanted to mention is that this blouse has more ease than you might be used to. It’s loose-fitting, with about 4 inches (10 cm) of ease around the bustline. That’s part of the style, it’s relaxed for a soft silhouette, and also so you can pull it over your head. To get the same look, resist the urge to over-fit the blouse. That’s why I suggest using something drapey instead of actual muslin – seeing how the blouse looks in a stiff, board-like fabric may put you off the style! I hope I’ve explained this properly. The blouse is meant to have space between you and the blouse! It’s the princess seams that give it the illusion of being fitted to the body, and streamline the look.
Fitting and sizing are such personal issues, so I hope this quick guide to measuring and choosing a size has given you enough to get started! Tomorrow and the day after tomorrow, we’ll start talking about pattern adjustments.
For the beginners out there, does this make sense to you? If you have any questions on how to choose your size, leave a comment below.
UPDATE: Amy left a helpful comment on when a Full Bust Adjustment is necessary. Thanks, Amy!
The need for a FBA can also be affected by how much design ease there is, If something is close fitting, i.e., 0-2 or so inches of ease, then a FBA may be an absolute necessity for bustier gals. 4 inches gives a lot of “wiggle room,” so a FBA may not be necessary. When in doubt, I make a muslin without any changes and go from there.

Hi Tasia,
Great post :) Must re-measure my bust v. high-bust tonight. I’ve a feeling a small FBA is needed – that or adding a bit to the back + shoulder width for me (I have wide shoulders + back for my frame according to a Garment Technologist acquaintance of mine whom I asked to measure me-up last year when I started, but didn’t finish making a bodice sloper for myself LOL!).
Great post! I’d add that should measure oneself in underwear, ideally wearing a bra likely to worn with the garment to be sewn. I understand you not wanting to strip down for educational purposes though :)
Thanks for the post Tasia! I washed my fabric last night and took preliminary measurements! I’ll do a 2nd check of the measurements tonight with these guidelines but it looks like I may have to do a minor FBA which will definitely be a learning experience!
Hmmm…Oddly enough, I appear to be a near perfect size 12 on your chart (well, except for that pesky waist measurement and need for an FBA). Hooray for morning ego boosts! ;-)
While I’m not [currently] sewing this blouse (as I’m an utter novice), I just wanted to say that I definitely appreciate the fitting tips on the sew-along. It’s such a cute blouse that I have a strong urge to make it even though I am very much the opposite of a pear. I need to be strong and resist the shoulder ruffles!
This is great info to use on this blouse as well as other garments. Thanks!
The need for a FBA can also be affected by how much design ease there is, If something is close fitting, i.e., 0-2 or so inches of ease, then a FBA may be an absolute necessity for bustier gals. 4 inches gives a lot of “wiggle room,” so a FBA may not be necessary. When in doubt, I make a muslin without any changes and go from there.
Thank you Amy! That’s what I was thinking too. Take Amy’s advice if you’re unsure whether you need a FBA. Just wanted to cover all bases, and mention the possibility of needing a FBA :)
So, I am just learning about body shapes. I gave up on Gertie’s sew along because I learnt that dresses aren’t for me and wrap dresses even less. I am a rectangle, tiny bust, broad shoulders. Should I even bother with the ruffles? Or will I invariably end up looking like a linebacker?
Thanks Tasia
I am really looking forward to sewing these blouses. Yes, I had two pieces on my stash, so will be doing both View A and View B!!
Hi Julia! If you love the ruffles, then go for it! I peeked onto your blog and looked at some of your photos, and I think the ruffles would be lovely on you. They’re not HUGE ruffles in that they’d overpower you. Plus, I’m also smaller on top and I love the ruffles. My sister has way broader shoulders than me, but similar body type everywhere else and the ruffles look great on her. She also calls her shoulders ‘linebacker shoulders’ but looks fantastic in the ruffled version. They almost ‘soften’ the look of straight, broad shoulders.
Short answer – if you like the idea and the look of ruffles, then give them a go!
OR – Before you completely sew the blouse, try pinning it all together when it’s half-constructed and see if you like the look of the ruffles. If you don’t, then sew it up without! Or make a muslin to test out the look and feel. I hope this helps!
Tasia – a quick question. When reading about measurements recently, I believe in Fit For Real People, I was advised to take the hip measurement at the widest point, regardless of whether it’s above, at, or below the crotch. So, in your case, where you say your widest point is your thighs (I assume, from the photo you posted, you mean the point right below the pockets of your jeans), they would say that’s actually where you should be taking your hip measurement. Are you familiar with this? Thoughts? (I ask because my widest point is also relatively low, like you.)
@ms. modiste: No, you’re right! Sorry if it was confusing above. I meant to explain that my widest point is actually across my butt, but from the front it looks like it’s my thighs. Size-wise, the butt is still larger, in my case. I was just pointing out how it *looks* like my thighs are the widest. Mostly because I really notice it in the photos!
So yes – measure the widest part of you, wherever it is! (In this case it won’t matter too, too much since we’re not fitting our hips except for at the hemline.)
Hope this makes sense!
Hi Tasia!
I thought the same ms. modiste, that the hip measurement–on most women anyway–is below the area where you have shown in the photos. Please excuse the somewhat disturbing image, but this Wiki article shows the hips being measured “at the widest portion of the buttocks”.
http://en.wikipedia.org/wiki/Waist%E2%80%93hip_ratio
I understand we are all different sizes and shapes, but I believe creating clothing that will fit this area (across the bum) will allow for the best fit. That has been in my experience as a designer anyway!
Thank you for your wonderful blog and I especially enjoyed the hand-picked zipper tutorial.
Thank You for this post on measuring. I So appreciate the pictures.
Just another thought about doing the FBA – even if there’s enough ease to accommodate the bust, doing an FBA does change the proportions in a way that might still be more comfortable/flattering, depending on your fit preference. I did one on my muslin, and while I now have to figure out the best way of taking the extra ease back in, I do find the fit in the bust much more comfortable and flattering.
@Tasia:
Oh, I see what you’re saying now! Thanks for clarifying! My bad :)
@ms. modiste: No problem! I’m glad you were able to adjust using a FBA. If there’s too much ease throughout the rest of the body, you can pinch in along the princess seams, or along the side seams. Wherever makes the most sense so the princess seams hang straight down the body and don’t look pulled to the side or middle.
Fitting is so much harder than sewing! The sewing on this blouse is easy.
@Tasia:
Agreed about the sewing! And, for any beginners who haven’t attempted an FBA before, I’ve actually found the princess seams a really fun style to learn on. I wanted to be a bit nerdy about it, but in the end I found the fit was quite intuitive… a bit here, a bit there. I’m really happy with the fit now!
@ms. modiste: Yay! Thrilled to hear you’ve tweaked the fit to perfection! It’s awesome hearing that people are happy with the pattern. Good for you for attempting (and conquering) the FBA as a beginner!
Oh thanks for the photos & explanation! I’ve never understood the high bust thing and didn’t realize to take it with the tape lower in the back and above the bust in front! Thanks! Going to go get my fabric and catch up with the SAL!
Thanks so much, this is a great post and looking forward to the one tomorrow. Just figuring out what size pattern to cut out is a real roadblock for me. And apparently I’ve been measuring my high bust all wrong all this time.
Thanks for the tips.
A quick question. I’m a size 8 in bust, 6 in waist and 0 in hip. Should I just run with the size 8 blouse? I’m guessing the hip size isn’t too influential as it’s a blouse?
@Lauren: Yes, that’s what I’d suggest too! Also, I’ll be covering how to narrow the hips in a future post. You can either leave the blouse as-is, knowing you’ll have extra room around the hemline, or taper the hips so it doesn’t ‘flare’ out too much.
What if your high bust is bigger than your bust? =/
Tasia, do you plan on doing a swayback adjustment or is it needed with this pattern? Thank you for all your helpful hints!!
@Carrie: Then, perhaps you have a broad back, which is making the high bust seem larger? I would say it’s safe to assume you don’t need a full bust alteration. I would choose the pattern size based on your bust measurement. Hope that helps!
@LDerriso: I wasn’t planning on doing a swayback adjustment, but that doesn’t mean I can’t! From my understanding, the best way to determine if you need one or not, is to make a muslin first.
Sherry has a great post about analyzing for a swayback adjustment:
http://buzzybeesworld.blogspot.com/2010/12/sway-back-alterations-my-analysis.html
Take a read through and see if that sounds about right. She’s noted that often, when people think they need a swayback adjustment, what they really need is more space at the hips, or to take in the blouse around the back waist for a slightly more fitted look instead of adjusting for swayed posture.
This blouse is not quite as snug as her example, so it might not be necessary to adjust for a swayback. Also, I almost always wear mine tucked in, if you think you’ll do the same then it’s fine as is.
Hope that helps you get started!
Thanks for the pictures Tasia they are a great help. I too was measuring incorrectly but now that I know I will redo the measurements and find my size.
Can’t wait until tomorrow!
I love your sizing chart! That’s me, small on top, big hips! It’s a good feeling to finally fit into a size chart and not feel like a there is something wrong with my shape all the time. You made my day! I would love to see more dress patterns with these sizes too.
@gina: Yes! My thoughts exactly. There’s nothing ‘wrong’ with us, just like there’s nothing wrong with anyone who’s shorter than the norm, or bustier than the average.
I definitely have dress patterns in the future – can’t wait to share new designs with you guys when they’re ready!
I’m glad to hear you’ll be talking about how to narrow the hips. My bust and waist are right at a size 6, but my hips are 4″ smaller than the size 6 expects! I’m guessing we’ll just taper the pattern pieces down from the waist to the hem, but it will be really nice to see your tips on how to make it look right. Everything in your posts is so helpful and clear.
@Tasia: Thanks! :) Usually when I size a shirt based on my bust it is too tight across the shoulders/upper back. Even sometimes going by high bust it is too tight across the shoulders. But maybe with such short sleeves it won’t be an issue here. I have like negative hips but that hasn’t been an issue yet. :D
Thanks so much for this! I have my bust and hips in the same column for the first time ever, so amazing! I’m a size 10. But my waist is one size up. Will the amount of ease compensate for having a 31″ waist if I want to make a size 10?
Thank you so much for this post, it answered a lot of questions. I still have one question though, I am a size 6 waist, but at the bust I am in the middle of size 6 and 8. Do you think I should cut a size 6 or size 8 – or adjust the bust to my measurement between the two sizes? My hips are between size 2 and 4 so I’ll need to adjust for that.
I’m also wondering what the best way to handle picking the size is for me….my hip/waist fall more or less perfectly into size 6, but my high bust is closer to size 8. (Yes, I needed to go with that instead.) So I’m wondering if I should go with the size 8 with an FBA and take it in some at the waist, or just do an FBA on the size 6 to get my chest to fit in. I’ve learned from experience that a lot of extra ease at the waist is really unflattering on me, so I’d prefer not to do a bigger size there than I have to!
This is so helpful! Thanks Tasia! I love your comment about not ‘fudging’ the numbers. It won’t help at all if you don’t work from true numbers.
Of course, the weight on my drivers license is my goal weight and my own business. :)
@Funnygrrl: Haha! My driver’s license lie is about height.. mine says I’m 5’7 which is so not true! (I think I may have updated this little stretch of the truth last year when I renewed though..) It’s true though, we like to round down when measuring ourselves, no matter what size we are. Sewing keeps us honest :)
@Becky: Ok – I’d go with your instincts on this one. The difference between a 6 and an 8 is only 1.5″ all around, so if you’re concerned about too much ease around the waistline, then pick the 6, adjust for the bust, and know that you can always ‘slim’ down the blouse along the princess lines while you’re sewing it together.
@Astrid: I’d pick the 6 – there’s 4″ of ease in the bust so it should cover you no problem. We’ll adjust for narrower hips in tomorrow’s post!
@Pam: Yes! There’s plenty of ease around the waistline. If you look at the next Sew-Along post, where I’ve traced out the pattern pieces, you can see that they don’t taper in at the waistline too much, so you should have plenty of ease in there to be comfortable. You should be fine to make the size 10!
@Misty: Yup, that’s what we’ll cover tomorrow! I’ll show you how to narrow the hips on the pattern pieces. All you’ll need to know is how much you want to *decrease* the hips by. And of course, if the post isn’t completely clear, just leave me a comment and I’ll help you out!
I’m glad the measuring photos were helpful to you guys. I was cropping and editing them, thinking about how awkward I looked, and debated posting illustrations instead! But I always find everything so much clearer when you see a real person doing it, so I left them in.
You are so exceptionally helpful, Tasia – thank you so much. I’m a beginner and I’m so pleased to have signed up for this!
@Pam: Thank you Pam! I’m happy to help! There’s nothing worse than getting frustrated when you’re trying to learn something, and not knowing where to find the answers. :)
@Tasia: Thank you so much! It’s so great being able to ask questions as we go along, and you are so nice about answering them all – I’m really glad I decided to do this sewalong!
@Astrid: Of course, no problem! This is my first time doing a sew-along, and I want it to be fun and helpful so you’ll sew along with me again!
I need to do a 3″ full bust adjustment on the pattern but don’t know which front pieces to do it on.
Is there a special technique?
@Rosemary: Hi Rosemary! Yes, there’s a special way to adjust for a full bust.
I’m putting together a post very soon but in the meantime, here are some helpful links if you wanted to get a running start:
Example of a FBA on a princess seam coat (similar to the blouse)
http://www.blogforbettersewing.com/2010/09/guest-post-lady-grey-fba.html
A bunch of bust adjustment links on Gertie’s blog:
http://www.blogforbettersewing.com/2010/12/helpful-links-for-bust-alterations.html
FBA on the Sew, Mama, Sew blog:
http://sewmamasew.com/blog2/?p=486
Hope that helps! I’ll include as many helpful links as I can find, when I put together the actual post :)
Thanks Tasia, your photos are great. I might try your tip on the high bust measurement – I usually have the tape measure high up under the arms. I will try lowering it a little at the back.
Looking at your body measurement chart is a little strange because we are used to working in metric here in Australia. However imperial measurements also in the pattern books also.
The pattern catalogues that we have here in Australia (Vogue, Butterick, McCalls etc.) use body measurement charts with a two inch difference between all sizes after 12. As there is a two inch difference between chest and bust – corresponding to a ‘B’ bra cup size – the chest measurement for any given size is the size below the bust measurement on the chart.
For instance, using your chart and your 39 inch bust example, that would be a size14 bust. The chest for that size 14 pattern would be 37 inches. If the person’s chest measurement is 36 inches, yes you would need to go down a size, but only one – to a 12. The bust at size 12 is 37 1/2, so the chest will be 351/2 – already half an inch smaller than the required 36 inches.
If you go down to a size 10, then the chest for that pattern will be 34 – way too small.
If we read the charts this way, then I think you are more likely to get a more accurate fit and the FBA won’t need to be as big. It is especially helpful for those girls who are very amply endowed where the chest/bust difference can be as much as 6, 7 or 8 inches. If they cut out according to their chest measurement, the whole garment is tight all over and needs to be graded up again. A full bust adjustment increases the cup size of the pattern only, so it is only done to the front pattern pieces. Unless there are other fitting issues, the back and the sleeves don’t change.
I’ve been teaching since 1995 using commercial patterns in my classes, but like everybody else I am still learning! I devour any new information I can get my hands on – I don’t think we ever stop learning.