 Hello, everyone! If you’ve been wondering about adjusting this dress for a fuller bust, I can help! I can at very least, point you in the right direction for your own alterations. Keep in mind I am adjusting for an imaginary full-bust, and haven’t fit this according to a real person. However, I’ve added a ton of helpful FBA links at the bottom of this post for further reading! Between this and all of the links, you’ll have plenty of information to start with.
The best part is that the knot front is adjustable, and you can tie it tighter or looser above the bustline for just the right fit, every time you wear it. You may want to tie a full knot so it never comes undone or loosens as you wear it, or you may want to tie a half-knot for discreet adjustments on the go. (You’ll be able to quickly reach up and tighten the knot when no one’s looking!)
Today, I’ll show you possible ways to adjust this dress – and share as many links to other FBA tutorials as I can find!
If you have any suggestions to add, or have a method that’s worked for you, I’d love to hear it! Leave a comment and let’s help each other out.
Before making any adjustments, we’ll need to figure out how much to add. If you consistently make the same 1″ FBA, then likely that’s the same adjustment you’ll need here! This pattern is drafted for a B cup.
Figuring out how much to add:
Cut out the bodice front pattern piece. (Or use your tracing of the pattern piece, if you prefer to trace your patterns.)
Hold it up to your body (or dress form), and line up the sideseam along your sideseam. This is a little tricky to do with paper, as the area between centre front and the top edge will get gathered up in the knot!
 Figure out how far away your pattern piece is from meeting at centre front. This is how much you need to add in your FBA adjustment.
 Mark the bust point on the pattern piece, according to your body. Time to move on to the pattern adjustment!
Adding to the pattern:
Cut a piece paper slightly larger than your bodice pattern piece. This will go on your workspace, under your pattern, so you can slash-and-spread the pattern piece and tape it to the paper below.
Lay your pattern piece (Bodice Front) on top of the paper. We’ll do our work with this piece of paper underneath! If you don’t have a single sheet that’s large enough, take a few smaller sheets and tape them together.
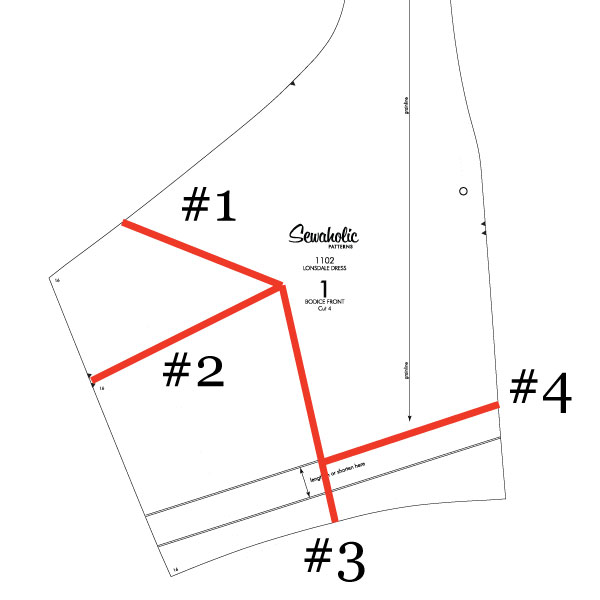
Now we’ll draw four lines!
Line #1: Draw a line from the ‘armhole’ to the bust point – in this case, we don’t have an armhole, so I’ve made it about 1/3 of the way between the sideseam and the notch.
Line #2: Draw a line from the sideseam to the bust point. This should be positioned where a dart would be, with a slight upward angle.
Line #2: Draw a line from the ‘armhole’ – in this case, we don’t have an armhole, so I’ve made it about 1/3 of the way between the sideseam and the notch.
Line #3: Draw a line from the bust point, straight down. I’ve drawn mine to the middle of the pattern piece.
Line #4: Draw a horizontal line. I’m using the ‘shorten or lengthen here’ pattern line.
Slashing the pattern
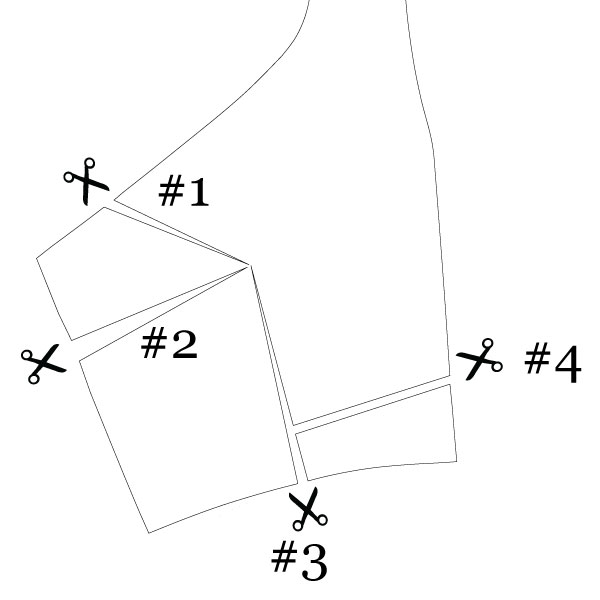
Now we’ll cut these lines and spread our pattern apart! Before cutting, make sure you have that piece of paper underneath your pattern, it will be so much easier to tape it in place.
First cut line #1, then cut line #2 right up to the bust point but not through line #1. There should be a teeny bit of paper still left holding the top half and bottom half together.
Cut Line #3 up from the bottom. Cut Line #4 all the way through.
Spreading the pattern
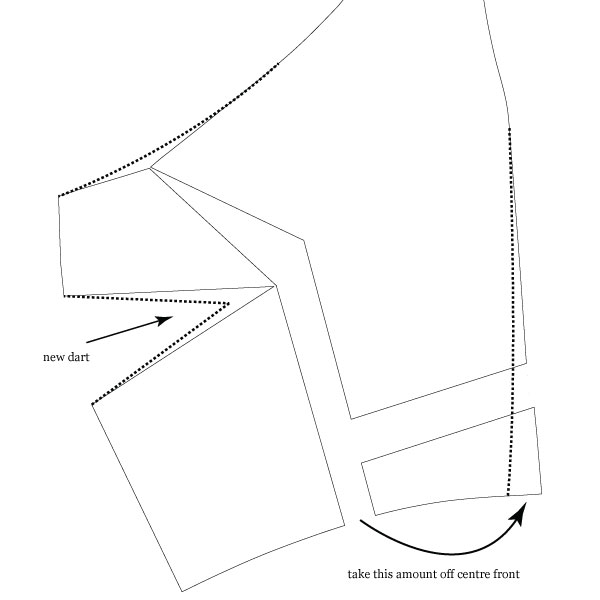
Spread the pattern piece apart along line #1 and #3. The distance of the opening should be the amount we determined we needed to add in the first step, trying on the pattern tissue.
Keep the opening along Line #3 evenly spread from top to bottom.
Move the section below Line #4 downwards until the bottom edge lines up.
Now you have a side bust dart in your dress pattern!
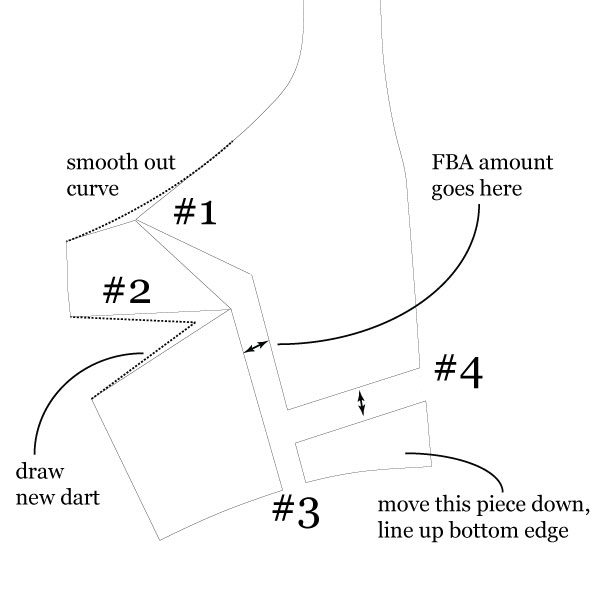 The last thing you’ll need to do, is adjust the waistline. Do you need the extra around the waist that we’ve added? Then slash-and-spread your waistband and skirt pieces to match. Don’t want any extra ease around the waistline? I’d either take the amount we added back out of centre front, or out of the sideseam.
These are major alterations! If you’re making major pattern adjustments like this, I’d strongly recommend making a muslin of at least the bodice, to make sure you’re happy with the fit before starting your real project.
Feeling adventurous? Decide where to put the fullness. It’s your choice!
Now that you have your new pattern piece, you can decide where to move the dart fullness. The important part is that we’ve created enough room in the bust area to fit. You can pivot this dart anywhere you like to shift the fullness.
Some ideas – take a look at the tutorials below for more!
- You can leave this side dart in your bodice pattern, and sew it into your dress.
- You can move the dart to the centre front, and then shift it over to the sideseam for a dartless bodice.
- Or, you can put the fullness into the knot area, and have a more gathered knot at centre front.
Credits and Other Helpful Links:
- Full Bust Adjustment methods adapted from Fit for Real People. Great book for solving a variety of fitting challenges, not just busts!
- My FBA post on the Pendrell Blouse – different type of bodice but similar concept!
- FBA tutorial on Sew, Mama, Sew!
- FBA tutorial on Sew L.A. using a dartless shirt
FBA tutorial on the Pink Chalk Studio blog - Fun with FBAs by so-so sewist
Suggestions, tips and recommendations on FBAs are welcomed – leave a comment below!

Thank you so much for this tutorial. The only thing I’m confused about is moving the dart. I’m probably going to feel silly because it’s likely obvious, but I’m such a newbie that I have to ask.
I just finished my first pendrell blouse yesterday. (I actually started and finished it yesterday) And I LOVE it! My husband and sister love it too. I was able to use the sew-a-long to help when I got stuck and it was very helpful. I’m looking forward to making this blouse again too.
Ok. I am confused about FBA: why not just cut the larger size and adjust the waist by tucking in sides and center seams?
This is what I’ve always done. Is it wrong? What benefits would I get from switching to this seemingly more complicated method?
Great sketches, they make it very easy to understand the process! :) I’m with thetroubleis though, how would you go about moving the dart and incorporating it into the side seam? It sounds like it might be helpful for other kinds of darts as well…
@Astrid: Cutting a larger size to accommodate a full bust can result in gaping at the neckline or armholes. If you have a larger cup size, you only need the extra fabric in the front (not the back) and you need extra length in the front bodice which you don’t get from just cutting a larger size. A FBA will result in a garment that fits better in the shoulders AND fits in the bust area. This is why many people talk about buying patterns according to your upper bust measurement, then doing a FBA. As you saw in the tutorial above, the FBA will also increase the waist measurement which you may need after starting with a smaller size according to your upper bust measurement.
Confused? it takes a while to understand but it’s definitely worth trying our in a muslin if you have a cup size larger than B or C.
A sizing question. I don’t need an FBA, …but according to the size chart I am a 6 at the waist and between a 6 and 8 in the bust. Should I cut the 6 or 8? I read back through your Pendrell posts and you recommended a 6 for that situation as that pattern had alot of ease. But this one is more fitted. What would you do?
@Caroline: Glad you asked that – I’m the same :-) I don’t think I really need an FBA because I’m only a D cup and pretty much in proportion, so I was just going to go for the 8 because that’s closest to the right waist size, only half an inch out, and assume that the knot will take care of the extra inch in the bust. Hips (36″) I’m just going to ignore but I guess I can bring it in if the skirt is too full around them.
I have a question about busts — not necessarily an FBA — as we’re amongst friends ;) I’m breastfeeding and I’m currently a DD but I’m usually a C. Would you guys risk making this for a C and loosening it for DD for the next 4-6 months until I’m done feeding? (My bub is 8 months). Tasia, do you think the adjustability (is that a word?) in the tie would accommodate this?
Working on tracing the Lonsdale and per usual, the hardest hurdle to get over is figuring out what size to trace/cut. Knowing where the waist is supposed to hit on the Lonsdale would really help with flat pattern adjustments—I am either long-waisted or low-busted and consistently have to fix that after a muslin. Why can’t the finished measurement for nape-to-waist be a standard listing on the pattern envelope?
By the way—I added an inch of length and think I’m happy with it, waistband will hit right at my navel where I like it.
Also, for others—I’m a 36 high bust and 38 bust/C-cup—I cut a size 10 at the top and tapered down to a 15 (halfway between 14 and 16) at the waist (34 at navel), and didn’t do an FBA and think it’s fine like that.
Picture: http://sewaholic.net/sewing-pattern-store/1102-lonsdale-dress/
Sorry. Totally pasted the wrong link. Here’s the bodice muslin pic:
http://twitter.com/#!/bydaiyami/status/96819534467575808
Ryan. Thanks. I have to try this out as I recently made a sleevless dress using “my method” and experienced the exact things you’re referring to (and of course, fitted them afterwards). I think I’ll try and make a smaller size with an FBA and compare the two muslins (I still have the old one!).
About the sizing question. I am pretty much between size 6 and 8 in the waist and 8 in the bust. I found an 8 size muslin of the bodice (I know, I just couldn’t wait…) too roomy. Then I tried size 6 and it was just perfect! I must say, I love fitted garments with just a little ease. So, that is something to consider. I would definitely recommend making a muslin. If it is too roomy around your under-the-bust-area AND not tight in the bust, instead of making adjustments in just try a size smaller, you might get lucky!
Can’t wait to finish the dress, this is the easiest pattern for a fitted dress I’ve ever seen! It looks just amazing!!!
@Doortje: Thanks for this. My gut was to go with the size 6 as it still has a good amount of ease in the bust area for a fitted garment. I’m so eager to get started!
Hello, everyone! Dropping in to answer questions. Thanks so much to @Doortje: and @daiyami: and @Ryan: for jumping in to answer others’ questions, I appreciate it!
Ryan’s explanation is exactly right for why people do a FBA – to add room for the bust, without adding to the shoulder and neck. Yes, there’s no shoulder and neck here, but it will be better than just cutting a larger size. (That’s my understanding, anyways, as I never have to adjust for full busts..)
@daiyami: Thanks for the suggestion! Because the straps are adjustable, it’s hard to determine what measurement to put in that spot, which is why it’s not included. I will think of that for future pattern developments though when there is no adjustability factor!
@Jane Elise: Jane Elise, I’m not sure what to suggest here! I would make it for the size you want it to be, if that’s a C, then make it a C – the adjustability amount is not going to be over the cups, more at the top edge, if that makes sense?
For those who asked about moving the dart, here are some links:
http://jsterndesigns.blogspot.com/2009/05/how-to-move-bust-dart-to-center-front.html
http://madebyjoanie.blogspot.com/2010/06/drafting-moving-darts.html
Basically, you slash the pattern, and pivot the fullness to a different place. Closing the dart somewhere opens up another dart somewhere else!
Sizing questions – I’d suggest making a quick muslin if you’re unsure. If you choose the larger size you can always take it in, but you can’t make smaller things larger!
@Doortje: Thanks Doortje! I was wondering about that…so I’ve traced the 6 and will muslin it this weekend to check, but going by the finished measurements it should be just about right. With any luck, I won’t have to make any adjustments at all! :-)
Hi Tasia—I’m aiming to finish this tonight and wear it tomorrow, so not a cry for help but just an FYI/question for next time. I cut my high bust size (10bust tapered to 16waist), but still found that the back gaped a bit at the zipper in the muslin, so I took a 1/2 inch on each side out at the top of the center seam for the real version but still find I am pulling the straps real tight and it gapes. And for some idiot reason, I moved the loops toward the side seam to sit a bit wider, which actually made the gaping worse. But now it’s all finished so my options are limited, and I’m still fussing with how the knot sits so don’t want to perma-stitch straps. So I’m thinking that I’m going to stitch some elastic inside the upper back edge, and if that doesn’t do it, add another set of loops right on either side of the zipper. Would love to hear better ideas. It doesn’t feel like I need to take excess out at the side seam, but maybe I do.
But, the Lonsdale was a real pleasure to sew—I’ve been tweeting it all—cutting was the toughest part but it came together all nicely and the self-lined bodice just looks so lovely and clean.
@daiyami: I’m so glad it was a pleasure to sew! I do like the look of the self lined bodice too – no facings! no slippery lining!
Regarding the back, you could definitely try the elastic trick to cinch it in along the top edge. Or, take it in more along the zipper? You could move the loops but that’s a lot of un-picking. You could always move the loops the speedy way – unpicking the understitching and top edge just an inch on either side of the loop, then unpicking a new opening to sew the loop closer to the centre back, and edgestitch the loop in place, then slipstitch the opening closed. It’s a bit fiddly but it might work if you like the fit overall, and just need the loops closer together!
Sorry, Tasia, missed seeing this by just a few hours, until now. It seemed that getting a better bra fixed the issue, or good enough. I hadn’t realized I could move the loops after the fact.
I got lots of compliments on the dress, including its design, so thanks!
Tasia et al, let me know if you have suggestions for my muslin! Will a full bust adjustment solve all my problems? Should I have cut a 6 instead of an 8? Help! http://www.crozette.com/2011/09/i-am-not-very-experienced-in-sewing-for.html#more
I am working on my muslin for the Lonsdale. The FBA seems to have really worked and I think it fits my front well! However, the bodice back pieces are huge– an inch is extra on both sides. Does that mean that I picked the wrong original size? Or should I adjust the back when I install the zipper? That could work, but I am concerned about that also affecting the skirt and the waist. Thanks for your help!
Hi thanks for this tutorial. I was wondering if you could recommend a way to do a full bust adjustment without increasing the size of the waist as well? All the tutorials I have seen increase the bust but also increase the waist. Thanks! Samantha