Hey, everyone! We’re super excited to have Caroline as a guest on the blog today. Caroline has been a long-time reader of the blog – you’ve likely seen her name come up in the comments before! She’s going to give us tips and tricks to sewing a waterproof jacket.
Hello Sewaholic readers! I’m so pleased Sewaholic has given me the opportunity to share my experience sewing waterproof outerwear.
First off, be honest with yourself: why take on the (advanced) project of making your own rain gear? It is exciting to choose and edit an outerwear garment’s color, cut, and features, and when it is complete and wearable you earn major bragging rights… but that may be about it. There are a few reasons why you might consider just buying rain gear from your local outdoor store instead:
- Price. Without discounts, you are likely to pay just as much for custom rain gear as store-bought. Most quality waterproof fabrics top $20/yard, seam-sealing tape costs $1.50-$4/yard, and water resistant zippers are dear. That said, some GoreTex rain jackets top $500. Most handmade goods are priceless.
- Time. Count your time investment, especially if you are seam-sealing every single seam.
- Access. Can you find the fabrics you desire, notions like fobs and water resistant zippers, and seam-sealing supplies?
- Frustration. Once a seam is sewn, and especially once it is seam-taped, it’s pretty much final. Mistakes are sometimes very tragic.
- Result. Are you happy with a less-than-“perfect” result? No warrantee, no return, no guarantee of performance?
Cool, brave soul, let’s go!
Materials:
- Waterproof/Windproof/Breathable (W/P/B or WP/BR) 2, 2.5, or 3-layer; water-resistant breathable fabric like uncoated fabric with a DWR (durable water repellant) finish; or non-breathable fabric like nylon coated to be waterproof. REI provides an excellent overview of these fabrics and how to choose them, so to avoid redundancy, here is a link to their site: (http://www.rei.com/expertadvice/articles/rainwear.html). Did you know any synthetic machine-washable/-dryable garment can be waterproofed or re-waterproofed with DWR coating? You might just consider applying a waterproofing spray or wash-in product like McNett’s ReviveX® after you’ve sewn up your rain gear. But – what about the seams?
- Seam sealing:
- Glue-style, like McNett’s Seam Grip®, can be squeezed from a tube onto the seam line then allowed to dry (about 12 hours unless a curing agent is used). This can be done on a completed synthetic garment, and is the most economical and simple approach. Seam Grip® in particular is a time-tried bestseller because it dries clear, flexible, and is durable. (I am not affiliated with McNett’s. I am just recommending the most widely available and popular waterproofing product.) Clear and simple instructions for glue-style seam-sealing products are available online and on the product packaging, so I won’t repeat that here.
- 3-layer Melco or Gore-Seam cloth-type tape comes in different weights to allow for seam movement and minimize show-through of tape on the garment’s right side. These days taping is ubiquitous in garments and outdoor gear. Manufacturing houses have the means to find the correct weights, technical properties, and even matching colors; and have machines to apply it, but home sewists might struggle a little more to locate and apply it. I’ll talk more about my experience here later.
- 2-layer film type tape is also applied with heat, but even more frustrating to apply as it also sticks to Teflon when hot. You may see the clear kind in shops – it is invisible, flexible, but I have found that it is easily damaged by friction – seam threads eat through it. I’m not impressed anymore.
- A Teflon sheet to protect your fabric and iron during seam-sealing tape bonding. eBay usually has biggest sheets for the lowest price (search for “Teflon sheet heat”).
- Sharp needles. Try smaller gauge sharp needles (8,10). They will leave smaller holes in laminated and coated fabrics and may gum up less. If you experience gumming (I haven’t yet), it is recommended to swab the needle with cotton soaked in rubbing alcohol. Keep the alcohol away from your fabric. Change your needle frequently as synthetic fabrics dull needles quickly.
- Polyester thread (any other thread type may rot)
- Notions like zippers, zipper pulls, cord, and fobs. Water resistant zippers like YKK’s Uretek or Riri’s Aquazip are hard to find and expensive. I recommend getting lengths of #3 and #5 and adding your own pulls. Find a long, separating #5 and shorten as necessary if you are making a jacket. In a pinch you can install a regular coil zipper outside-in and cover it with a storm flap for water-resistant results. Before I started my project I looked at closures and cinchers and other features on fancy rain gear to get ideas and build a shopping list. Just because I’m making the rain jacket at home doesn’t mean it can’t have bells and whistles!
Skills & Tips:
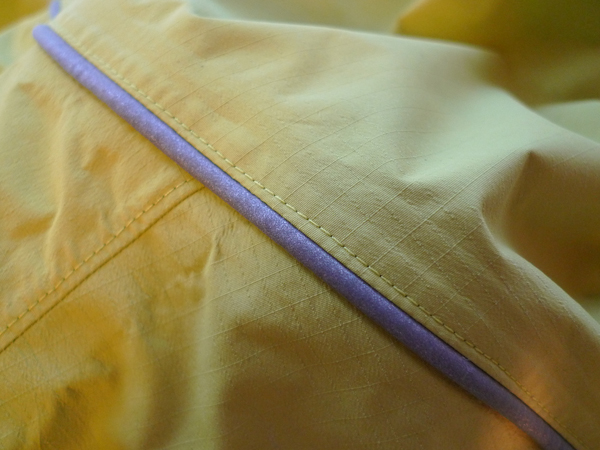
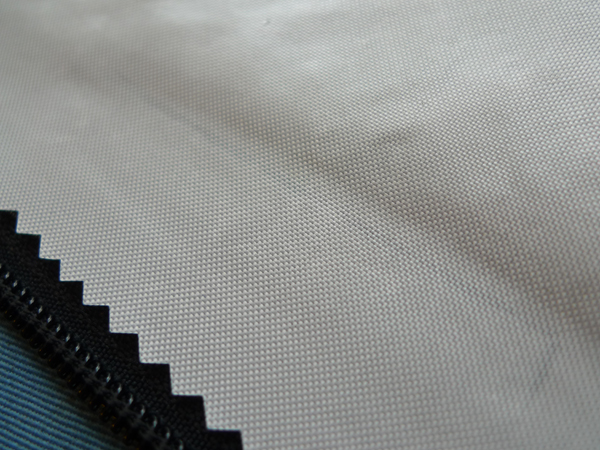
- If you want the pro look and are going to be using seam-sealing glue, go for felled seams. However, if you plan on taping your seams, keep it simple for your sanity: a seam with a 1/4″ seam allowance and about 10 stitches/inch saves fabric, cuts down bulk, minimizes needle holes in the fabric, and is seam-sealing-ready. Taped rain gear is sewn in a logical sequence, with each seam sewn, top-stitched, and seam-taped before moving to the next seam. I recommend folding the 1/4” allowance to one side (strategically so that water doesn’t fall by gravity into the seam) and then topstitching about 1/8″ from seam.
- Another pro method is to 3-thread serge your seams and simply use the seam sealing tape to tack the seams strategically to one side or the other – skipping the topstitching.
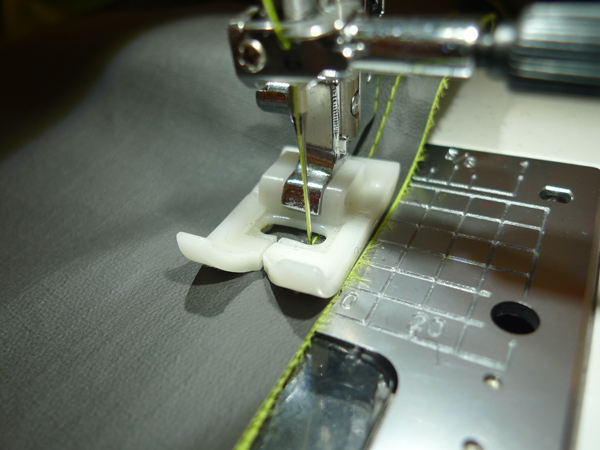
- Pieces can be pinned prior to sewing, but only in the seam allowances! You don’t want needle holes anywhere else but in the seams, especially not in laminate fabrics. I didn’t use pins. A Teflon presser foot and sacrificial tissue paper are good ways to get around uneven feeding and puckering. At times I needed to place a strip of tissue paper between a particularly rubbery fabric and the needle plate to keep it from sticking to the metal. The tissue tears away once you’ve sewn the seam. Some synthetic fabrics are stickier than others, so it may not be an issue for you. Test, test, test!
- When cutting your length of seam-sealing for a seam, cut it so the ends don’t extend past future seam allowances. For example, if you have a 12″ straight seam and are using 1/4″ seam allowances, cut a piece 11-1/4″ to 11-1/2″ long. This allows you to turn and top-stitch that future seam without the extra bulk of seam-sealing tape in the mix.
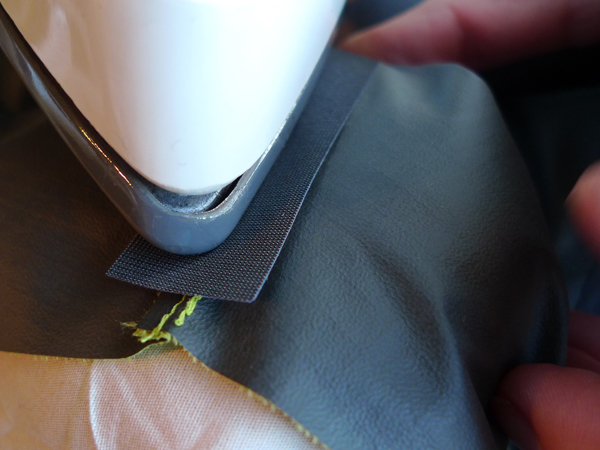
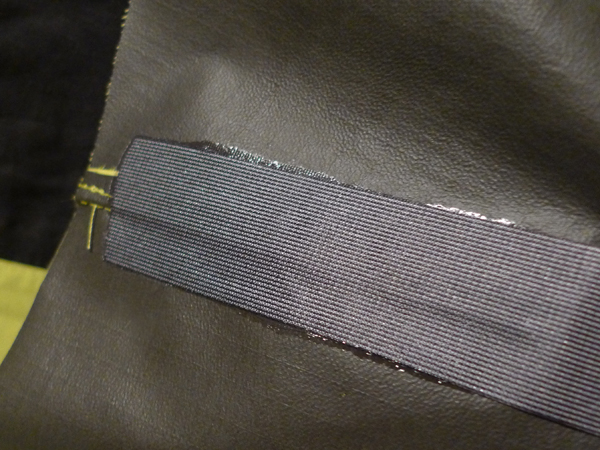
- Seam-sealing should be centered on the seam, on the wrong side of the fabric. Most people don’t have access to a seam-sealing machine or extra hands and a hot air gun, both of which heat the tape to melt the glue before applying it to the fabric. An iron works fine. I have my eyes on a Clover mini iron, but I made do without. Here’s what I eventually figured out with my full-sized iron. Melco tape glue melts at 350’ so I had it set on medium-high. I held short (3-4” at a time) pieces of tape in place over the seam, which would be draped over a small tailor’s ham. Using an edge at the nose of the hot iron, I would tack down the tape first along the middle, then along each side, coming as close to the edge as possible without making glue leak out onto the iron. I would then place my clean Teflon sheet over that section and heat until I could see a little glue coming out the sides of the tape. (I can see through my Teflon sheet.) I then make sure my Teflon sheet is clean (rub off any glue) and move on to the next 3-4” section. It takes a while. All this and I’m aware my local technical fabric shop rents use of their seam-sealing machine…
- Seam-sealing tape can be torsioned and notched to follow curves. Once I realized I could really twist it around the curves of my ham before tacking it down with the iron, I was able to get it on without incorporating wrinkles, and without having to notch it. Wrinkles are ugly but not the end of the world – unless they create tunnels to the seam. Sometimes the sealing can be re-heated, pulled up, and torsioned or notched to ease the wrinkle. Sometimes entire lengths of seam-sealing can be removed by re-heating it – but be warned this is a potential messy disaster.
- Seam sealing tape or glue can be used to repair tears in technical fabrics. This is great to keep in your “toolbox” for torn technical goods. Just iron or squeeze it on!
- For pockets and armpit zips, the best way to put in a zipper so that it can be seam-taped is to inset the zipper exposed (or even make a placket!), top-stitch around it, then seam-seal the inside raw edges. A separating zipper down the front of your garment can be put in with simple 1/4” allowances, topstitched, and seam-taped down the inside raw edges – so easy and clean!
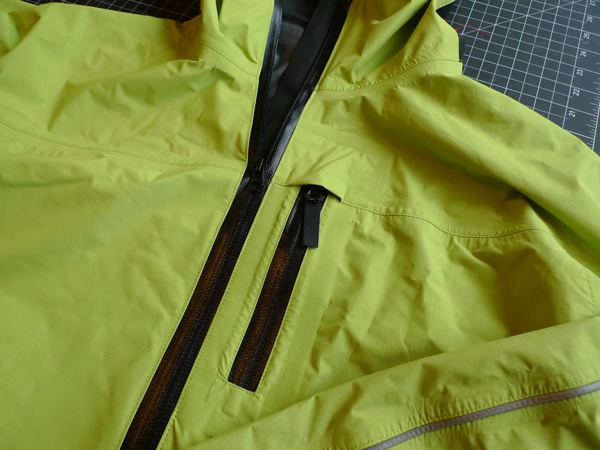
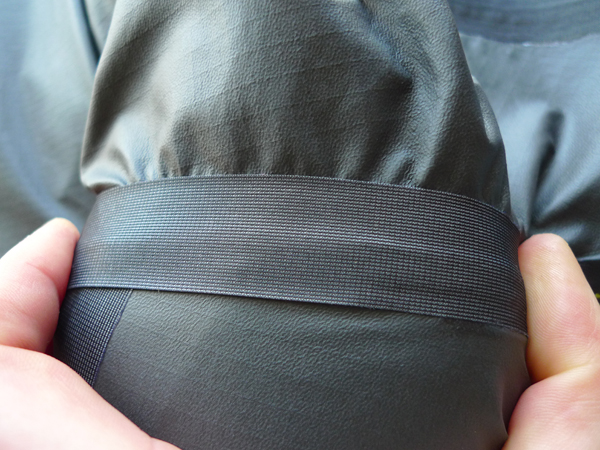
The first few seams I taped didn’t come out perfectly, but as I went along I got better and better at it (after 15 yards one would hope so). Remember all the reasons I suggested you might not want to make your own waterproof gear? None of them matter to me now. I’m excited the jacket has special features like a great big hood that fits over his helmet (yeah, for some reason he likes this), reflective tape along the sleeves and back, articulated elbows so the sleeves don’t ride up, and a dropped hem in the back to keep mud off his backside. And I have major bragging rights!
Great post! I’ll definitely be bookmarking it for use this winter.
Hello Tasia and Caroline,
Thanks for the wonderful pattern and the very useful tips on how to make it waterproof! Now you probably think me very ungrateful, but I was wondering – could you possibly post something about making the coat waterproof with wax, like a Barbour coat? It was the first thing that came to my mind when I saw the pattern – to do it in a dark green twill and make it water-resistant by waxing…
Hello German Girl,
About waxing fabric: it’s funny you bring that up because that’s something I have tried and investigated. Waxing is a bit of a nightmare but still time-honored DIY, lovely, and fascinating to me. I honestly didn’t even think about it while writing this post but it’s so obvious I should have! There are only a couple companies making waxed (not really exactly wax, but wax-ish chemical-impregnated — try http://www.waxwear.com/) fabrics and it’s pricey. I tried impregnating cloth with my own blend of beeswax and jojoba oil (that’s proprietary! ;) ) but dropped the project before I got the right blend. The rub is that the fabric has to be re-waxed with wear, and that’s messy and laborious. IMO it’s an even bigger project than buying technical waterproof fabric and seam-sealing! The advance of modern chemistry giving us RainX and W/P/B laminate is such an awesome thing, come to think of it… but the old way is always enticing in that nostalgic way.
Thanks Caroline! I love this post and have bookmarked it. I make quite a bit of outdoor clothing (with fabrics mostly procured from Seattle Fabrics!) – sometimes rather unsuccessfully! It’s good to see such an informative and expert post! Please post more Caroline (or start your own biking and sewing blog?). . . Super cute caps, by the way, I need to purchase one of your patterns!
Wow, It just looks incredibly pro! I’m really really impressed! While I don’t think this is a challenge for me juust yet (the thought of not being able to easily rip seams or fix a mistake just sounded too scary =), you have definitely given me new ideas and tools for a future sewing project. Thanks!
Lots of interesting & useful info, but you scared me away, too!
The finished result looks awesome! Thanks for taking the time to share.
Wow! Impressive work! Thank you for sharing!! Now I understand why Gore-tex jackets are so expensive–it isn’t just the cost of the fabric, but also the construction.
Thanks, Caroline! This is awesome. Your jacket looks amazing and I am SO glad that he loves it too! I can’t wait to try out some of your techniques and tips on my own jacket one day! Especially since it’s ALWAYS raining here. :)
I’m super impressed with your jacket. Thanks for being a guest on the blog today! And if you make a second jacket for yourself, I’d love to hear what you did differently and if you learned anything new the second time around!
Tasia
What a great and interesting post. I have never tried this, not sure I have your stamina for such a project! Thanks so much for sharing all your tips and insights. I have book marked the post to my tutorial collection.
Great post. I’m not sure when I’ll get to making rain gear, but this is food for thought.
Awe-some!
It’s great to see some technical stuff….gear is so expensive, and having it not fit is just a thousand times worse than having a t-shirt and jeans not fit, because you’re so active in it. And if you do somehow find good fitting gear, it’s almost surely going to be the exact color that looks the pukiest on your particular body or otherwise fills you with horror (is there some reason all the women’s gear needs to be pastel? really?)
It seems like it’s especially rewarding to sew technical clothing for that reason, but I rarely see any stuff on the blogs about it. Thanks for sharing, Caroline!
Wow, what an incredibly professional looking garment, I’m totally in awe!
Awesome! Great work. Great post. Lucky boyfriend.
I have been dying to see a post like this! I know heaps of people make their own gear but I have not seen any posts about how they are doing it. I guess it is almost like giving away hard won secrets. I love your jacket, my husband and I are looking into ways we can possibly make our own gear including light weight tents/bivvy bags etc. your post has really been an eye opener. Congratulations on such a beautiful piece of workmanship.
That is AMAZING. It all sounds very challenging, but you haven’t put me off trying! Thank you so much for this extremely useful information.
What a great, insightful post. Caroline, thank you for the amount of time involved in writing this. The jacket is beautifully sewn. And Tasia, you blog is one of the most useful I’ve found since I rediscovered sewing for myself. THANK YOU!
What a great jacket, it looks pro. So much food for thought here, Thank you so much!
Thanks for the post, Caroline. My first ever sewing project was a pair of rain pants when I decided that I was going to be a year-round bicycle commuter. I offer another source: http://www.therainshed.com While this is a local store for me, they have a good web presence and will provide fabric swatches. They were a great help to me on my first and subsequent projects.
Great job Caroline! This has been what Im looking for. What pattern did you use? There is a great lack of mens patterns especially outerwear.
Thank you, Orval! I’ve noticed people starting to find this article from outside the Sewaholic community, and that’s great. I had noticed a lack of advice and tutorials on this matter, so I’m happy to chime in. I didn’t use a pattern. I borrowed a fancy jacket from a friend, and I drafted a pattern from it. It worked so well I may end up creating a pattern from it, but probably not any time soon. It would need to be graded and instructions would need to be written out to make it worth offering to other people. As it is I have a men’s size medium pattern, no instructions, not even seam allowances! If you have a jacket you like, I recommend getting on the floor with a ruler, a tape measure, some fabric pencils, a pen, and some pattern-making paper or muslin! It’s a fun, challenging (math) project — well, it was for me, anyway.
Hi Caroline – you got a link on the BikePortland.org blog in the Nov. 14th Monday Roundup. I expect that is getting you a few more hits here.
Hey, very cool jacket! Would you mind to tell us what “fancy jacket” you cloned here? I really like the pattern and there are so little good patterns for this type of cloths are available ….. keep up the good work!
Hi David, and thanks for your comment! I cloned the Moonstone “Nemesis” jacket. It was a favorite because of its sleeve shaping and helmet-compatible hood. I believe Moonstone is no longer in business, unfortunately.
Wowzers, what a thorough and useful post! I’d never realised there would be so much to think about when sewing a waterproof jacket. Thank you so much for taking the time to share what you’ve learnt with us.
Just an update on this jacket: it’s holding up *really* well!
My boyfriend just washed the heck out of it the other day (gentle machine wash after a stain treatment, air dry), and it’s back in action good as new. He says he first took a shower in it before stain-treating it (!) and water came in in little tiny, thin stripes along the zippers, but nowhere else. (Remember, the YKK Uretek zipper is only “water resistant.”) Yes!
We want to take pictures to show off the finishing, that are coming!
While investigating something else entirely, I ran across a website for a company called Otter Wax, that sells all-natural supplies for waterproofing (water-resistanting?) clothes and shoes. I was actually on the hunt for natural (non-petroleum-based) supplies for cleaning and maintaining leather shoes, but apparently their focus is on wax for treating clothes, including raincoats. So now I’m curious about whether Otter Wax would work for a raincoat, and whether anyone has tried it. I ordered some to treat my canvas shoes – I wonder how well it works! Any thoughts, Tasia or anyone else? Would it work for a rain coat? Has anyone tried it? I am quite intrigued!
Caroline,
I’m in the process of collecting/ordering materials to make a rain jacket as well, and I’m really confused about which material is best. I did a lot of research and decided to use what I take to be one of the best waterproof/breathable materials on the market: GoreTex Pro Shell. I found this material to be sold by a company called Outdoor Wilderness Fabrics. I was excited to finally find what seemed to be the perfect material, but when I called to order, they were out of it (except in yellow…yuck). The seemingly knowledgeable employee on the phone said that the GoreTex Pro Shell is very similar to generic waterproof/breathable fabrics, that I shouldn’t bother specifically with GoreTex. He also said that his first choice for a rain jacket would be waterproof rip-stop nylon, not any fancy breathable material. I noticed that you didn’t mention specifically what type of material you ended up using, so what kind was it?
Hi Tracy! This was a guest post from two years ago, so I’m not sure that Caroline who wrote it is going to see your comment and respond. (It’s not the same Caroline who is working with me now.) It sounds like the employee you spoke with knows their stuff, and you may even have a wider range of colours with ripstop nylon, so that might be a good option! Sorry I couldn’t be more helpful.
Thank you for writing this post, it’s great to learn from your experimentation and knowledge. Making waterproof coats seems like a serious niche!
I am inspired to make myself a water resistant jacket but am finding it impossible to find the right material online. I either find very heavy fabric that is meant for wipe-clean table cloths or pre-made jackets in outdoor shops.
Do you have any recommendations for fabric suppliers/shops?
Thank you-
Rosie x
Hi Rosie! I believe Caroline has mentioned some sources in this post, and she’s the one with the knowledge on sewing waterproof/water resistant garments! Other than that I don’t know, sorry I couldn’t be more helpful!
Thank you so much for posting this! I live in a very rainy town in Alaska and don’t have a rain coat we are lucky enough to have one sporting goods store but the more expensive things get the pickier I get about how they fit me (the arms are too short the waist is too wide the hood keeps falling back etc.). So I have taken it upon myself to make my own rain coat and have been scouring the web looking for supplies and at the same time wondering if I was missing anything. I was. So thank you for telling me what :). The seam taping is the thing I needed the most help understanding.
Hello, that looks really cool to me, do you know where i can find the pattern for that particular jacket though?
thanks!
It’s a pattern that Caroline made specially for her boyfriend, not a commercial pattern! I haven’t seen anything else like it. It is a really great design. Sorry I couldn’t be more helpful!
Hi Hugh,
This was a coat patterned after a borrowed fancy Moonstone-brand Nemesis rain jacket (or at least I believe it’s the Nemesis – it looks the same though it’s been several years). I no longer have the pattern. It’s a very tricky one though – I’d say “advanced.”
Thanks so much for responding, Caroline! Hope you are well. :)
Well done Caroline!! I personally think the info is absolutely awesome!! Looking forward to have great discussion on outerwear in this forum. Cheers and Merry Xmas.
Loved the post. RCT fabrics online is now http://www.fabricline.com
Hi Caroline and Tasia,
Where can I find Melco or Gore 3-layer heat tape in smallish quantities in the Lower Mainland? I’ve looked at a couple of places, but they seem to want to sell whole rolls. I only need a couple of metres to repair a Gore-Tex jacket.
That transparent 2-layer tape is easy to find (at Fabricland, etc.), but, as mentioned in your article, it’s just a pain to work with.
That jacket looks ah-mazing. Thank you for the wonderful tips.