Happy Thursday everyone! Today we’re talking about full and small bust adjustments for the Yaletown dress & blouse. This is part of our sew-along series for this pattern. Here is a recap of the schedule, I have linked what we have covered so far!
Yaletown Sew-Along: Fabric Suggestions, Choosing a Size, and FAQ
Today – FBA and SBA Tutorials and Tips
TBA – Cutting, Gathering Supplies
TBA – Preparing Bodice and Sewing Facing (Instruction Steps 1-4)
TBA – Finishing Facing, Sewing Bodice Side Seams (Instruction Steps 5-7)
TBA – Sewing Skirt / Lower Blouse (Instruction Steps 8-10)
TBA – Sewing Bodice to Skirt, Sewing Elastic Casing (Instruction Steps 11-13)
TBA – Sewing & Attaching Sleeves (Instruction Steps 14-17)
TBA – Hemming, Sewing Tie Belt (Instruction Steps 18-19)
TBA – Thread Loops and Securing Neckline (Instruction Steps 20-21)
FBA (Full Bust Adjustment)
On deciding which size to cut.
There is no hard and fast rule for this because all of our bodies are different. For this particular pattern, would recommend choosing the size closest to your high bust and waist measurement. To get your high bust measurement, measure above your bust, running the tape measure just under your arms. Check that your hip measurement also fits into that size, and you should be good to go!
Choosing a size based on your high bust and waist will ensure that the pattern will fit your frame and shoulders, and we will be able to adjust for the larger bust.
Tip: Trace your pattern instead of cutting into your tissue, just in case you need to go back and make some major changes.
On deciding how much to add in the bust.
Take your bust measurement, and subtract the bust measurement of the size you chose to begin with. The difference will be the amount you need to add to the bust. Divide that by two to know how much to add to your pattern piece for your FBA (since the piece will be cut on fold).
EXAMPLE:
Your bust measurement is 39″
Your high bust measurement is 36″, so you traced a size 10.
You will need to add 3″ total to the bust of the size 10. So you will be adding 1.5″ to your pattern piece at the bust. Remember this measurement for later!
Or, you can make a muslin and slash your fabric in a cross shape at your bust apex. The opening will separate to accommodate your bust comfortably. Measure that opening to know how much you need to add for your FBA.

Step 1: Hold your pattern piece up against your body, lining up the center front line with the middle of your chest. Mark your bust apex.
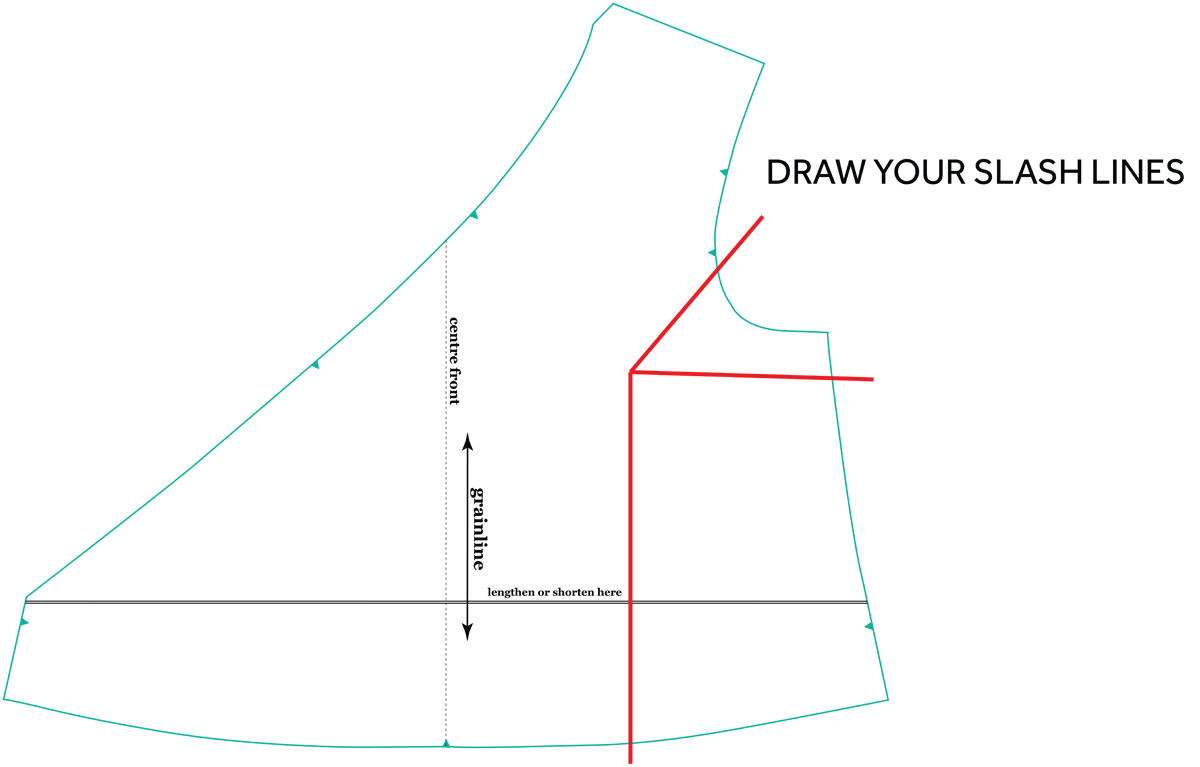
Step 2: Draw three lines from the bust apex.
- One extending to the side seam, perpendicular to the grainline.
- One extending to the waist, parallel to the grainline.
- One extending into the armhole, about 1/3 of the way up.
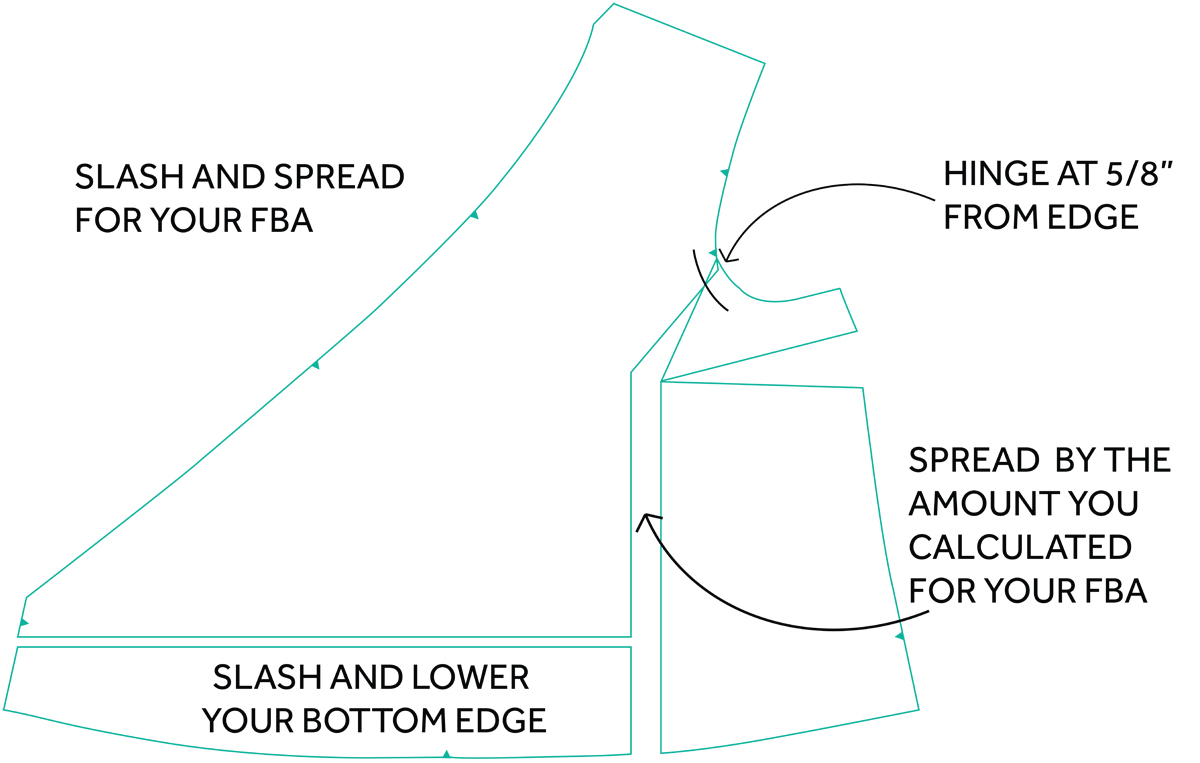
Step 3: Slash along these three lines and spread your pieces as illustrated above.
- Spread apart the bottom right piece by the amount you calculated for your full bust adjustment. Keep the left edge parallel to the grainline.
- The corner of your top right piece will follow your bottom right piece, this forms a dart.
- To even out the waist seam, slash and lower your left bottom edge.
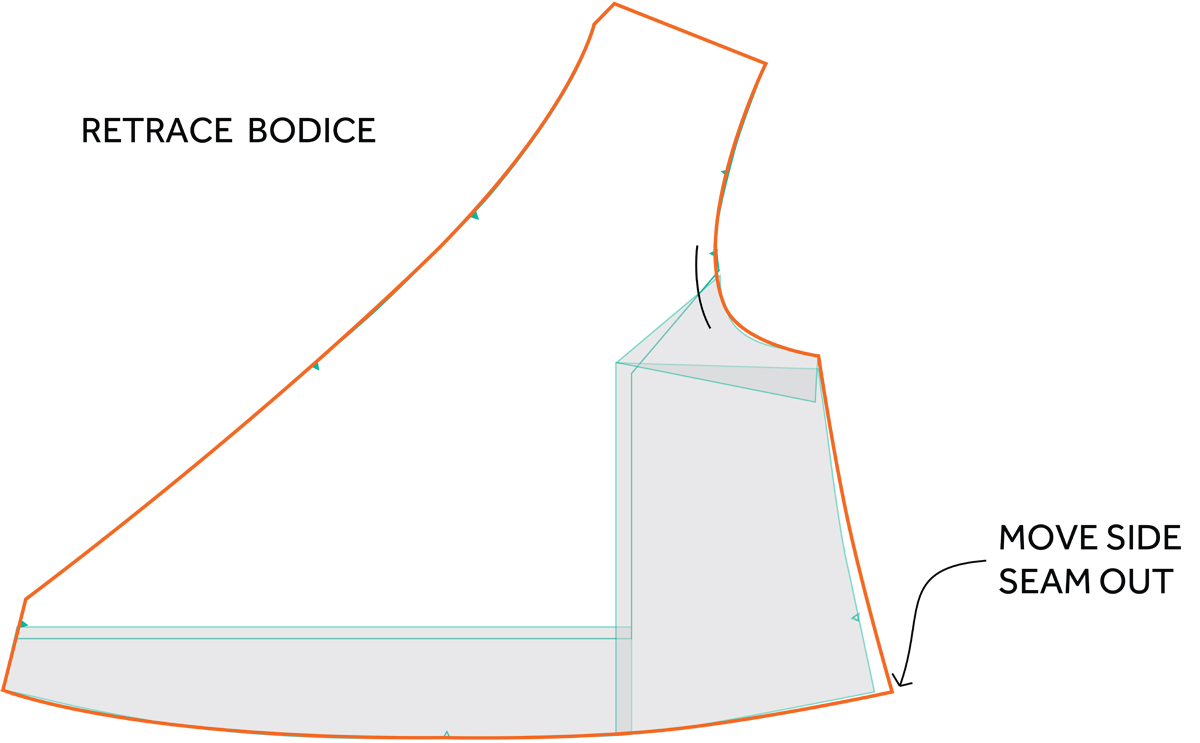
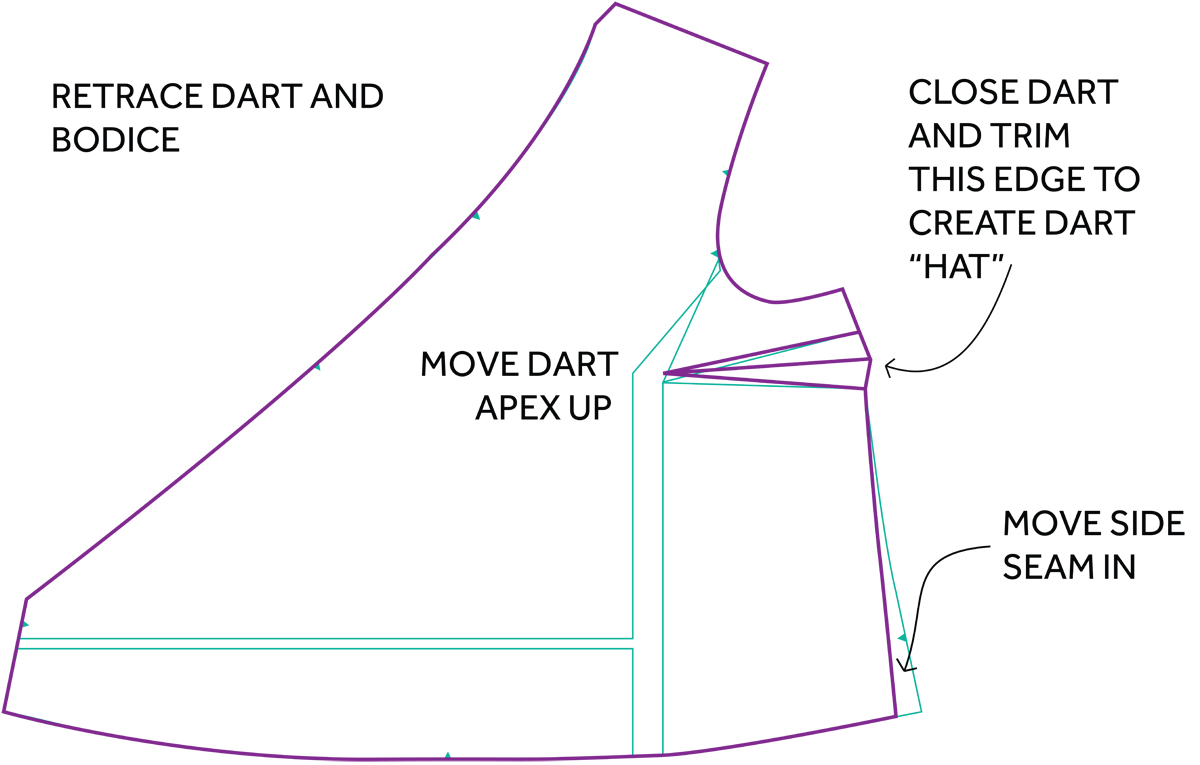 Step 4: Retrace your bodice piece with some small adjustments.
- Move the bottom corner of your side seam in by the same amount as your FBA. Since our FBA widened the waistline, we need to make it the correct size again so that it matches up with our skirt pieces.
- Move your dart apex up so that it is back in line with your original bust apex.
- Create your dart “hat” by folding up your dart before trimming away the excess paper.
That’s all folks! With this method, we are keeping the dart in the final garment. You won’t have to adjust any other pieces, everything should fit together just fine as we haven’t altered the neckline or the length of the side seam or waist.
Now you can make a muslin to check the fit. While trying on your FBA bodice, it’s normal to find that you need to move your dart up or down slightly, or lengthen/shorten your dart. Don’t be discouraged if it’s not perfect on the first go! You are taking steps in the right direction. Forge on!
SBA (Small Bust Adjustment)
A small bust adjustment is the same concept as a full bust adjustment, except you are removing instead of adding to the bust.
On deciding which size to cut.
You can choose your size based on your high bust and waist measurements, and adjust for a smaller bust.
Tip: Trace your pattern instead of cutting into your tissue, just in case you need to go back to the drawing board.
On deciding how much to remove in the bust.
Take your the bust measurement of the size you chose, and subtract your bust measurement. The difference will be the amount you need to remove from the bust. Divide that by two to know how much to overlap your pattern piece for your SBA (since the piece will be cut on fold).
Or, you can make a muslin and pin out the fullness at your bust apex. measure how much you pinned out to know how much you need to subtract for your FBA.
Now we can get started!
To begin, repeat steps 1 & 2 from the FBA instructions above. These two steps are the same whether you want to do a full bust or small bust adjustment.
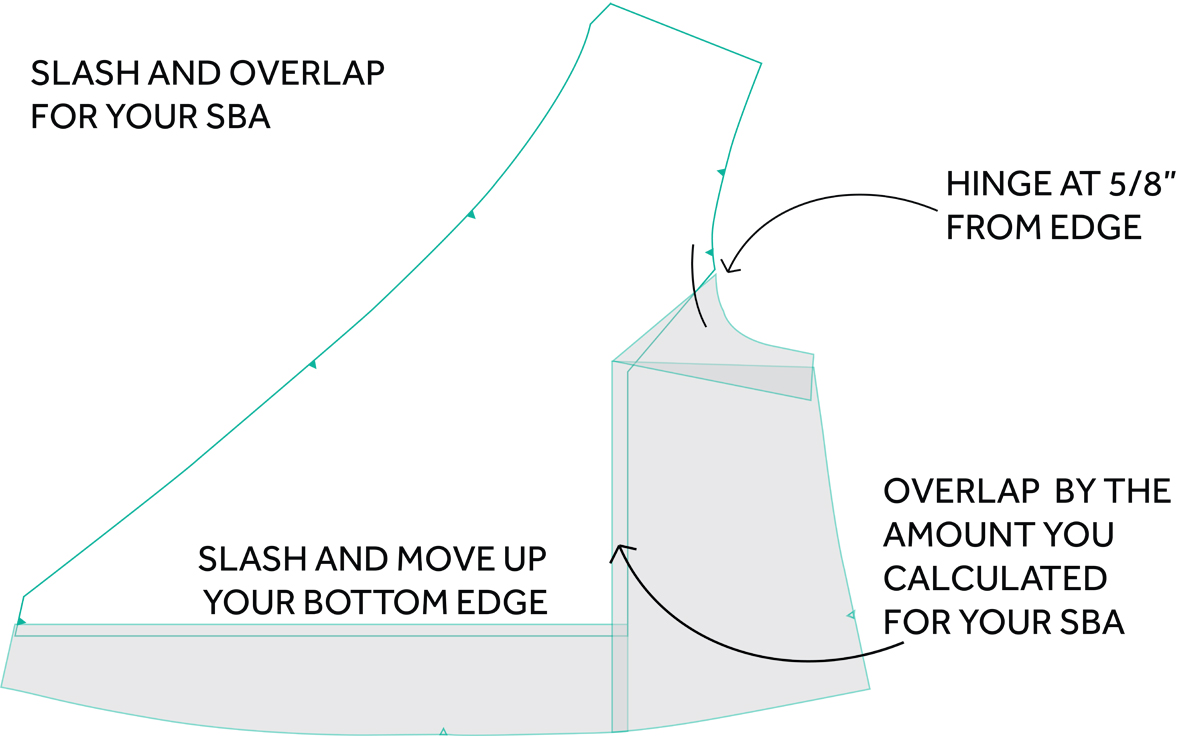
Step 3: Slash along these three lines and overlap your pieces as illustrated above.
- Overlap the bottom right piece towards the left, by the amount you calculated for your small bust adjustment. Keep the left edge parallel to the grainline.
- The corner of your top right piece will follow your bottom right piece, this will remove some of the length from the side seam.
- Slash and overlap your left bottom edge upwards, so that it lines up along the waistline.
 Step 4: Retrace your bodice piece with a couple of adjustments.
- Move the bottom corner of your side seam out by the same amount as your SBA. Since our SBA narrowed the waistline, we need to make it the correct size again so that it matches up with our skirt pieces.
- You may have guessed that with this SBA method, we have shortened the bodice. You have two choices at this point: you can also shorten your back bodice to match your front bodice, or you can lengthen your front bodice so that it matches the back bodice. It’s up to you! Use your “lengthen/shorten” lines and lengthen or shorten to make your side seams the same length.
All done! Time to make a muslin to check the fit.
Any questions? Feel free to ask me in the comments. Happy fitting!
This is a really good small bust adjustment tutorial for wrap styles. Ihttp://theslapdashsewist.blogspot.com/2008/10/small-bust-adjustment-sba.html
Thanks Jaime! I did see this tutorial, it looks like this method could work as well.
For this to fit properly and not pull in a funny way, you would also need to adjust the opposite (wrap/tail) side of the bodice piece with a small slash and spread (or overlap) to match the amount added in the same area of the FBA/SBA: http://thesewingdivas.wordpress.com/2007/03/09/adjusting-for-a-full-bust-on-a-wrap-top/
That is, unless the wrap lands far below the bustline. I don’t have Yaletown yet, so I may be talking out of my butt!
Thanks Jess! Great point.
I did see this tutorial and debated including this step in my instructions as well. Ultimately I decided against it, because the wrap of the blouse is not super snug against the chest. The bust ease is generous so it tends to drape below the bust on the opposite side on most people. I’m glad you linked this though in case anyone wants to do this extra step! Thank you!
question – on FBA – because i am larger in the hips and waist then the size for my upper bust (39) should i use the 16 or use the 14 size pattern and adjust all the measurements as i go – if i use the size 16 and my full bust is 44 would i use the difference between the 41 on the pattern and my 44? thanks to anyone who can help me here.
Hi Arlene! So sorry for my late reply, I just realized I missed your comment and did not get back to you as quickly as I would have liked.
If the waist and hips of the size 16 match your measurements, I think that a size 16 would be a good starting point. Then you can make a 3″ FBA (1.5″ spread on the pattern piece).
That is unless you have very narrow shoulders. If you find that patterns tend to be loose around the shoulders, then how about start with a size 14? Then you can grade out at the waist and hips to the size 16, and make the FBA from the size 14 bust.
Hope this makes sense!
Great tutorial! I have never seen a bust adjustment tutorial for a faux wrap bodice.
Hi, I am just about to start doing this and may need to do a SBA. Can I use the finished garment size or do I need to use the pattern size measurement.
Hi Stephanie! If you are choosing a size, use the body measurement chart. The finished measurements have ease, which is the extra room built into a pattern for ease of movement and a better fit. This particular pattern is designed to have a looser, blousy fit.
Great illustrations! Thanks for sharing.
I found the perfect fabric – a med wt poly-nylon – that is a fabulous blue colour. I just have to purchase my copy ( i love that you have printable patterns now…) and I’ll be caught up by mid-week. I’m not sure about this as a dress but I love the blouse.